GitLab 安裝與專案建立

Loading

這邊討論一下 GitLab 的安裝 與 如何從 使用者端 (Client) 建立專案並上傳程式.

Server 端安裝 GitLab

測試環境 Ubuntu 22.04 Desktop ( 虛擬機 IP:192.168.31.136 )

想要在公司內部架設 GitHub 的相似軟體有很多選擇,目前看起來是 GitLab 是最多人在使用的.

不同作業系統的安裝方式可以參考官方網站 – https://about.gitlab.com/install/#ubuntu

安裝所需套件.

root@ben-virtual-machine:~# apt-get update
root@ben-virtual-machine:~# apt-get install -y curl openssh-server ca-certificates tzdata perl

安裝 Mail 系統.

root@ben-virtual-machine:~# apt-get install -y postfix

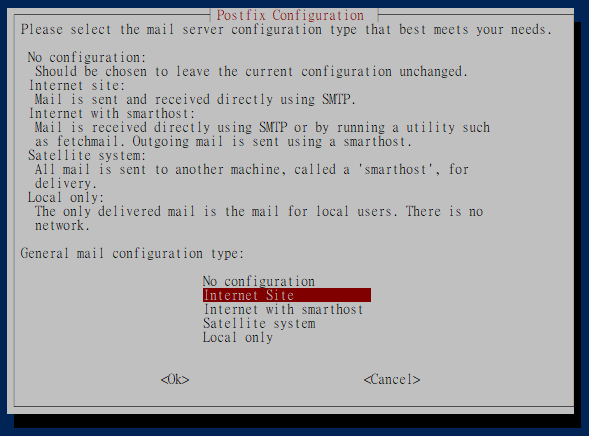
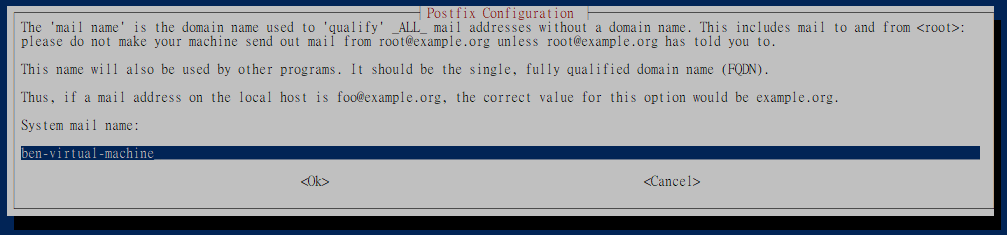
安裝 Postfix 過程中需選擇 configuration 選擇 ‘Internet Site’ 即可,並輸入 Mail 與 FQDN (我這邊是測試用就沒特別填寫).


加入 GitLab 套件的 repository 並且安裝相關套件.

root@ben-virtual-machine:~# curl https://packages.gitlab.com/install/repositories/gitlab/gitlab-ee/script.deb.sh | sudo bash

其中的 EXTERNAL_URL 需使用你的 FQDN ( 可使用 http 或是 https ) 或是像我只是要玩一下就直接用 IP 即可. 版本我這邊是安裝 gitlab-ee ( Enterprise Edition ) 或是可以選擇 CE ( Community Edition ) 版本.

root@ben-virtual-machine:~# EXTERNAL_URL="http://192.168.31.136" apt-get install gitlab-ee

這樣就設定完成了, 打開網頁 http://192.168.31.136

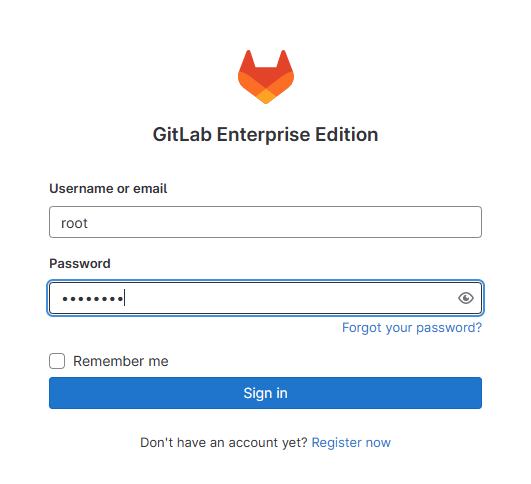
設定好 GitLab 就可以使用 root (Administrator 管理者) 的身分登入.

預設管理者帳號: root
密碼: 存放在這邊 /etc/gitlab/initial_root_password , 須注意該文件將在 24 小時後第一次重新配置運行(gitlab-ctl reconfigure )時自動刪除.

root@ben-virtual-machine:~# cat /etc/gitlab/initial_root_password

可以先把密碼設定到 /etc/gitlab/gitlab.rb 的 initial_root_password .

root@ben-virtual-machine:~# vi /etc/gitlab/gitlab.rb 
gitlab_rails['initial_root_password'] = '<my_strong_password>'

並透過 網頁管理介面建立新使用者,我這邊建立了一個 ben 使用者, 之後就可以使用該使用者並建立專案 Project 或是 Repository (預設權限為 Private ,需帳號密碼才能存取) , 或是透過 Rails Console 來建立使用者帳號.

root@ben-virtual-machine:~# gitlab-rails console
--------------------------------------------------------------------------------
 Ruby:         ruby 3.0.6p216 (2023-03-30 revision 23a532679b) [x86_64-linux]
 GitLab:       16.1.2-ee (0642e8c5c91) EE
 GitLab Shell: 14.23.0
 PostgreSQL:   13.11
------------------------------------------------------------[ booted in 39.40s ]
Loading production environment (Rails 6.1.7.2)
irb(main):001:0> u = User.new(username: 'ben', email: 'ben@benjr.com', name: 'ben', password: '2ertgds#', password_confirmation: '2ertgds#')
=> #<User id: @ben>
irb(main):002:0> u.skip_confirmation!
=> 2023-07-19 08:40:15.133285589 UTC
irb(main):003:0> u.save!
=> true
irb(main):004:0>
[1]+  Stopped                 gitlab-rails console

我們建立好專案後可以直接在網頁編輯程式碼,不過大多的經驗是會在測試端來寫程式碼,下面來看看在測試端要怎麼將程式上傳 (到 GitLab) 或是下載 (從 GitLab 到 Local).

從 Local 端建立新 GitLab Project

測試環境 Ubuntu 22.04 Desktop ( 虛擬機 )

Git 的主要幾個指令可以參考 https://zh.m.wikibooks.org/zh/File:Git_data_flow_simplified.svg 的說明.

安裝 git .

root@ben-virtual-machine:~# apt install git
root@ben-virtual-machine:~# git --version
git version 2.34.1

初始化(只需要做一次)

  • git config
    設定使用者帳號與 Mail .

    root@ben-virtual-machine:~# git config --global user.name "Ben"
    root@ben-virtual-machine:~# git config --global user.email "ben@gmail.com"
    
  • git init
    設定哪一個目錄是需要透過 git 來保管.

    root@ben-virtual-machine:~# mkdir test_code
    root@ben-virtual-machine:~# cd test_code
    

    並做初始化設定,會產生 .git 目錄來記錄相關設定.

    root@ben-virtual-machine:~/test_code# git init
    hint: Using 'master' as the name for the initial branch. This default branch name
    hint: is subject to change. To configure the initial branch name to use in all
    hint: of your new repositories, which will suppress this warning, call:
    hint:
    hint:   git config --global init.defaultBranch <name>
    hint:
    hint: Names commonly chosen instead of 'master' are 'main', 'trunk' and
    hint: 'development'. The just-created branch can be renamed via this command:
    hint:
    hint:   git branch -m <name>
    Initialized empty Git repository in /root/test_code/.git/
    

有新增或是修改資料都需要 add , commit 與 push

  • Local 端的 git add 與 commit
    建立一個程式碼.

    root@ben-virtual-machine:~/test_code# vi test.cpp 
    #include <fstream>
    #include <iostream>
    #include <chrono>
    #include <ctime> 
    #include <unistd.h>
     
    using namespace std;
     
    int main() {
    while(true)
    {
        ofstream myFile_Handler;
        // File Open
        myFile_Handler.open("/tmp/1.txt", std::ios_base::app);
     
        auto timenow = chrono::system_clock::to_time_t(chrono::system_clock::now());
       
        // Write to the file
        myFile_Handler << ctime(&timenow) << endl;
     
        // File Close
        myFile_Handler.close();
        
        // Sleep
        sleep(60);
    }
    }
    

    並透過 git add 與 commit 將程式交給 git 保管. git add 的 “.” 代表現有目錄所有檔案,也可以直接指定檔案名稱.

    root@ben-virtual-machine:~/test_code# git add .
    
    root@ben-virtual-machine:~/test_code# git commit -m "First Code"
    [master (root-commit) 938dfba] First Code
     1 file changed, 27 insertions(+)
     create mode 100644 test.cpp
    

    檢視其狀態.

    root@ben-virtual-machine:~/test_code# git status
    On branch master
    nothing to commit, working tree clean
    

    須注意這邊程式交給 Local 端而已,需要下面步驟從能上傳到 GitLab.

  • GitLab 端的 git remote 與 push
    同一個目錄的 Project 只須設定一次 git remote 即可,之後可以透過 git remote show origin 檢視其設定.

    root@ben-virtual-machine:~/test_code# git remote add origin http://192.168.31.136/ben/test.git
    
    root@ben-virtual-machine:~/test_code# git push -u origin master
    Username for 'http://192.168.31.136': ben
    Password for 'http://ben@192.168.31.136':
    Enumerating objects: 3, done.
    Counting objects: 100% (3/3), done.
    Delta compression using up to 4 threads
    Compressing objects: 100% (2/2), done.
    Writing objects: 100% (3/3), 466 bytes | 466.00 KiB/s, done.
    Total 3 (delta 0), reused 0 (delta 0), pack-reused 0
    remote:
    remote:
    remote: The private project ben/test was successfully created.
    remote:
    remote: To configure the remote, run:
    remote:   git remote add origin http://192.168.31.136/ben/test.git
    remote:
    remote: To view the project, visit:
    remote:   http://192.168.31.136/ben/test
    remote:
    remote:
    remote:
    To http://192.168.31.136/ben/test.git
     * [new branch]      master -> master
    Branch 'master' set up to track remote branch 'master' from 'origin'.
    

    可以透過網頁看到程式碼的確已上傳.

    或是透過指令看狀態.

    root@ben-virtual-machine:~/test_code# git remote show origin
    
  • git pull
    如果程式碼有被修改時可以透過 pull 從 GitLab 下載.

    root@ben-virtual-machine:~/test_code# git pull
    Username for 'http://192.168.31.136': ben
    Password for 'http://ben@192.168.31.136':
    remote: Enumerating objects: 1, done.
    remote: Counting objects: 100% (1/1), done.
    remote: Total 1 (delta 0), reused 0 (delta 0), pack-reused 0
    Unpacking objects: 100% (1/1), 248 bytes | 248.00 KiB/s, done.
    From http://192.168.31.136/ben/test
       938dfba..d76b680  master     -> origin/master
    Updating 938dfba..d76b680
    Fast-forward
     test.cpp | 1 +
     1 file changed, 1 insertion(+)
    

第一次從 GitLab 下載 Project Code 到 Local 端

如果是要從 GitLab 下載一個全新的 Project 到 Local 端,可以使用 Git Clone.

root@ben-virtual-machine:~/test_code# cd
root@ben-virtual-machine:~# git clone http://192.168.31.136/ben/test
Cloning into 'test'...
Username for 'http://192.168.31.136': ben
Password for 'http://ben@192.168.31.136':
warning: redirecting to http://192.168.31.136/ben/test.git/
remote: Enumerating objects: 7, done.
remote: Counting objects: 100% (4/4), done.
remote: Compressing objects: 100% (3/3), done.
remote: Total 7 (delta 1), reused 0 (delta 0), pack-reused 3
Receiving objects: 100% (7/7), done.
Resolving deltas: 100% (1/1), done.
root@ben-virtual-machine:~# ll test/
total 16
drwxr-xr-x 3 root root 4096  六   6 16:20 ./
drwx------ 8 root root 4096  六   6 16:19 ../
drwxr-xr-x 8 root root 4096  六   6 16:20 .git/
-rw-r--r-- 1 root root  503  六   6 16:20 test.cpp

遇過的問題

  • 如果遇到網頁無法開啟,或是顯示錯誤訊息,可以透過以下方式檢視 GitLab 的日誌.
    root@ben-virtual-machine:~# gitlab-ctl tail 
    
  • EXTERNAL_URL 設定錯誤會讓網頁無法開啟,可以透過修改設定檔.
    root@ben-virtual-machine:~# vi /etc/gitlab/gitlab.rb 
    external_url "http://192.168.31.136"
    

    執行前須注意 要把預設密碼儲存起來 ,密碼檔 /etc/gitlab/initial_root_password 將在 24 小時後第一次重新配置運行(gitlab-ctl reconfigure )時自動刪除.

    並透過指令 Reconfigure GitLab .

    root@ben-virtual-machine:~# gitlab-ctl reconfigure
    
  • 預設的專案 Project 或是 Repository 權限為 Private (需帳號密碼才能存取)
    可以在網頁修改為 Public 或是使用以下方式來儲存使用者帳號與密碼.

    網頁變更 project visibility

    1. Settings > General
    2. Expand Visibility, project features, permissions.
    3. Change Project visibility to either Private, Internal, or Public and Save changes.

    或是變更預設 project visibility

    1. Select Settings > General.
    2. Expand the Visibility and access controls section.
    3. Select the desired default project visibility:
    4. Select Save changes.

    儲存使用者帳號與密碼.

    root@ben-virtual-machine:~# vi ~/.netrc
    machine 192.168.31.136
    login ben
    password 111111
    

    並修改權限.

    root@ben-virtual-machine:~# chmod 600 ~/.netrc
    
  • 存放密碼的檔案 /etc/gitlab/initial_root_password 會在 24 小時後第一次重新配置運行(gitlab-ctl reconfigure )時自動刪除,訊息如下.
    Found old initial root password file at /etc/gitlab/initial_root_password and deleted it.
    

    密碼檔已被刪除.

    root@ben-virtual-machine:~# cat /etc/gitlab/initial_root_password
    cat: /etc/gitlab/initial_root_password: No such file or directory
    

    可以過以下指令重新設定密碼 (至少 8碼 + 數字與英文)

    root@ben-virtual-machine:~# gitlab-rake 'gitlab:password:reset[root]'
    Enter password:
    Confirm password:
    Unable to change password of the user with username root.
    Password is too short (minimum is 8 characters)
    
    root@ben-virtual-machine:~# gitlab-rake 'gitlab:password:reset[root]'
    Enter password:
    Confirm password:
    Unable to change password of the user with username root.
    Password must not contain commonly used combinations of words and letters
    
    root@ben-virtual-machine:~# gitlab-rake 'gitlab:password:reset[root]'
    Enter password:
    Confirm password:
    Password successfully updated for user with username root.
    
沒有解決問題,試試搜尋本站其他內容

發佈留言

發佈留言必須填寫的電子郵件地址不會公開。 必填欄位標示為 *

這個網站採用 Akismet 服務減少垃圾留言。進一步了解 Akismet 如何處理網站訪客的留言資料