![]()
上傳到 GitLab 的程式有辦法自行進行測試嗎? 可以透過 CI/CD 的功能.
測試環境 Ubuntu 22.04 Desktop ( 虛擬機 IP:192.168.31.136 )
安裝 GitLab
關於 GitLab 的安裝請參考 – https://benjr.tw/105652 , 並建立新使用者 ben .
GitLab CI Runner
首先須建立 Runner (也就是上傳後的程式可以在哪邊環境來進行測試)
- 安裝 GitLab CI Runner 套件
不同 GitLab Runner 的 repositories 不一樣, 步驟請參考 – https://docs.gitlab.com/runner/install/linux-repository.htmlUbuntu
root@ben-virtual-machine:~# curl -L https://packages.gitlab.com/install/repositories/runner/gitlab-runner/script.deb.sh | sudo bash
root@ben-virtual-machine:~# sudo apt-get install gitlab-runner
RHEL / CentOS / Fedora
[root@localhost ~]# curl -L "https://packages.gitlab.com/install/repositories/runner/gitlab-runner/script.rpm.sh" | sudo bash
[root@localhost ~]# yum install gitlab-runner
- 註冊 runner
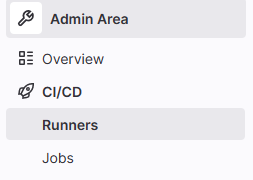
要註冊一個新的 Runner ,須回到 Gitlab 網頁的管理介面 Admin Area / CI/CD / Runners (使用 root Administrator 身分) ,這邊主要是可以產生註冊 (Register) runner 語法
我這邊要產生的 Runner (程式測試環境) 就是使用 Gitlab 本身這一台 Ubuntu 22.04 Desktop , 其 Executor 為系統本身的 Shell .
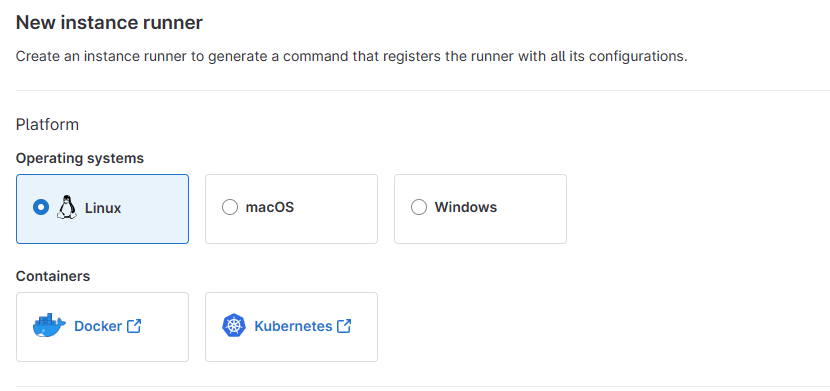
點選 New Instance Runner 產生 Runner 的語法.
- 首先需要選擇測試環境為何, 我這邊是要利用本身這一台的 Linux shell 跑,所以 OS 選擇 Linux.
- 接下來是 Tags
之後 .gitlab-ci.yml 設定檔要對應到相對應的 Tags 來決定 Runner / Executor 是哪一個.

- 首先需要選擇測試環境為何, 我這邊是要利用本身這一台的 Linux shell 跑,所以 OS 選擇 Linux.
- 執行 Register Runner 的語法
剛剛選擇完畢就會出現下面的語法(產生新的 Runner)
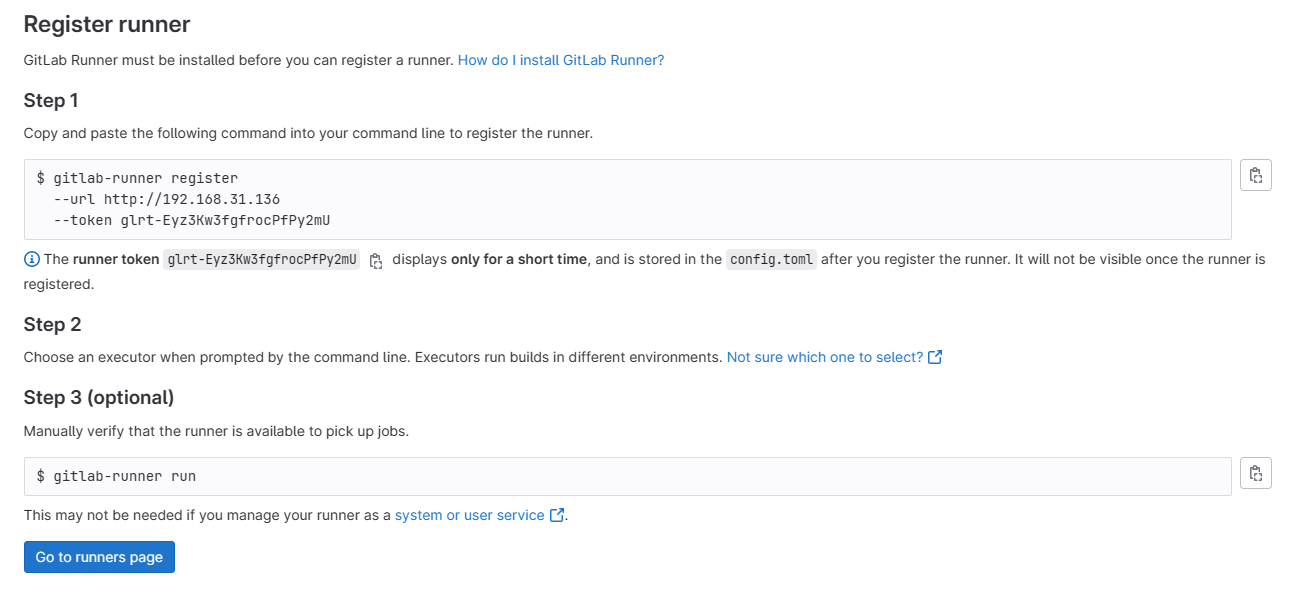
主要是執行 Step 1 指令即可.
root@ben-virtual-machine:~# gitlab-runner register  --url http://192.168.31.136  --token glrt-v6zxWbCj4maXxMo5Gzy8
Runtime platform                                    arch=amd64 os=linux pid=51157 revision=865283c5 version=16.1.0
Running in system-mode.
我要利用本身這一台的 Linux shell 跑,所以使用預設值即可.
Enter the GitLab instance URL (for example, https://gitlab.com/):
[http://192.168.31.136]:
Verifying runner... is valid                        runner=v6zxWbCj4
輸入這個 Runner 的名稱.
Enter a name for the runner. This is stored only in the local config.toml file:
[ben-virtual-machine]: Ubuntu 22.04 Shell
關於 executor 有很多種類,我選擇的是 shell ( 指定 Runner 直接在 Gitlab 本身環境去執行 CI Job, 須確保環境要包含 如 make , pip , python 等相關套件) , 其他 executor 請參考 – https://chengweichen.com/2021/03/gitlab-ci-executor.html#%E7%9B%AE%E5%89%8D%E5%8F%AF%E9%81%B8%E7%94%A8%E7%9A%84-executor 說明.
Enter an executor: custom, shell, kubernetes, ssh, virtualbox, docker-autoscaler, docker+machine, instance, docker, docker-windows, parallels:
shell
Runner registered successfully. Feel free to start it, but if it's running already the config should be automatically reloaded!

Configuration (with the authentication token) was saved in "/etc/gitlab-runner/config.toml"
剛剛設定內容皆會寫到 config.toml 檔案去.
root@ben-virtual-machine:~# cat /etc/gitlab-runner/config.toml
concurrent = 1
check_interval = 0
shutdown_timeout = 0

[session_server]
  session_timeout = 1800

[[runners]]
  name = "Ubuntu 22.04 Shell"
  url = "http://192.168.31.136"
  id = 3
  token = "glrt-v6zxWbCj4maXxMo5Gzy8"
  token_obtained_at = 2023-06-29T07:17:12Z
  token_expires_at = 0001-01-01T00:00:00Z
  executor = "shell"
  [runners.cache]
    MaxUploadedArchiveSize = 0
這樣 Runner 就產生好了,其 Tags 為 Ubuntu22.04_shell

須注意本身 shell 可以提供那些程式環境,下面範例使用 python ,就需先安裝好 python3.
root@ben-virtual-machine:~# apt install python3
GitLab Client
我們可以開始從 Client 端,將程式上傳至 GitLab , 需有以下步驟.
初始化(只需要做一次)
- git config
設定使用者帳號與 Mail .root@ben-virtual-machine:~# git config --global user.name "Ben" root@ben-virtual-machine:~# git config --global user.email "ben@gmail.com"
- git init
設定哪一個目錄是需要透過 git 來保管.root@ben-virtual-machine:~# mkdir runner_code root@ben-virtual-machine:~# cd runner_code
並做初始化設定,會產生 .git 目錄來記錄相關設定.
root@ben-virtual-machine:~/runner_code# git init
hint: Using 'master' as the name for the initial branch. This default branch name
hint: is subject to change. To configure the initial branch name to use in all
hint: of your new repositories, which will suppress this warning, call:
hint:
hint:   git config --global init.defaultBranch <name>
hint:
hint: Names commonly chosen instead of 'master' are 'main', 'trunk' and
hint: 'development'. The just-created branch can be renamed via this command:
hint:
hint:   git branch -m <name>
Initialized empty Git repository in /root/test_code/.git/
- 程式碼
建立一個程式碼.root@ben-virtual-machine:~/runner_code# vi hello.py import sys print(f'Hello {sys.argv[1]}')需要透過 runner 執行程式需有 .gitlab-ci.yml 這個檔案.
root@ben-virtual-machine:~/runner_code# vi .gitlab-ci.yml
stages:
  - test

Run-Test:
  stage: test
  tags:
    - ubuntu22.04_shell
  script:
    - python3 hello.py Ben
說明:
要執行那些 stagestages: - test
區塊名稱
Run-Test:
Stage 的名稱
stage: test
透過哪一個 runner 來執行.
  tags:
    - ubuntu22.04_shell
執行指令
  script:
    - python3 hello.py Ben
有新增或是修改程式與資料後都需要 add , commit 與 push
- git add 與 commit
並透過 git add 與 commit 將程式交給 git 保管. git add 的 “.” 代表現有目錄所有檔案,也可以直接指定檔案名稱.root@ben-virtual-machine:~/runner_code# git add .
root@ben-virtual-machine:~/test_code# git commit -m "First Code"
[master (root-commit) 938dfba] First Code
 1 file changed, 27 insertions(+)
 create mode 100644 test.cpp
須注意這邊程式交給 Local 端而已,需要下面步驟從能上傳到 GitLab. 這邊使用 ben 這個使用者 (需事先至 GitLab 網頁建立) 來建立專案.
- git remote 與 push
同一個目錄的 Project 只須設定一次 git remote 即可,之後可以透過 git remote show origin 檢視其設定.root@ben-virtual-machine:~/runner_code# git remote add origin http://192.168.31.136/ben/runner_test.git
root@ben-virtual-machine:~/runner_code# git push -u origin master
Username for 'http://192.168.31.136': ben
Password for 'http://ben@192.168.31.136':
Enumerating objects: 4, done.
Counting objects: 100% (4/4), done.
Delta compression using up to 4 threads
Compressing objects: 100% (3/3), done.
Writing objects: 100% (4/4), 379 bytes | 379.00 KiB/s, done.
Total 4 (delta 0), reused 0 (delta 0), pack-reused 0
remote:
remote:
remote: The private project ben/runner_test was successfully created.
remote:
remote: To configure the remote, run:
remote:   git remote add origin http://192.168.31.136/ben/runner_test.git
remote:
remote: To view the project, visit:
remote:   http://192.168.31.136/ben/runner_test
remote:
remote:
remote:
To http://192.168.31.136/ben/runner_test.git
 * [new branch]      master -> master
Branch 'master' set up to track remote branch 'master' from 'origin'.
程式與資料已上傳完畢.
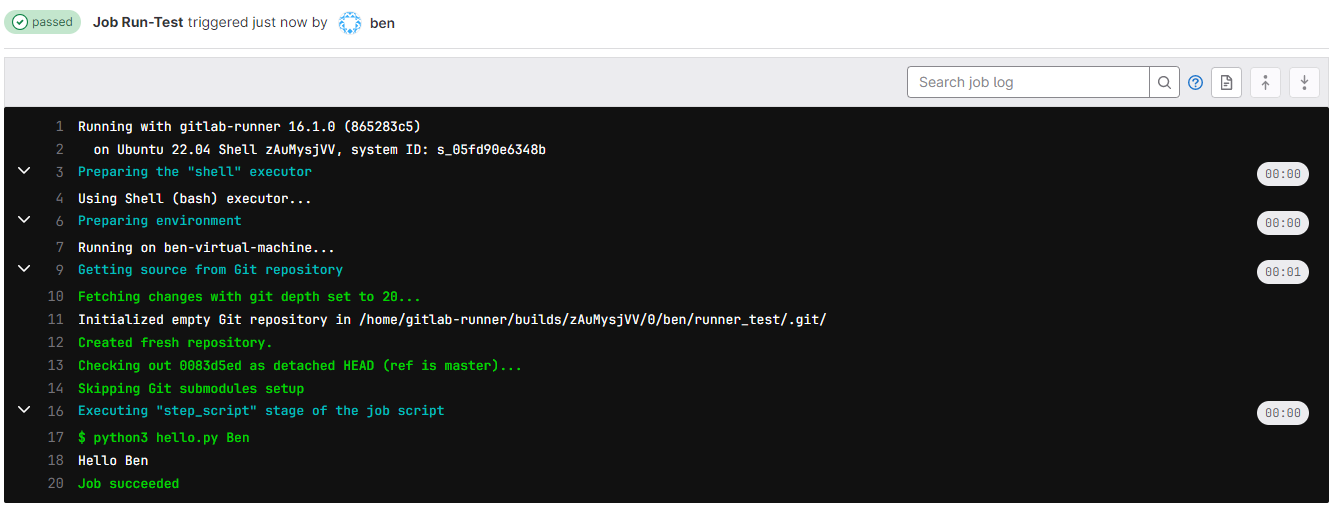
使用 ben 身分登入 GitLab 網頁,並檢視 runner_test 專案的 CI/CD Pipiline
或是 Jobs 看程式是否有自行執行.
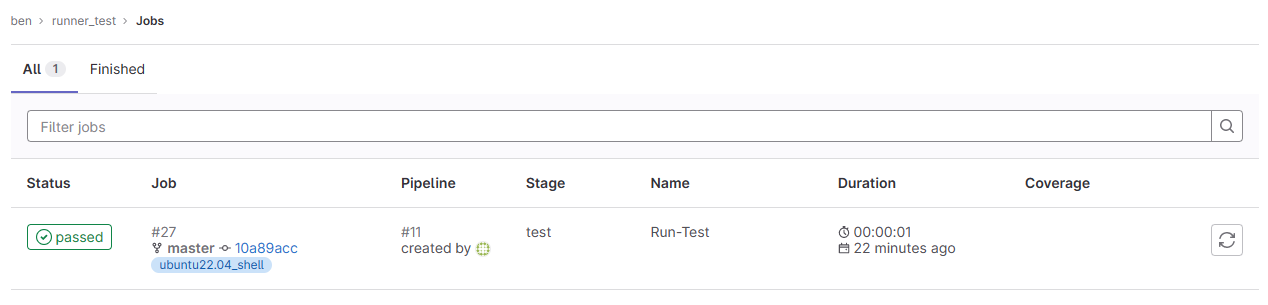
並檢視其結果.