![]()
作業環境 CentOS 8 x86_64 (虛擬機)
MariaDB Galera Cluster 架構圖
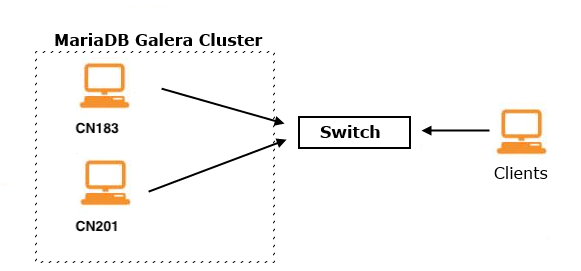
每一個 Node 都需要以下的設定.
- Node1 : cn183 , IP – 192.168.111.183
- Node2 : cn201 , IP – 192.168.111.201
以下步驟需在每一台 Cluster Node 設定好.
安裝 MariaDB Galera Cluster
直接透過 dnf 安裝, CentOS 7 安裝方式請參考 – https://benjr.tw/95350
[root@localhost ~]# dnf -y install mariadb-server-galera
Failed to set locale, defaulting to C.UTF-8
Last metadata expiration check: 16:32:31 ago on Wed Jun 10 00:52:51 2020.
Dependencies resolved.
=================================================================================================================
 Package                         Arch        Version                                        Repository      Size
=================================================================================================================
Installing:
 mariadb-server-galera           x86_64      3:10.3.17-1.module_el8.1.0+257+48736ea6        AppStream       59 k
Installing dependencies:
 galera                          x86_64      25.3.26-1.module_el8.1.0+217+4d875839          AppStream      1.6 M
 mariadb                         x86_64      3:10.3.17-1.module_el8.1.0+257+48736ea6        AppStream      6.1 M
 mariadb-common                  x86_64      3:10.3.17-1.module_el8.1.0+257+48736ea6        AppStream       62 k
 mariadb-connector-c             x86_64      3.0.7-1.el8                                    AppStream      148 k
 mariadb-connector-c-config      noarch      3.0.7-1.el8                                    AppStream       13 k
 mariadb-errmsg                  x86_64      3:10.3.17-1.module_el8.1.0+257+48736ea6        AppStream      232 k
 mariadb-server                  x86_64      3:10.3.17-1.module_el8.1.0+257+48736ea6        AppStream       16 M
 perl-DBD-MySQL                  x86_64      4.046-3.module_el8.1.0+203+e45423dc            AppStream      156 k
Installing weak dependencies:
 mariadb-backup                  x86_64      3:10.3.17-1.module_el8.1.0+257+48736ea6        AppStream      6.0 M
 mariadb-gssapi-server           x86_64      3:10.3.17-1.module_el8.1.0+257+48736ea6        AppStream       49 k
 mariadb-server-utils            x86_64      3:10.3.17-1.module_el8.1.0+257+48736ea6        AppStream      1.6 M
Enabling module streams:
 mariadb                                     10.3
 perl                                        5.26
 perl-DBD-MySQL                              4.046

Transaction Summary
=================================================================================================================
Install  12 Packages
hosts & hostname
每一個 Node 都需要知道彼此相對應的 Hostname.
[root@localhost ~]# vi /etc/hosts
192.168.111.183 cn183
192.168.111.201 cn201
Firewall & SELinux
因為單純試 MariaDB Galera Cluster 的功能,所以為了避免影響測試,我將 Firewall 以及 SELinux 關閉 (安裝完 CentOS 預設都是開啟的).
停止 Firewall (iptables) 功能.
[root@localhost ~]# systemctl stop firewalld
[root@localhost ~]# systemctl disable firewalld
Selinux 只能調整開機後不要啟動.所以設定完後必須重新開關機.
[root@localhost ~]# vi /etc/sysconfig/selinux
SELINUX=disabled
SELINUXTYPE=targeted
[root@localhost ~]# reboot
SELINUX 預設為 enforcing 需要修改成為 disabled .
[root@localhost ~]# sestatus
SELinux status:          disabled
設定 MySql
安裝完之後第一步就是要設定 MySQL ,我們可以透過 #mysql , #mysqladmin 指令或是透過 #mysql_secure_installation 來設定,透過指令可以參考這一篇的說明 https://benjr.tw/12461
[root@localhost ~]# systemctl start mariadb
[root@localhost ~]# systemctl enable mariadb
Created symlink /etc/systemd/system/mysql.service → /usr/lib/systemd/system/mariadb.service.
Created symlink /etc/systemd/system/mysqld.service → /usr/lib/systemd/system/mariadb.service.
Created symlink /etc/systemd/system/multi-user.target.wants/mariadb.service → /usr/lib/systemd/system/mariadb.service.
[root@localhost ~]# mysql_secure_installation

NOTE: RUNNING ALL PARTS OF THIS SCRIPT IS RECOMMENDED FOR ALL MariaDB
      SERVERS IN PRODUCTION USE!  PLEASE READ EACH STEP CAREFULLY!

In order to log into MariaDB to secure it, we'll need the current
password for the root user.  If you've just installed MariaDB, and
you haven't set the root password yet, the password will be blank,
so you should just press enter here.

Enter current password for root (enter for none):
OK, successfully used password, moving on...

Setting the root password ensures that nobody can log into the MariaDB
root user without the proper authorisation.

Set root password? [Y/n]
New password:
Re-enter new password:
Password updated successfully!
Reloading privilege tables..
 ... Success!


By default, a MariaDB installation has an anonymous user, allowing anyone
to log into MariaDB without having to have a user account created for
them.  This is intended only for testing, and to make the installation
go a bit smoother.  You should remove them before moving into a
production environment.

Remove anonymous users? [Y/n]
 ... Success!

Normally, root should only be allowed to connect from 'localhost'.  This
ensures that someone cannot guess at the root password from the network.

Disallow root login remotely? [Y/n] N
 ... skipping.

By default, MariaDB comes with a database named 'test' that anyone can
access.  This is also intended only for testing, and should be removed
before moving into a production environment.

Remove test database and access to it? [Y/n]
 - Dropping test database...
 ... Success!
 - Removing privileges on test database...
 ... Success!

Reloading the privilege tables will ensure that all changes made so far
will take effect immediately.

Reload privilege tables now? [Y/n]
 ... Success!

Cleaning up...

All done!  If you've completed all of the above steps, your MariaDB
installation should now be secure.

Thanks for using MariaDB!
除了設定密碼外,我都用預設值,不過我希望 root 能透過遠端連結到 database 所以把 Disallow root login remotely? [Y/n] n , 但 root 權限還是要設定過才能從遠端登入.
[root@localhost ~]# mysql -u root -p
Enter password:
Welcome to the MariaDB monitor.  Commands end with ; or \g.
Your MariaDB connection id is 12
Server version: 5.5.51-MariaDB-wsrep MariaDB Server, wsrep_25.14.r9949137

Copyright (c) 2000, 2016, Oracle, MariaDB Corporation Ab and others.

Type 'help;' or '\h' for help. Type '\c' to clear the current input statement.

MariaDB [(none)]> GRANT ALL PRIVILEGES ON *.* to root@'%' IDENTIFIED BY '111111' WITH GRANT OPTION;
Query OK, 0 rows affected (0.00 sec)

MariaDB [(none)]> FLUSH PRIVILEGES;
Query OK, 0 rows affected (0.00 sec)

MariaDB [(none)]> EXIT;
Bye
主要的指令是下面這一行.
MariaDB [(none)]> GRANT ALL PRIVILEGES ON *.* to root@'%' IDENTIFIED BY '111111' WITH GRANT OPTION;
各代表的意思
- GRANT ALL PRIVILEGES
授權的權限 (ALL: SELECT, INSERT, DELETE …. etc) - *.*
指定可以存取哪些 Db_name/Table (* 代表全部) - root@’%’
username@localhost , username – 新增的使用者, localhost – 限制可從哪裡來存取, 可用 ‘%’ (代表全部) - IDENTIFIED BY ‘111111’
password: 使用者密碼
試試看 root 可以透過遠端登入到 database.
[root@localhost ~]# mysql -u root -p -h 192.168.111.183
Enter password:
Welcome to the MariaDB monitor.  Commands end with ; or \g.
Your MariaDB connection id is 17
Server version: 10.3.17-MariaDB MariaDB Server

Copyright (c) 2000, 2018, Oracle, MariaDB Corporation Ab and others.

Type 'help;' or '\h' for help. Type '\c' to clear the current input statement.

MariaDB [(none)]> SHOW DATABASES;
+--------------------+
| Database           |
+--------------------+
| information_schema |
| mysql              |
| performance_schema |
+--------------------+
3 rows in set (0.001 sec)

MariaDB [(none)]> EXIT;
Node1-cn183
設定 Hostname
[root@localhost ~]# vi /etc/hostname
cn183
[root@localhost ~]# hostname cn183
[root@localhost ~]# exit
logout
Connection to 192.168.111.183 closed.
Ben@Ben10 ~ % ssh root@192.168.111.183
root@192.168.111.183's password:
Activate the web console with: systemctl enable --now cockpit.socket

Last login: Sat Jun 20 22:16:05 2020 from 192.168.111.1
[root@cn183 ~]#
接下來要修改 Cluster 的設定值,需先把 mysql 服務停止.
[root@cn183 ~]# systemctl stop mariadb
Shutting down MySQL. SUCCESS!
Cluster 設定檔位於 /etc/my.cnf.d/server.cnf
[root@cn183 ~]# vi /etc/my.cnf.d/mariadb-server.cnf
[galera]
wsrep_provider=/usr/lib64/galera/libgalera_smm.so
wsrep_cluster_name='cluster'
wsrep_cluster_address='gcomm://'
binlog_format=row
wsrep_node_name='cn183'
wsrep_sst_auth=root:111111
wsrep_sst_method=rsync
wsrep_node_address=192.168.111.183
- wsrep_provider
Path to the Galera library. - wsrep_cluster_name
The name of the cluster. Nodes cannot connect to clusters with a different name, so needs to be identical on all nodes in the same cluster. - wsrep_cluster_address
Galera Cluster Address,gcomm – This is the option to use for a working implementation. - binlog_format
Binary Log Formats, There are three formats for binary logging – statement-based, row-based and mixed
Row-based – Records events affecting individual table rows. Enable with –binlog-format=ROW. - wsrep_node_name
Name of this node.Default Value: The server’s hostname. - wsrep_sst_auth
Username and password of the user to use for replication. Unused if wsrep_sst_method is set to rsync, while for other methods it should be in the format: . T - wsrep_sst_method=rsync
Method used for taking the state snapshot transfer (sst). - wsrep_node_address
Specifies the node’s network address, in the format ip address[:port]. As of MariaDB 10.1.8, supports IPv6.
其他參考設定值
- wsrep_on
ON – Enable wsrep replication (starting 10.1.1) - default_storage_engine
Default Value: InnoDB (>= MariaDB 5.5) - innodb_autoinc_lock_mode
2 – interleaved” lock mode
更多關於 Galera Cluster System Variables 參數,請參考官方網站的說明:
https://mariadb.com/kb/en/mariadb/galera-cluster-system-variables/
設定好之後透過 galera_new_cluster 啟動第一個 Galera cluster (當所有 Cluster Node 都關機後,啟動第一個 Node 也是透過這個指令)
[root@cn183 ~]# galera_new_cluster
啟動 MariaDB .
[root@cn183 ~]# systemctl start mariadb
透過下面指令可以確認設定是否正確.
[root@cn183 ~]# mysql -u root -p -e "show status like 'wsrep%'"
.....
wsrep_cluster_size           | 1
wsrep_cluster_status         | Primary
wsrep_connected              | ON
看一下 wsrep_cluster_size , wsrep_cluster_status , wsrep_connected 狀態是否正常.發生錯誤時可以檢視一下目前 TCP port 的狀態.
[root@cn183 ~]# netstat -anlp | grep -e 4567 -e 3306 -e 4568 -e 4444
tcp        0      0 0.0.0.0:3306            0.0.0.0:*               LISTEN      2457/mysqld
tcp        0      0 0.0.0.0:4567            0.0.0.0:*               LISTEN      2457/mysqld
- 3306 – MySQL port
- 4567 – Galera Cluster
- 4568 – IST (Incremental State Transfers) port
- 4444 – SST (state snapshot transfer) port
如果啟動上有問題請參考 https://benjr.tw/95413
Node2-cn201
設定 Hostname .
[root@localhost ~]# vi /etc/hostname
cn201
[root@localhost ~]# hostname cn201
[root@localhost ~]# exit
logout
Connection to 192.168.111.201 closed.
Ben@Ben10 ~ % ssh root@192.168.111.201
root@192.168.111.201's password:
Activate the web console with: systemctl enable --now cockpit.socket

Last login: Sat Jun 20 22:16:05 2020 from 192.168.111.1
[root@cn201 ~]#
只需要修改一下 cn183 的設定檔即可以使用在 cn201 .
[root@cn201 ~]# systemctl stop mariadb
[root@cn201 ~]# vi /etc/my.cnf.d/mariadb-server.cnf
[galera]
wsrep_provider=/usr/lib64/galera/libgalera_smm.so
wsrep_cluster_name='cluster'
wsrep_cluster_address='gcomm://192.168.111.183'
binlog_format=row
wsrep_node_name='cn201'
wsrep_sst_auth=root:111111
wsrep_sst_method=rsync
wsrep_node_address=192.168.111.201
啟動 mysql.
[root@cn201 ~]# systemctl start mariadb
確定一下 WSREP 的狀態, wsrep_cluster_size 應該變成 2 而 wsrep_incoming_addresses 應該會列出 cn183 與 cn201 兩個 Node 的 IP (192.168.111.201:3306,192.168.111.183:3306 )
[root@cn201 ~]# mysql -u root -p -e "show status like 'wsrep%'"
.....
wsrep_cluster_size           | 2
wsrep_cluster_status         | Primary
wsrep_connected              | ON
wsrep_incoming_addresses     | 192.168.111.201:3306,192.168.111.183:3306
看一下目前 TCP port 的狀態.
[root@cn201 ~]# netstat -anlp | grep -e 4567 -e 3306 -e 4568 -e 4444
tcp        0      0 0.0.0.0:3306            0.0.0.0:*               LISTEN      2291/mysqld
tcp        0      0 0.0.0.0:4567            0.0.0.0:*               LISTEN      2291/mysqld
tcp        0      0 192.168.111.201:49926   192.168.111.183:4567    ESTABLISHED 2291/mysqld
測試看看 Cluster
從 cn183 建立新增 test 資料庫,從 cn201 也可以看到新增加的 test 資料庫,就代表我們的 Cluster 已經設定成功了.
- CN183
[root@cn183 ~]# mysql -u root -p
Enter password:
Welcome to the MariaDB monitor.  Commands end with ; or \g.
Your MariaDB connection id is 5
Server version: 5.5.51-MariaDB-wsrep MariaDB Server, wsrep_25.14.r9949137

Copyright (c) 2000, 2016, Oracle, MariaDB Corporation Ab and others.

Type 'help;' or '\h' for help. Type '\c' to clear the current input statement.

MariaDB [(none)]> CREATE DATABASE test;
Query OK, 1 row affected (0.00 sec)

MariaDB [(none)]> SHOW DATABASES;
+--------------------+
| Database           |
+--------------------+
| information_schema |
| mysql              |
| performance_schema |
| test               |
+--------------------+
4 rows in set (0.00 sec)
- CN201
[root@cn201 ~]# mysql -u root -p
Enter password:
Welcome to the MariaDB monitor.  Commands end with ; or \g.
Your MariaDB connection id is 5
Server version: 5.5.51-MariaDB-wsrep MariaDB Server, wsrep_25.14.r9949137

Copyright (c) 2000, 2016, Oracle, MariaDB Corporation Ab and others.

Type 'help;' or '\h' for help. Type '\c' to clear the current input statement.

MariaDB [(none)]> SHOW DATABASES;
+--------------------+
| Database           |
+--------------------+
| information_schema |
| mysql              |
| performance_schema |
| test               |
+--------------------+
4 rows in set (0.00 sec)
這個 Cluster 還沒結束,雖然使用者不管連線到哪一台資料庫的資料都會同步,但對於使用者太不方便,他需要自行選擇不同台的資料庫,我們欠缺一台 proxy (HAProxy – https://benjr.tw/95536 )讓使用者有統一窗口可以進行連線.