![]()
MariaDB Galera Cluster 與 HAProxy 作業系統平台皆為 CentOS 7.2 ,本篇的重點放在 HAProxy 的設定.
- MariaDB & Galera 5.5 安裝方式請參考 https://benjr.tw/95350
- MariaDB Galera Cluster Server 設定方式請參考 https://benjr.tw/95381
之前已經設定好 MariaDB + Galera Cluster 雖然可以讓不同台的伺服器的資料庫同步,但使用者的不見得會自行分散存取這些不同的伺服器,最好的方式是有統一對使用者的窗口,該窗口再把資料庫的存取分散到不同台的伺服器上.這就需要靠 HAProxy 了.
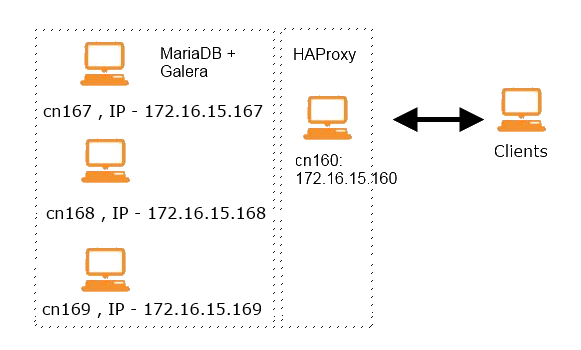
測試環境如下:
- Proxy : proxy , IP – 172.16.15.160
- Node1 : cn167 , IP – 172.16.15.167
- Node2 : cn168 , IP – 172.16.15.168
- Node3 : cn169 , IP – 172.16.15.169
安裝 HAProxy
[root@localhost ~]# yum install haproxy
設定 HAProxy
[root@localhost ~]# vi /etc/haproxy/haproxy.cfg
listen galera 172.16.15.160:3306
     balance source
     mode tcp
     option tcpka
     option mysql-check user haproxy
     server node1 172.16.15.167:3306 check weight 1
     server node2 172.16.15.168:3306 check weight 1
     server node2 172.16.15.169:3306 check weight 1
說明 :
- balance:
Defines the destination selection policy you want HAProxy to use in choosing which server it routes the incoming connections to.
分散存取資料 (balance) 的方式有很多種- Round Robin (roundrobin)
Directs new connections to the next destination in a circular order list, modified by the server’s weight. - Static Round Robin (static-rr)
Directs new connections to the next destination in a circular order list, modified by the server’s weight. Unlike the standard implementation of round robin, in static round robin you cannot modify the server weight on the fly. Changing the server weight requires you to restart HAProxy. - Least Connections (leastconn)
Directs new connections to the server with the smallest number of connections available, which is adjuted for the server’s weight. - First
Directs new connections to the first server with a connection slot available. They are chosen from the lowest numeric identifier to the highest. Once the server reaches its maximum connections value, HAProxy moves to the next in the list. - Source Tracking (source)
Divides the source IP address by the total weight of running servers. Ensures that client connections from the same source IP always reach the same server.
關於這些模式的使用請自行參考 https://benjr.tw/95644
- Round Robin (roundrobin)
- mode tcp:
Defines the type of connections it should route. Galera Cluster uses TCP connections. - option tcpka:
Enables the keepalive function to maintain TCP connections. - option mysql-check user
Enables a database server check, to determine whether the node is currently operational. - server
check weight 1
Defines the nodes you want HAProxy to use in routing connections.
其他參數說明可以參考 http://galeracluster.com/documentation-webpages/haproxy.html 或是 https://cbonte.github.io/haproxy-dconv/
mysql-check
剛剛在 haproxy.cfg 有設定 option mysql-check user haproxy ,主要是 HAProxy 可以對 MySQL / MariaDB 進行基本的狀態檢查,這檢查選項就是下面的設定即可啟用此功能,不過我們也需要在這些 MySQL / MariaDB Cluster (Node1, Node2, Node3) 的 Database 建立相對應的使用者,因為這些 Cluster 會自行同步資料庫,所以只需要在其他一台進行新增使用者即可.
在 Node1 (cn167) 建立 haproxy 所需的使用者以及其密碼.
[root@cn167 ~]# mysql -u root -p
Enter password:
Welcome to the MariaDB monitor.  Commands end with ; or \g.
Your MariaDB connection id is 6
Server version: 5.5.51-MariaDB-wsrep Source distribution, wsrep_25.14.r9949137

Copyright (c) 2000, 2016, Oracle, MariaDB Corporation Ab and others.

Type 'help;' or '\h' for help. Type '\c' to clear the current input statement.

MariaDB [(none)]> CREATE USER 'haproxy'@'172.16.15.160';
Query OK, 0 rows affected (0.01 sec)

MariaDB [(none)]> flush privileges;
Query OK, 0 rows affected (0.00 sec)

MariaDB [(none)]> exit
Bye
關於資料庫的使用請參考 https://benjr.tw/12461
HAProxy 狀態
要透過 web 的方式來看其 MariaDB Galera Cluster + HAProxy 的狀態需要在設定檔 haproxy.cfg 寫入下面的設定.來看狀態.
[root@localhost ~]# vi /etc/haproxy/haproxy.cfg
listen stats 0.0.0.0:9000
## HAProxy stats web gui running on port 9000 - username and password: howtoforge.
        mode http
        stats enable
        stats uri /stats
        stats realm HAProxy\ Statistics
        stats auth howtoforge:howtoforge
        stats admin if TRUE
[root@localhost ~]# systemctl enable haproxy
Created symlink from /etc/systemd/system/multi-user.target.wants/haproxy.service to /usr/lib/systemd/system/haproxy.service.
[root@localhost ~]# systemctl start haproxy
[root@localhost ~]# systemctl status haproxy
● haproxy.service - HAProxy Load Balancer
   Loaded: loaded (/usr/lib/systemd/system/haproxy.service; disabled; vendor preset: disabled)
   Active: active (running) since 六 2016-09-10 17:24:29 CST; 9s ago
 Main PID: 16177 (haproxy-systemd)
   CGroup: /system.slice/haproxy.service
           ├─16177 /usr/sbin/haproxy-systemd-wrapper -f /etc/haproxy/haproxy....
           ├─16178 /usr/sbin/haproxy -f /etc/haproxy/haproxy.cfg -p /run/hapr...
           └─16179 /usr/sbin/haproxy -f /etc/haproxy/haproxy.cfg -p /run/hapr...

[root@localhost ~]# netstat -anlp |grep -e 9000
tcp        0      0 0.0.0.0:9000            0.0.0.0:*               LISTEN      16179/haproxy
接著到 web browser http://172.16.15.160:9000/stats ,需要輸入剛剛設定的 auth 使用這帳號: howtoforge 與密碼: howtoforge .
測試看看
現在對於使用者而言,統一窗口是 172.16.15.160 , HAProxy 會把工作分散到不同台的 Node1 , Node2 , Node3 (這幾個 Node 的資料也會同步).
[root@localhost ~]# mysql -u root -p -h 172.16.15.160
Enter password:
Welcome to the MariaDB monitor.  Commands end with ; or \g.
Your MariaDB connection id is 33
Server version: 5.5.51-MariaDB-wsrep Source distribution, wsrep_25.14.r9949137

Copyright (c) 2000, 2016, Oracle, MariaDB Corporation Ab and others.

Type 'help;' or '\h' for help. Type '\c' to clear the current input statement.

MariaDB [(none)]> show databases;
+--------------------+
| Database           |
+--------------------+
| information_schema |
| mysql              |
| performance_schema |
| wsrep              |
+--------------------+
4 rows in set (0.00 sec)

MariaDB [(none)]> exit
Bye
但是我們不確定 HAProxy 功能是否正常,所以透過下面的方式來試試看.
每一台的 MySQL / MariaDB 都可以設定屬於自己的 server_id ,設定全部的 SQL Server 並給予不同的 server_id .
[root@localhost ~]# mysql -h 172.16.15.167 -u root -p -e "SET GLOBAL server_id=167"
[root@localhost ~]# mysql -h 172.16.15.168 -u root -p -e "SET GLOBAL server_id=168"
[root@localhost ~]# mysql -h 172.16.15.169 -u root -p -e "SET GLOBAL server_id=169"
剛剛設定 balance 為 source (他會依據使用者的 IP 來分配給不同的 SQL server) ,但我使用同一台機台當作使用者端做測試,所以會被分配在同一台 SQL server 上,所以先建議修改成 Round Robin 再做測試.
[root@localhost ~]# mysql -h 172.16.15.160 -u root -p -e "show variables like 'server_id'"
Enter password:
+---------------+-------+
| Variable_name | Value |
+---------------+-------+
| server_id     | 167   |
+---------------+-------+
[root@localhost ~]# mysql -h 172.16.15.160 -u root -p -e "show variables like 'server_id'"
Enter password:
+---------------+-------+
| Variable_name | Value |
+---------------+-------+
| server_id     | 168   |
+---------------+-------+
如果可以得到不同的 server_id 就代表 HAProxy 正確無誤的.
3 thoughts on “CentOS 7 – MariaDB Galera Cluster + HAProxy”