![]()
之前有一篇是關於 smartbits – Performance 網卡效能測試
這是測試 NIC 卡的,如果要測試 Switch 有什麼不同的嗎??其實最大的不同是 Switch 不用設定 IP .
Switch 與 smartbits 所需的網路埠也一樣是兩個而實際的接圖如下:
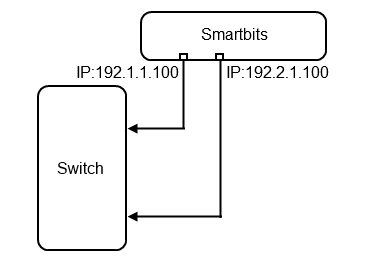
在開始前你必須先知道大概 smartbits 的 SmartWindow,transmit Setup 和 SmartCounters 的使用方式.設定大概需要以列幾步驟:
Linux – IP Forwarding- Smartbits – Streams Setup(Transmit Setup) – SmartMetric Mode
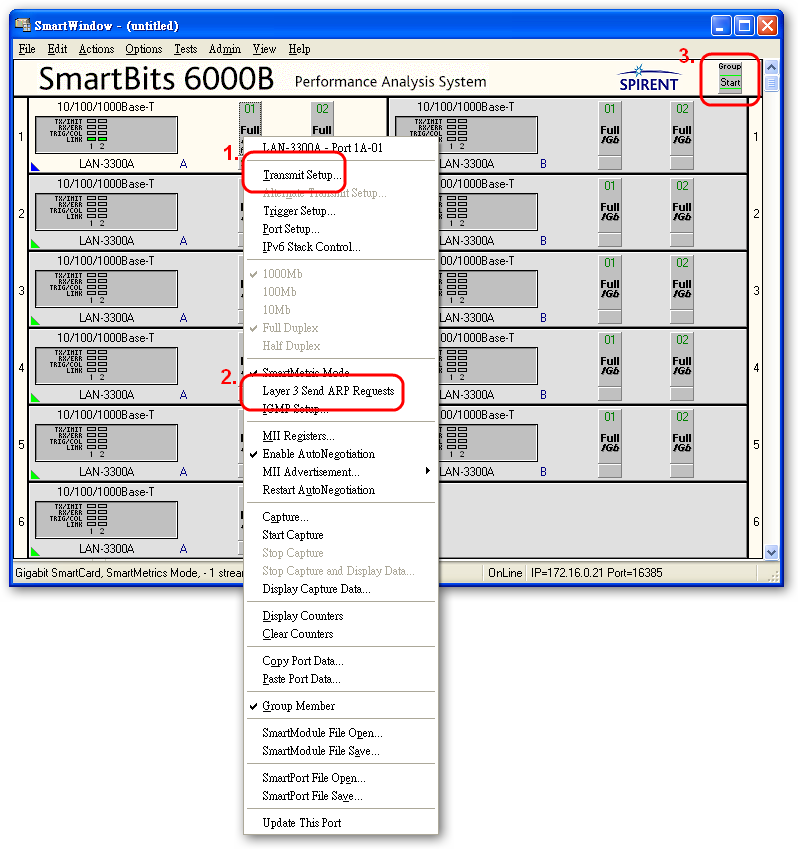
- Smartbits – Layer3 Send ARP Requests
- Smartbits – Group Start
-
IP Forwarding因為是 switch 本身就會做 Forwarding 的功能.所以不用做任何事.
-
Streams Setup(Transmit Setup) – SmartMetric Mode
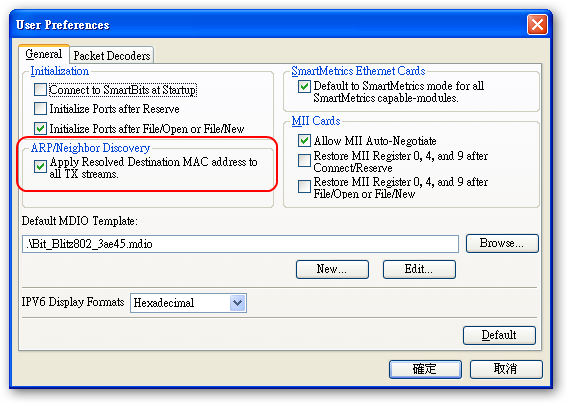
回到我們的 Smartbits 的 SmartWindow 這邊的設定會以 SmartMetric Mode 為主.如果前面將預設改為 Traditional Mode,透過修改 SmartMetrics Ethernet Cards 值可以回到 SmartMetric Mode 從 Options / Preferences / General / SmartMetrics Ethernet Cards 來修改, 預設是有勾選 Default to SmartMetrics mode for all SmartMetrics capable-modules.(也就是 SmartMetric Mode).
或是在埠按 SmartMetric Mode 再去設定 Transmit Setup.. 一樣可以設定.
預設的值大多都不需要改變.
- Interframe Gap (IFG)這邊指的是封包可傳送的最小間隔時間,速度會因為網卡的速度而不同,通常速度越快的網卡可間隔時間越小,如 10M: 9.6 微秒. 100M: 0.96 微秒. 1G: 0.096 微秒. 微秒( us : 0.000001 10的負6次方)
- Mode傳輸封包模式有 Continuous(不間斷的傳輸封包) , Single(傳送指定個數封包) ,multiburst(在指定時間內傳輸指定個數封包) , cont multiburst ,echo
- Stream Header Length64-byte 適用於 IPV4 而 128Byte 適用於 IPV6
- Background傳送的封包內容值,可以透過 Background 來選擇 A 或者是 B
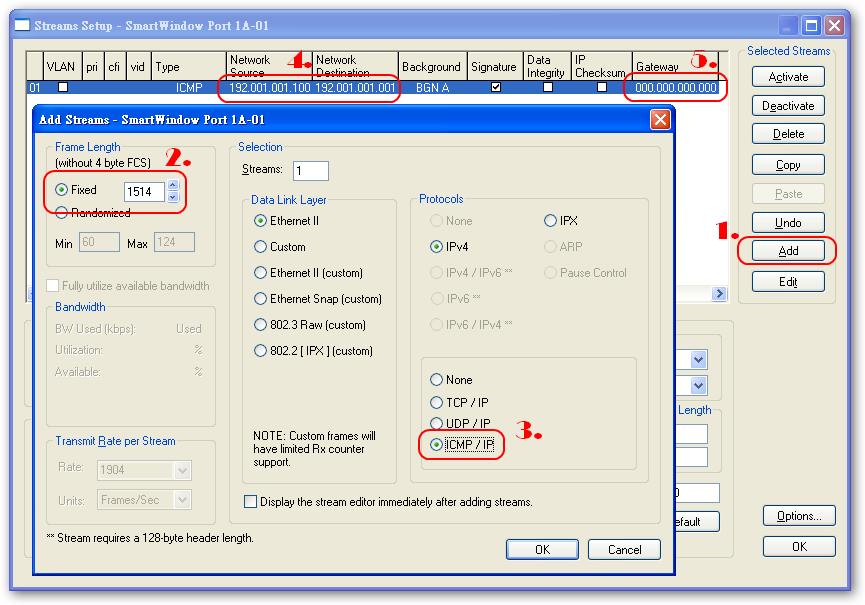
在 smartWindow 中選擇要傳送的埠上按右鍵設定 Transmit Setup .因為是 SmartMetric Mode 這邊要新增傳送封包格式時只要選擇 “Add”. 其中最主要的設定是 Frame Length 訊框長度.我把他設定為最長的訊框格式 1514 nytes (標準訊框最大可以為 1518 bytes – 4bytes,FCS:frame check sequence)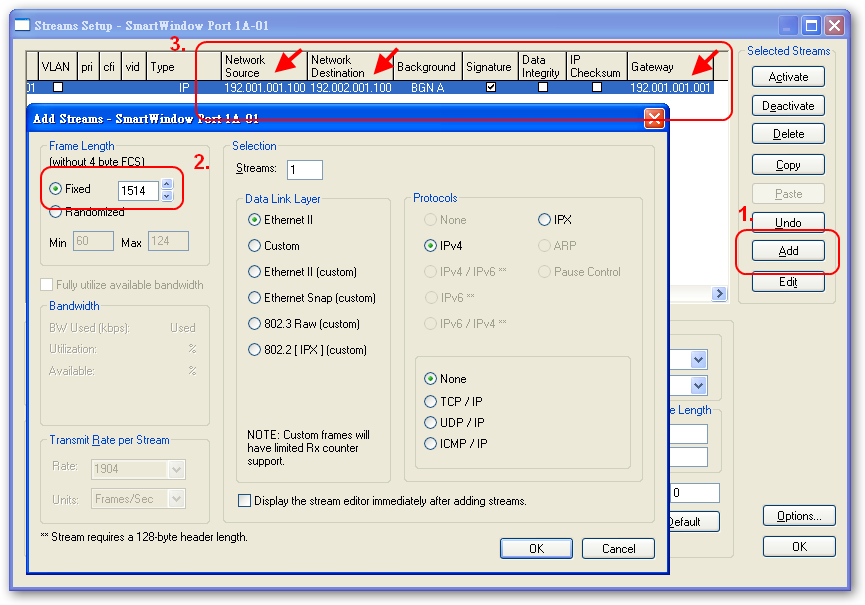
在 PC / Server 環境下當 Frame Length 過小容易造成 Buffer 一下就滿了,進而造成封包的遺失這樣在效能表現上反而無法達到最大值.所以在設定 Frame Length 使用了最大值.在 Frame 的定義如下,訊框大小除了資料 46bytes ~ 1500bytes 加上其他 header 就是 64 bytes ~ 1518bytes .新增好一個封包這邊我們就開始指定兩端的 IP(以 TCP/IP Layer 3 為測試方式).以前面的範例為設定值,另外一個埠也是以相同的方式做設定.
- Network Source :192.1.1.100
- Network Destination :192.2.1.100
Gateway :192.1.1.1
因為 Switch 所以不用設定 Gateway.- Mode :Continuous
最主要是測試效能所以建議使用 Continuous 方便我們看出效能的極限制.
-
Layer3 Send ARP Requests
在一開始兩邊的埠都不認識對方所以必須先發出一個 ARP 找出相對應的網路埠.你可以在 Transmit Setup 看出封包內容在傳送出 Layer3 Send ARP Requests 後有明顯的不同. 原本是 FF FF FF FF FF FF 的廣播封包現在變成 unicast 的封包.

這邊是在 Options / Preferences / User Preferences / General 預設 ARP/Neighbor Discovery 功能 Apply Resolved Destination MAC address to all TX streams. 是開啟的,所以 smartbits 在認識對方的網路埠之後就會採用 unicast 的封包來傳送. -
Group Start
要測試的兩個網路埠都設定好 Network Source / Network Destination / Gateway .在測試中傳輸和接受是雙向同時進行的, 也因此我們不能像之前的測試直接在 SmartWindow 按 “Burst” 必須按左上方的 Group / Start 讓兩個網路埠的傳輸能同時進行.
經過一段時間後可以透過 SmartCount 看到剛剛測試的結果.不過我們要怎們算出最大效能呢!!
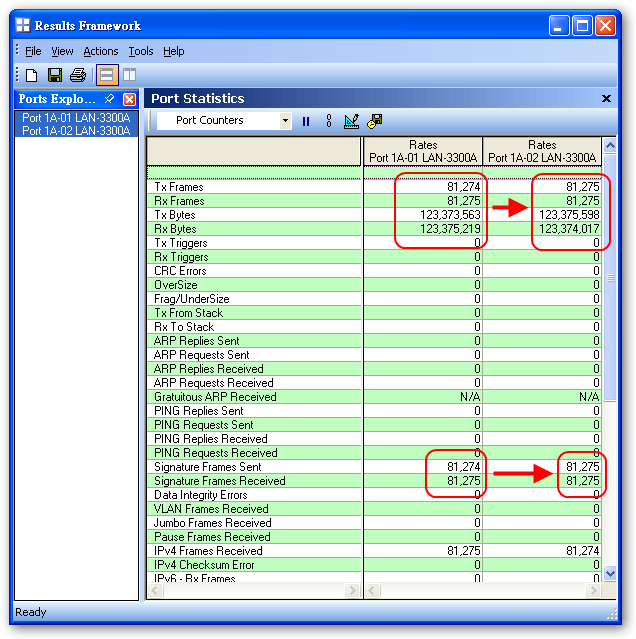
然這邊看到 Tx / Rx Bytes 是 123MBytes 以幾乎是 984Mbits(1Gbits) 的速度,但是這裡不建議看 Tx / Rx Bytes 他會受到 Frame Length 大小而影響到結果,建議看 Tx / Rx Frames 的數值會比較準,不過 Tx / Rx Frames 需要手動算出:Preamble –> 8 bytes * 8 = 64 bits
Frame length –> 1518 bytes (minimum) * 8 = 12144 bits
Inter-frame gap –> 12 bytes (minimum) * 8 = 96 bits
運算公式如下:
Maximum Frame Rate = MAC Transmit Bit Rate (Connection Speed) / (Preamble + Frame Length + Inter-frame Gap)
= 1,000,000,000 / (64 + 12144 + 96)
= 1,000,000,000 / 12304
= 81,274 frame per second (fps) 和 SmartCounter 看到的81,274 一致,的確效能已經達到最大值了.
通常在測試 switch 其效能會比 NIC 的表現好.

One thought on “smartbits – switch 測試”