![]()
CoreOS 的安裝與設定請參考 https://benjr.tw/96511

Continaer 與 Docker
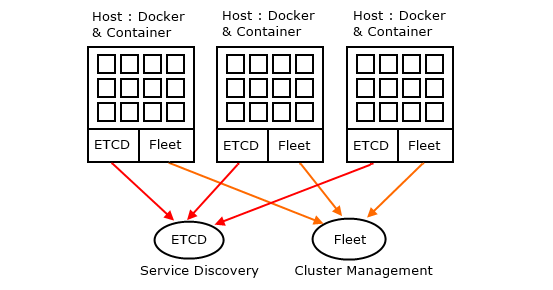
要先瞭解 Fleet 就先要知道什麼是 Container ,Docker ,Docker 是用來管理 Container 的.而 Fleet 是用來管理 Docker 的.感覺很困惑!!
Container -> Docker -> fleet
先來看看什麼是 Container ,他是輕量級的虛擬化軟體,透過資源共享的方式,可以快速建立出一個獨立空間 (虛擬環境,有自己的 file system, process 與 block I/O ,network 空間) 給另外一個作業系統來使用,透過 Docker 的基本三元素. 容器 (Container) , 映像檔 (Image) , 倉庫 (Repository) .讓我們更方便管理 Container 的環境,但是要能做到 方便大量,分散式的 部署與管理,這時候就要透過 Fleet 來協助.
關於 Continaer 與 Docker 請參考 https://benjr.tw/96566
ETCD2 (Service Discovery)
那 etcd 是做什麼的, etcd 是一種分散式的 key/value 儲存方式 (至少要有三個 node ,會把資料複製三份到個別的 node 作儲存,以確保資料的可靠度),不同於傳統的關聯式資料庫系統 (傳統的關聯式資料庫基本上就是一堆 tables),etc2 採用的是 key / value Stores 儲存,資料就只有 key / value Stores 採用 雜湊表 (Hash table) 是根據鍵 (Key) 來查詢 (noSQL 的方式) 存儲的資料結構.
這邊要先確認 etcd2 這個服務都是啟動的.
關於設定 ETCD2 可以參考
- 關於 etcd2 設定與使用方式 – https://benjr.tw/96404
- 新增移除 etcd2 Node – https://benjr.tw/96449
- etcd2 Cluster 的災難復原 – https://benjr.tw/96497
- etcd2 Cluster 的容錯能力 – https://benjr.tw/96688
目前我的 etcd2 Cluster Node 為
- CoreOS1 , IP: 172.16.15.21
- CoreOS2 , IP: 172.16.15.22
core@coreos1 ~ $ etcdctl cluster-health
member 432deaac673805ba is healthy: got healthy result from http://172.16.15.21:2379
member e04e14516e20f6f7 is healthy: got healthy result from http://172.16.15.22:2379
cluster is healthy
core@coreos1 ~ $ etcdctl member list
432deaac673805ba: name=node01 peerURLs=http://172.16.15.21:2380 clientURLs=http://172.16.15.21:2379 isLeader=true
e04e14516e20f6f7: name=node02 peerURLs=http://172.16.15.22:2380 clientURLs=http://172.16.15.22:2379 isLeader=false
Fleet (Cluster Management)
已經安裝好的 CoreOS 也可以直接透過 systemd 的方式來啟動服務,管理指令 systemctl 是 enable , start fleet.
-
Node1
core@coreos1 ~ $ sudo systemctl enable fleet Created symlink /etc/systemd/system/multi-user.target.wants/fleet.service → /usr/lib/systemd/system/fleet.service. core@coreos1 ~ $ sudo systemctl start fleet core@coreos1 ~ $ systemctl status fleet ● fleet.service - fleet daemon Loaded: loaded (/usr/lib/systemd/system/fleet.service; enabled; vendor preset: disabled) Active: active (running) since Mon 2017-01-23 07:54:08 UTC; 34min ago Main PID: 1215 (fleetd) Tasks: 8 Memory: 14.1M CPU: 19.671s CGroup: /system.slice/fleet.service └─1215 /usr/bin/fleetd -
Node2
core@coreos2 ~ $ sudo systemctl enable fleet
Created symlink /etc/systemd/system/multi-user.target.wants/fleet.service → /usr/lib/systemd/system/fleet.service.
core@coreos2 ~ $ sudo systemctl start fleet
core@coreos2 ~ $ systemctl status fleet
● fleet.service - fleet daemon
   Loaded: loaded (/usr/lib/systemd/system/fleet.service; enabled; vendor preset
   Active: active (running) since Tue 2017-01-24 06:30:34 UTC; 6s ago
 Main PID: 1994 (fleetd)
    Tasks: 7
   Memory: 11.0M
      CPU: 110ms
   CGroup: /system.slice/fleet.service
           └─1994 /usr/bin/fleetd
透過下面的指令來看一下目前的 Fleet 的狀態.
core@coreos1 ~ $ fleetctl list-units
UNIT	MACHINE	ACTIVE	SUB
core@coreos1 ~ $ fleetctl list-machines
MACHINE		IP		METADATA
4fbe0d41...	172.16.15.22	-
ddc09604...	172.16.15.21	-
下面的例子是透過 Fleet 去管理 busybox (一個精簡核心並包含基本工具的 Linux) 的 Container.
Fleet 的設定檔如下
core@coreos1 ~ $ vi hello.service
[Unit]
Description=MyApp
After=docker.service
Requires=docker.service

[Service]
TimeoutStartSec=0
ExecStartPre=-/usr/bin/docker kill busybox1
ExecStartPre=-/usr/bin/docker rm busybox1
ExecStartPre=/usr/bin/docker pull busybox
ExecStart=/usr/bin/docker run --name busybox1 busybox /bin/sh -c "trap 'exit 0' INT TERM; while true; do echo Hello World; sleep 1; done"
ExecStop=/usr/bin/docker stop busybox1
主要可以分成兩個區塊
Unit
Description=MyApp
敘述
After=docker.service
需要在 Docker 服務後啟動
Requires=docker.service
需要 Docker 這個服務
Service
都是 Docker 相關的指令
Docker 相關參數
- kill – Kill one or more running containers
- rm – Remove one or more containers
- pull – Pull an image or a repository from a registry
- run – Run a command in a new container
產生一個名稱為 busybox1 的 Container ,使用的是 busybox 的 Image ,並執行後面的指令 /bin/sh -c “trap ‘exit 0’ INT TERM; while true; do echo Hello World; sleep 1; done” - stop – Stop one or more running containers
兩個由 Fleet 管理的 Container 可以清楚看到 Fleet 的運作,所以這邊多再增加一個新的 Container (busybox2),一樣使用的是 busybox 的 Image.
core@coreos1 ~ $ vi hello1.service
[Unit]
Description=MyApp
After=docker.service
Requires=docker.service

[Service]
TimeoutStartSec=0
ExecStartPre=-/usr/bin/docker kill busybox2
ExecStartPre=-/usr/bin/docker rm busybox2
ExecStartPre=/usr/bin/docker pull busybox
ExecStart=/usr/bin/docker run --name busybox2 busybox /bin/sh -c "trap 'exit 0' INT TERM; while true; do echo Hello World; sleep 1; done"
ExecStop=/usr/bin/docker stop busybox2
透過 Load 載入 container ,start 啟動 container
core@coreos1 ~ $ fleetctl load hello.service
Unit hello.service inactive
Unit hello.service loaded on 18514a4c.../172.16.15.21
core@coreos1 ~ $ fleetctl start hello.service
Unit hello.service launched on 18514a4c.../172.16.15.21
core@coreos1 ~ $ fleetctl load hello1.service
Unit hello1.service inactive
Unit hello1.service loaded on aed2b206.../172.16.15.22
core@coreos1 ~ $ fleetctl start hello1.service
Unit hello1.service launched on aed2b206.../172.16.15.22
觀察一下目前兩個 Container, hello , hello1 ,運行在兩台不同的 CoreOS 上.
core@coreos1 ~ $ fleetctl list-units
UNIT		MACHINE				ACTIVE		SUB
hello.service	18514a4c.../172.16.15.21	active		running
hello1.service	aed2b206.../172.16.15.22	activating	start-pre
透過 stop 停止 container , unload 卸載 container
fleetctl 其他常用參數
- cat – Output the contents of a submitted unit
- destroy – Destroy one or more units in the cluster
- list-machines – Enumerate the current hosts in the cluster
- list-unit-files – List the units that exist in the cluster.
- list-units – List the current state of units in the cluster
- load – Schedule one or more units in the cluster, first submitting them if necessary.
- unload – Unschedule one or more units in the cluster.
- start – Instruct systemd to start one or more units in the cluster, first submitting and loading if necessary.
- status – Output the status of one or more units in the cluster
- stop – Instruct systemd to stop one or more units in the cluster.
3 thoughts on “CoreOS – Fleet”