![]()
測試環境 Ubuntu 16.04 AMD64 (Docker 只支援 64位元的作業系統)
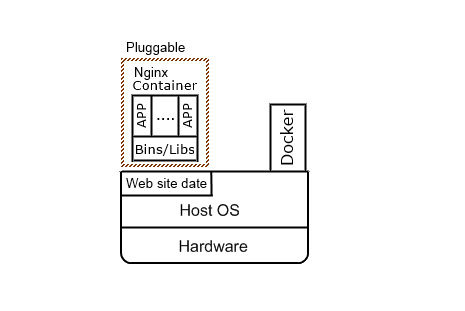
關於 Docker 的安裝使用 https://benjr.tw/95998 與 Container架構 https://benjr.tw/95955 請自行參考,下面使用 Docker 的技術來架設 web server (Nginx : 音同 Engine X 輕量化的 Web 伺服器)
先把 Nginx 這個 image 下載下來
- pull – Pull an image or a repository from a registry
root@ubuntu:~# apt-get install docker.io
root@ubuntu:~# docker pull nginx
Using default tag: latest
latest: Pulling from library/nginx
5040bd298390: Pull complete
333547110842: Pull complete
4df1e44d2a7a: Pull complete
Digest: sha256:f2d384a6ca8ada733df555be3edc427f2e5f285ebf468aae940843de8cf74645
Status: Downloaded newer image for nginx:latest
- images – List images ,查看系統有那一些 映像檔 (Image)
root@ubuntu:~# docker images
REPOSITORY          TAG                 IMAGE ID            CREATED             SIZE
nginx               latest              cc1b61406712        11 days ago         181.8 MB
使用剛剛從倉庫 (Repository)下載的映像檔 (Image)來產生 容器(Container).
- run – Run a command in a new container
- –name string : Assign a name to the container
- -p : 這邊可以指定 container 的埠 port 直接對應到 host 的哪一個埠 (port mapping)
- -d : Run container in background and print container ID
執行在 Detached Mode & Expose the Port
root@ubuntu:~# docker run --name docker-nginx -p 80:80 -d nginx
db2524b719b057139d147a24fe42a94067ab7b616395c12830ccd7393156c64d
root@ubuntu:~# docker ps -a
CONTAINER ID        IMAGE               COMMAND                  CREATED             STATUS              PORTS                         NAMES
db2524b719b0        nginx               "nginx -g 'daemon off"   9 seconds ago       Up 8 seconds        0.0.0.0:80->80/tcp, 443/tcp   docker-nginx
Docker 的虛擬網路網段為 172.17.0.x ,預設的 Container 採用 DHCP 的方式獲得 IP .
root@ubuntu:~# ifconfig docker
docker0   Link encap:Ethernet  HWaddr 02:42:c0:c3:79:b9
          inet addr:172.17.0.1  Bcast:0.0.0.0  Mask:255.255.0.0
          inet6 addr: fe80::42:c0ff:fec3:79b9/64 Scope:Link
          UP BROADCAST RUNNING MULTICAST  MTU:1500  Metric:1
          RX packets:8 errors:0 dropped:0 overruns:0 frame:0
          TX packets:31 errors:0 dropped:0 overruns:0 carrier:0
          collisions:0 txqueuelen:0
          RX bytes:536 (536.0 B)  TX bytes:4113 (4.1 KB)
Container 採用 DHCP 的方式獲得 IP,通常第一台的 IP 為 172.17.0.2 ,可以透過 #docker network inspect bridge 來確認.
- exec – Run a command in a running container
docker exec [OPTIONS] CONTAINER COMMAND [ARG…]
root@ubuntu:~# docker exec docker-nginx /bin/sh -c "ip addr show"
1: lo: <LOOPBACK,UP,LOWER_UP> mtu 65536 qdisc noqueue state UNKNOWN group default qlen 1
    link/loopback 00:00:00:00:00:00 brd 00:00:00:00:00:00
    inet 127.0.0.1/8 scope host lo
       valid_lft forever preferred_lft forever
    inet6 ::1/128 scope host
       valid_lft forever preferred_lft forever
6: eth0@if7: <BROADCAST,MULTICAST,UP,LOWER_UP> mtu 1500 qdisc noqueue state UP group default
    link/ether 02:42:ac:11:00:02 brd ff:ff:ff:ff:ff:ff
    inet 172.17.0.2/16 scope global eth0
       valid_lft forever preferred_lft forever
    inet6 fe80::42:acff:fe11:2/64 scope link
       valid_lft forever preferred_lft forever
已經確認 Container IP ,以及 Nginx 服務預設已經啟動,可以透過 curl 文字版的瀏覽器看一下服務是否正常.
root@ubuntu:~# ping 172.17.0.2
PING 172.17.0.2 (172.17.0.2) 56(84) bytes of data.
64 bytes from 172.17.0.2: icmp_seq=1 ttl=64 time=0.068 ms
64 bytes from 172.17.0.2: icmp_seq=2 ttl=64 time=0.111 ms
^C
--- 172.17.0.2 ping statistics ---
2 packets transmitted, 2 received, 0% packet loss, time 999ms
rtt min/avg/max/mdev = 0.068/0.089/0.111/0.023 ms
root@ubuntu:~# docker exec docker-nginx /bin/sh -c "service nginx status"
nginx is running.
root@ubuntu:~# curl 172.17.0.2
<!DOCTYPE html>
<html>
<head>
<title>Welcome to nginx!</title>
<style>
    body {
        width: 35em;
        margin: 0 auto;
        font-family: Tahoma, Verdana, Arial, sans-serif;
    }
</style>
</head>
<body>
<h1>Welcome to nginx!</h1>
<p>If you see this page, the nginx web server is successfully installed and
working. Further configuration is required.</p>

<p>For online documentation and support please refer to
<a href="http://nginx.org/">nginx.org</a>.<br/>
Commercial support is available at
<a href="http://nginx.com/">nginx.com</a>.</p>

<p><em>Thank you for using nginx.</em></p>
</body>
</html>
透過下面的指令可以停止,移除 Container.
- stop – Stop one or more running containers
- rm – Remove one or more containers
root@ubuntu:~# docker stop docker-nginx
docker-nginx
root@ubuntu:~# docker rm docker-nginx
docker-nginx
root@ubuntu:~# docker ps -a
CONTAINER ID        IMAGE               COMMAND             CREATED             STATUS              PORTS               NAMES
使用 Local Filesystem 來取代 Container 內的資料
如果 Web server 要使用自己的資料時要怎麼辦呢! 通常這些 container 像是可以抽換的模組,所以資料會另外儲存.
先在本地端建立 html 的資料,修改剛剛的 html 將 Welcome to nginx! 改成為 Welcome to Benjr.tw!
root@ubuntu:~# mkdir -p ~/docker-nginx/html
root@ubuntu:~# cd ~/docker-nginx/html
root@ubuntu:~/docker-nginx/html# vim index.html
<!DOCTYPE html>
<html>
<head>
<title>Welcome to Benjr.tw!</title>
<style>
    body {
        width: 35em;
        margin: 0 auto;
        font-family: Tahoma, Verdana, Arial, sans-serif;
    }
</style>
</head>
<body>
<h1>Welcome to nginx!</h1>
<p>If you see this page, the nginx web server is successfully installed and
working. Further configuration is required.</p>

<p>For online documentation and support please refer to
<a href="http://nginx.org/">nginx.org</a>.<br/>
Commercial support is available at
<a href="http://nginx.com/">nginx.com</a>.</p>

<p><em>Thank you for using nginx.</em></p>
</body>
</html>
Docker 的參數使用與剛剛類似,多了 -v
- -v, –volume value – Bind mount a volume (default [])
root@ubuntu:~/docker-nginx/html# cd
root@ubuntu:~# docker run --name docker-nginx -p 80:80 -d -v ~/docker-nginx/html:/usr/share/nginx/html nginx
d93f550f43ef447b55a1a2633baa110631314af7ba5f0570e4656d75a0abdd05
-v ~/docker-nginx/html:/usr/share/nginx/html
用剛剛建立好的本地端 ~/docker-nginx/html 資料夾去取代 Container 內的 /usr/share/nginx/html 資料夾.
透過 curl 文字版的瀏覽器看一下 Nginx 的確使用了當地端的資料夾.
root@ubuntu:~# curl 172.17.0.2
<!DOCTYPE html>
<html>
<head>
<title>Welcome to Benjr.tw!</title>
<style>
    body {
        width: 35em;
        margin: 0 auto;
        font-family: Tahoma, Verdana, Arial, sans-serif;
    }
</style>
</head>
<body>
<h1>Welcome to nginx!</h1>
<p>If you see this page, the nginx web server is successfully installed and
working. Further configuration is required.</p>

<p>For online documentation and support please refer to
<a href="http://nginx.org/">nginx.org</a>.<br/>
Commercial support is available at
<a href="http://nginx.com/">nginx.com</a>.</p>

<p><em>Thank you for using nginx.</em></p>
</body>
</html>
剛剛使用資料夾,也是可以針對單一檔案來設定.