![]()
測試環境為 Google Cloud Platform – Ubuntu 16.04 與 Ubuntu 18.04
雖然 Linode.com 最便宜的 1GB RAM + 1 CPU Core 只要 $5/mo , 但 Google 更狠, Google Cloud Platform 雲端主機提供一年的免費試用(最高上限可以使用 300美元),試用期結束後,不會自動續約,立刻申請一個來試試看看.
只要有 Google帳號,到 https://cloud.google.com/ 就可申請免費試用,裡面需要填寫信用卡資料,但不用擔心試用期結束後,不會自動續約,申請完畢後需要建立一個新的專案.
主要的目的是將 https://benjr.tw 的 wordpress 搬到這裡來.
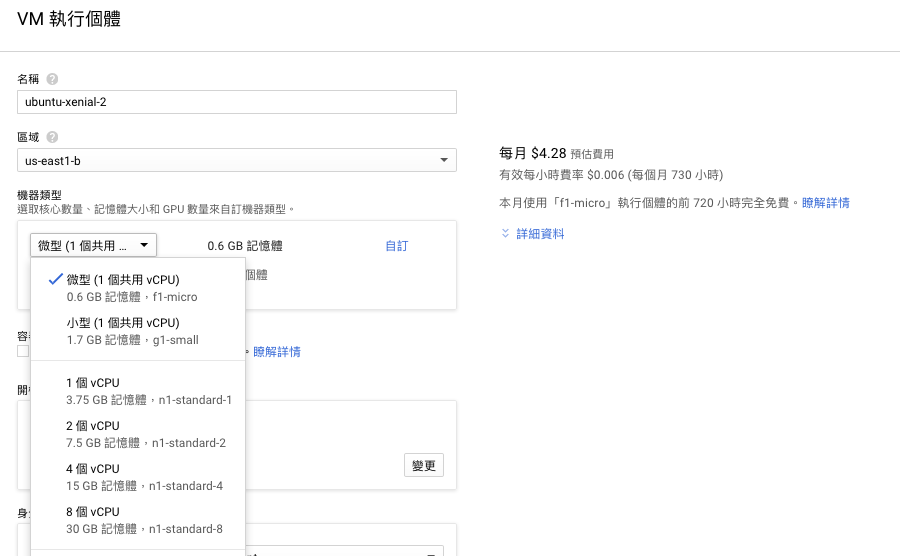
我常用的作業系統是 Ubuntu Xenial Linux (16.04 LTS) ,在 Cloud launcher 要選什麼種類呢!!我們可以從 Launcher / 虛擬機器 / 作業系統 / Ubuntu Xenial Linux (16.04 LTS) 選擇,雖然預估費用:每月 $25.95
但我們點選 “在 Compute Engine 上啟動” 可以選擇最省錢的方式 f1-micro 的 Google Compute Engine
1 個共用 vCPU + 0.6 GB 記憶體 + 10 GB 標準永久磁碟
總計 每月 $4.28
架站需要將防火牆新增允許接受來自網際網路 HTTP 流量及 HTTPS 流量.

其他計費方式請參考 https://cloud.google.com/compute/pricing
或是直接搜尋 wordpress 可以找到已經架設好的如 WordPress Certified by Bitnami 或是 WordPress with NGINX and SSL Certified by Bitnami ,預估費用都是 每月 $14.20 (一樣可自行調整 CPU + Memory 降低花費).
搬家步驟:
Linode
備份 wordpress
root@localhost:~# tar zcvf benjr.tar.gz /var/www/benjr
備份資料庫
root@localhost:~# mysqldump -u root -p benjr > benjr.sql
Enter password:
root@localhost:~# mv benjr.* /home/ben/
Google Cloud Platform
我們架站需要一組固定 IP ,系統預設對外 IP 為臨時的,須到 VPC 網路 / 外部 IP 位址 ,選擇靜態 IP(需要注意一下,未使用的 IP 位址是需要額外付費的,請參考 – https://benjr.tw/102081 ).還要到申請網域的網站修改網址對應 IP 的紀錄.
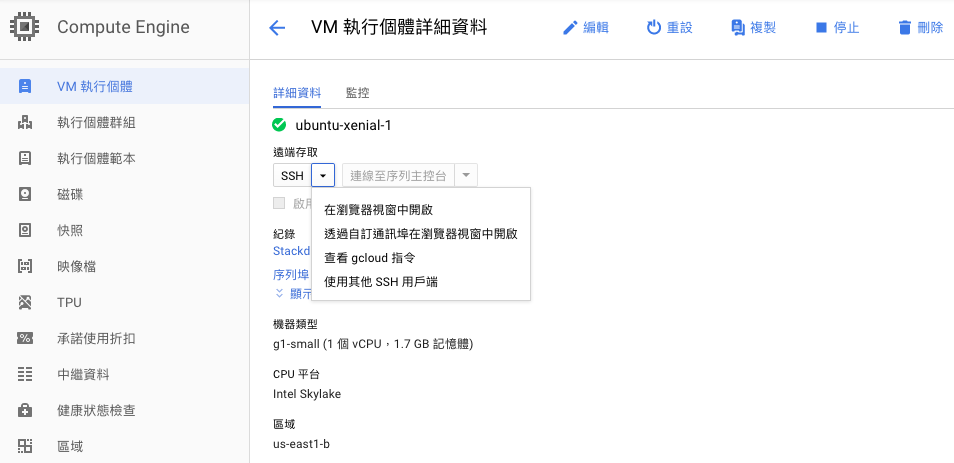
IP 已經設定好要怎麼 SSH 連線到創建的虛擬機,在 Compute Engine / VM 執行個體 點選已經創建好了虛擬機.
在 VM 執行個體詳細資料 / 遠端存取 / SSH 在瀏覽器視窗中開啟,如果要使用一般 SSH 工具,需要設定金鑰,請參考 – https://benjr.tw/99645
在使用 WordPress 前你必須先確定你的系統軟體符合他的需求
- Web server PHP 版本需要大於 7.2 (Ubuntu 16.04 預設為 7.0.x,一樣可以用),可選擇 Nginx 或是 Apache (這次的選擇)
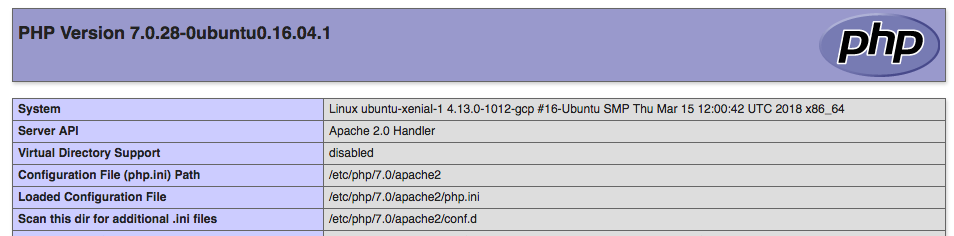
ben@ubuntu-xenial-1:~$ sudo su -
root@ubuntu-xenial-1:~# apt-get update
root@ubuntu-xenial-1:~# apt-get upgrade
root@ubuntu-xenial-1:~# apt-get install apache2
root@ubuntu-xenial-1:~# apt-get install php libapache2-mod-php php-mysql
root@ubuntu-xenial-1:~# systemctl restart apache2
root@ubuntu-xenial-1:~# systemctl status apache2
root@ubuntu-xenial-1:~# php -v
PHP 7.0.28-0ubuntu0.16.04.1 (cli) ( NTS )
Copyright (c) 1997-2017 The PHP Group
Zend Engine v3.0.0, Copyright (c) 1998-2017 Zend Technologies
    with Zend OPcache v7.0.28-0ubuntu0.16.04.1, Copyright (c) 1999-2017, by Zend Technologies
順便試一下 PHP 功能運作是否正常.你可以用自己喜歡的編輯器來鍵入下面的內容.
root@ubuntu-xenial-1:~# nano /var/www/html/phpinfo.php
<?php
phpinfo();
?>
開啟你的網頁連上你 http://yourIP/phpinfo.php ,如果一切運作正常那你會看到和下面一樣的網頁.
如果需要設定 Virtual Host 詳細說明請參考 – https://benjr.tw/11082
root@ubuntu-xenial-1:~# vim /etc/apache2/sites-available/000-default.conf
<VirtualHost *:80>
DocumentRoot /var/www/benjr
ServerName benjr.tw
</VirtualHost>
透過 SSH 就可以把剛剛在 Linode 備份的 wordpress 與 資料庫 複製到 Google 虛擬機.
root@ubuntu-xenial-1:~# scp ben@your_host:/home/ben/benjr.* ./
還原 wordpress
root@ubuntu-xenial-1:~# tar zxvf benjr.tar.gz
root@ubuntu-xenial-1:~# mv var/www/benjr /var/www/
- MySQL 版本需要大於 5.6 或是 MariaDB 10.0 (Ubuntu 16.04 使用)以上的版本.
root@ubuntu-xenial-1:~# apt-get install mariadb-server
root@ubuntu-xenial-1:~# mysql_secure_installation

NOTE: RUNNING ALL PARTS OF THIS SCRIPT IS RECOMMENDED FOR ALL MariaDB
      SERVERS IN PRODUCTION USE!  PLEASE READ EACH STEP CAREFULLY!

In order to log into MariaDB to secure it, we'll need the current
password for the root user.  If you've just installed MariaDB, and
you haven't set the root password yet, the password will be blank,
so you should just press enter here.

Enter current password for root (enter for none):
OK, successfully used password, moving on...

Setting the root password ensures that nobody can log into the MariaDB
root user without the proper authorisation.

Set root password? [Y/n] y
New password:
Re-enter new password:
Password updated successfully!
Reloading privilege tables..
 ... Success!


By default, a MariaDB installation has an anonymous user, allowing anyone
to log into MariaDB without having to have a user account created for
them.  This is intended only for testing, and to make the installation
go a bit smoother.  You should remove them before moving into a
production environment.

Remove anonymous users? [Y/n] y
 ... Success!

Normally, root should only be allowed to connect from 'localhost'.  This
ensures that someone cannot guess at the root password from the network.

Disallow root login remotely? [Y/n] y
 ... Success!

By default, MariaDB comes with a database named 'test' that anyone can
access.  This is also intended only for testing, and should be removed
before moving into a production environment.

Remove test database and access to it? [Y/n] y
 - Dropping test database...
 ... Success!
 - Removing privileges on test database...
 ... Success!

Reloading the privilege tables will ensure that all changes made so far
will take effect immediately.

Reload privilege tables now? [Y/n] y
 ... Success!

Cleaning up...

All done!  If you've completed all of the above steps, your MariaDB
installation should now be secure.

Thanks for using MariaDB!
還原資料庫
root@ubuntu-xenial-1:~# mysql -u root -p
Enter password:
MariaDB [(none)]> create database benjr;
MariaDB [(none)]> grant all privileges on benjr.* to user@localhost identified by 'your.password' ;
MariaDB [(none)]> exit;
root@ubuntu-xenial-1:~# mysql -u root -p benjr < benjr.sql

Enter password:
- HTTPS support – 非必要,有機會再討論.
其他相關設定:
WordPress 固定網址設定(Apache),詳細說明請參考 – https://benjr.tw/10918
root@ubuntu-xenial-1:~# vim /etc/apache2/sites-available/000-default.conf
<Directory /var/www/benjr>
        Options Indexes FollowSymLinks
        AllowOverride All
        Require all granted
</Directory>
root@ubuntu-xenial-1:~# a2enmod rewrite
root@ubuntu-xenial-1:~# systemctl restart apache2
root@ubuntu-xenial-1:~# vim /var/www/benjr/.htaccess
# BEGIN WordPress
<IfModule mod_rewrite.c>
RewriteEngine On
RewriteBase /
RewriteRule ^index\.php$ - [L]
RewriteCond %{REQUEST_FILENAME} !-f
RewriteCond %{REQUEST_FILENAME} !-d
RewriteRule . /index.php [L]
</IfModule>
# END WordPress
禁止瀏覽 WordPress 檔案和資料夾清單需要在 .htaccess 加入下面的敘述,詳細關於 .htaccess 設定請參考 – https://benjr.tw/100916 .
root@ubuntu-xenial-1:~# vim /var/www/benjr/.htaccess
Options All -Indexes
最後原先的備份 backup 策略也要複製到新的虛擬機上.