![]()
多核心的處理器最早是透過對稱多處理 SMP (Symmetric multiprocessing) 的方式,所有的 CPU 核心對於記憶體的存取是共用的,但是當 CPU 核心數太多時反而是一個限制,當不同的處理器需要交換資料時都是透過系統匯流排將資料儲存在記憶體中,但當核心數多時,交換資料變成常態, CPU 與記憶體之間的速度跟不上 CPU 處理的速度.越多的核心反而讓整體效能降低.
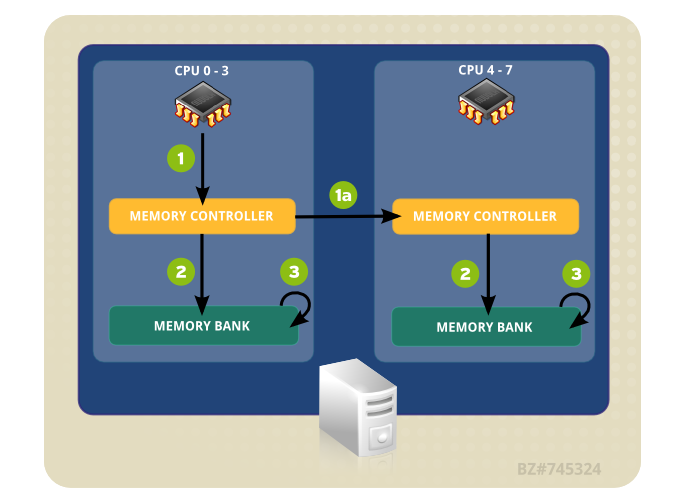
因此有了 Intel 的 NUMA (Non-uniform memory access),他把 CPU 與記憶體區分成不同的結點 Node (不同的 CPU 各自擁有記憶體),彼此的 CPU 節點再透過 QPI (Intel QuickPath Interconnect) , UPI(Ultra Path Interconnect) 這個介面做溝通.

圖片出自於 https://access.redhat.com/documentation/zh-tw/red_hat_enterprise_linux/6/html/performance_tuning_guide/main-cpu
關於 CPU 的演進可以參考鳥哥網站 http://linux.vbird.org/linux_enterprise/cputune.php
測試環境為 Ubuntu 16.04 64bits
來看一下我系統的下的 NUMA 狀態,可以使用 numactl , numastat 這兩個 指令,為非預設安裝,需要透過 apt 來安裝.
root@ubuntu:~# apt-get install numactl
Reading package lists... Done
Building dependency tree
Reading state information... Done
The following package was automatically installed and is no longer required:
  ubuntu-core-launcher
Use 'apt autoremove' to remove it.
The following NEW packages will be installed:
  numactl
0 upgraded, 1 newly installed, 0 to remove and 0 not upgraded.
Need to get 30.2 kB of archives.
After this operation, 117 kB of additional disk space will be used.
Get:1 http://tw.archive.ubuntu.com/ubuntu xenial/universe amd64 numactl amd64 2.0.11-1ubuntu1 [30.2 kB]
Fetched 30.2 kB in 0s (40.9 kB/s)
Selecting previously unselected package numactl.
(Reading database ... 205238 files and directories currently installed.)
Preparing to unpack .../numactl_2.0.11-1ubuntu1_amd64.deb ...
Unpacking numactl (2.0.11-1ubuntu1) ...
Processing triggers for man-db (2.7.5-1) ...
Setting up numactl (2.0.11-1ubuntu1) ...
numastat
透過 numastat 可以看到我的系統有兩個 Node (Node0 與 Node1)
root@ubuntu:~# numastat -c -z -m -n

Per-node system memory usage (in MBs):
                Node 0 Node 1  Total
                ------ ------ ------
MemTotal         32733 32768 65501
MemFree            132 20847 20979
MemUsed          32601 11920 44522
Active           31773 11130 42903
Inactive             8     2    10
Active(anon)     31773 11128 42902
Inactive(anon)       7     1     9
Active(file)         0     1     1
Inactive(file)       7     1     1
FilePages            5     3     8
Mapped               2     1     1
AnonPages        31778 11129 42908
Shmem                0      0    1
KernelStack          1     1     2
PageTables          65    38   104
Slab                14    18    33
SReclaimable         2     5     8
SUnreclaim          11    13    25
AnonHugePages    31352      0 31352

Per-node numastat info (in MBs):
               Node 0 Node 1  Total
               ------ ------ ------
Numa_Hit         6878  5606 12484
Numa_Miss          21 59793 59814
Numa_Foreign    59793    21 59814
Interleave_Hit     83    83   167
Local_Node       4791  2233  7025
Other_Node       2107 63166 65274
參數說明:
- -c
使用比較窄空間(減少空白)的方式顯示 NUMA 資訊. - -z
忽略欄,列中任何有零的. - -m
顯示每一個節點的記憶體使用資訊 (MemTotal ,MemFree ,MemUsed ,Active ,Inactive ,Active(anon) ,Inactive(anon) ,Active(file) ,Inactive(file) ,FilePages ,Mapped ,AnonPages ,Shmem ,KernelStack ,PageTables ,Slab ,SReclaimable ,SUnreclaim ,AnonHugePages) - -n
除了節點的資訊外,還有 total 的資訊.
Per-node numastat info 數值說明:
- numa_hit
Memory successfully allocated on this node as intended.
記憶體成功配置至此節點 - numa_miss
Memory allocated on this node despite the process preferring some different node. Each numa_miss has a numa_foreign on another node.
原先預定的節點的記憶體不足,而配置至此節點. numa_miss 與另一個節點的 numa_foreign 是相對應的. - numa_foreign
Memory intended for this node, but actually allocated on some different node. Each numa_foreign has a numa_miss on another node.
原先預定至此節點的記憶體但被配置至其他節點上. numa_foreign 與另一個節點的 numa_miss 是相對應的. - interleave_hit
Interleaved memory successfully allocated on this node as intended.
The number of interleave policy allocations that were intended for a specific node and succeeded there. - local_node
Memory allocated on this node while a process was running on it.
該節點上的程序成功配置到該節點的記憶體空間. - other_node
Memory allocated on this node while a process was running on some other node.
該節點上的程序,成功配置到另一個節點的記憶體空間.
numactl
指令參數參考
–hardware , -H
Show inventory of available node on the system.
root@ubuntu:~# numactl --hardware
available: 2 nodes (0-1)
node 0 cpus: 0 1 2 3 8 9 10 11
node 0 size: 3939 MB
node 0 free: 3034 MB
node 1 cpus: 4 5 6 7 12 13 14 15
node 1 size: 4029 MB
node 1 free: 3468 MB
node distances:
node   0   1
  0:  10  20
  1:  20  10
–show, -s
Show NUMA policy setting of the current process.
root@ubuntu:~# numactl --show
policy: default
preferred node: current
physcpubind: 0 1 2 3 4 5 6 7 8 9 10 11 12 13 14 15
cpubind: 0 1
nodebind: 0 1
membind: 0 1
command {arguments …}
透過 numacl 可以限制後面接的指令要使用哪一顆處理器或是記憶體.
# numactl [ --all ] [ --interleave nodes ] [ --preferred node ] [ --mem‐bind nodes ] [ --cpunodebind nodes ] [ --physcpubind cpus ] [--localalloc ] [--] command {arguments ...}
參數說明:
- –all
所有的 CPU 節點都可以使用. - –interleave=nodes
Memory interleave ,記憶體分配採用 Round Robin(標準輪詢的方式)來指定,可指定多個節點 (以逗號隔開,如 0,1),這個參數搭配測試記憶體程式如 stressapptest ,在程式執行分配記憶體時,會發現 other_node 有增加的現象(該節點上的程序,成功配置到另一個節點的記憶體空間),代表 QPI (UPI) 傳輸會增加? 關於 stressapptest 使用請參考 https://benjr.tw/96740root@ubuntu:~# numactl --interleave=0,1 ./stressapptest -s 180 -M 3200
- –preferred=node
記憶體分配到指定的節點,不同於 –mem‐bind 當記憶體無法分配至指定的節點上,系統就會分配到其它節點. - –membind=nodes
指定特定節點分配記憶體,不同於 –preferred 當記憶體無法分配至指定的節點上,分配會失敗. - –cpunodebind=nodes
指定特定一或多個節點上的 CPU 執行指令,利用 lmbench 的工具 lat_mem_rd 來進行測試時,限制 MEM (–membind=0), CPU (–cpunodebind=0 或是 –physcpubind=0) ,關於 lmbench 請參考 https://benjr.tw/98076root@ubuntu:~# numactl --membind=0 --cpunodebind=0 ./lat_mem_rd 2000 128
- –physcpubind=cpus
指定特定處理器(依據 /proc/cpuinfo 實際可以使用的來指定)執行指令,可以一次指定多個(以逗號隔開,如 1,5,7),類似於 cpuset (taskset) 來指定,不同於 cpunodebind (指定特定一或多個節點上的 CPU).root@ubuntu:~# numactl --physcpubind=0,1,4,5 ./stressapptest -s 180 -M 3200
- –localalloc
記憶體分配至現有節點上.
One thought on “NUMA (Non-uniform memory access)”