![]()
Kernel 編譯步驟
Step 0 : 所需套件
# rpm -ivh kernel-<VERSION>.src.rpm
Step 1 : Kernel-source 編譯步驟:
# rpmbuild -bp –target=x86_64 kernel-<VERSION>.spec
Step 2 : Patch 至最新版本的核心
# patch -p1 < ../path-<VERSION><VERSION>
Step 3 : 編譯 .config
# vi Makefile
# make mrproper
# cp /boot/config-<VERSION><VERSION> .config
# make oldconfig
# make xconfig
Step 4 : 編譯 Kernel
# make dep (kernel 2.4) ;make (kernel 2.6)
# make bzImage (kernel 2.4)
Step 5 : 編譯 modules
# make modules
# make modules_install
Step 6 : 安裝最後步驟
# make install
Step 0 : 所需套件
如果需要編譯核心,我們需要下列幾個套件.
Red Hat Enterprise Linux 3/ 4 移除了 kernel-source 套件。需要核心原始碼的使用者可以在http://ftp.redhat.com/pub/redhat/linux/enterprise/5Server/en/os/SRPMS/ 找到 kernel.src.rpm。
之前在編譯 SAS 的 Chipset modules 時發生了一件怪事,就是不管怎麼編譯修改路徑或是修改 Makefile 都不行,不能編就是不能編,打電話給廠商來支援,幸好廠商也很有經驗,其實 RHEL5 的 kernel-devel-2.6.18-92.el5.x86_64.rpm 不是一個完整的核心,常常缺東缺西,像這一次要編譯的是一個 SAS 的 Chipset 他需要像是 scsi_mod.c 等的檔案,但是 RHEL5 的 kernel-devel-2.6.18-92.el5.x86_64.rpm 就是沒有.所以解決方式就是去 http://kernel.org/ 下載類似版本的核心重新編譯過,在編輯 SAS 的 Chipset modules 時指定核心路徑到新的 kernel 下就將所有的問題迎刃而解,其實真的不是很懂 RedHat 的作法!!!
如果習慣用 kernel source rpm 在下面的連結也是可以使用的!!
http://rpm.pbone.net/index.php3/stat/4/idpl/5531198/com/kernel-devel-2.6.18-53.el5.i686.rpm.html
如果你是要使用一個全新版的kernel請至 http://www.kernel.org 下載你所需的版本.而且不需要步驟一,請直接跳至步驟二。更新至最新的kernel。
Step 1 : Kernel-source 編譯步驟:
安裝 kernel-<VERSION>.src.rpm(根據預設的 RPM 設定,本套件中的檔案會寫到 /usr/src/redhat/ 中)
[root@benjr root]# rpm -ivh kernel-<VERSION>.src.rpm
切換目錄到 /usr/src/redhat/SPECS/,然後執行以下指令:
[root@benjr root]# rpmbuild -bp –target=<ARCH> kernel-<VERSION>.spec
這裡的
根據預設的 RPM 設定,這核心樹將會位於 /usr/src/redhat/BUILD/。
至於
- i686:x86 32bites CPU
- x86-64:x86 64 bites CPU
- ppc64:Power CPU
- ppc64iseries:Power CPU
- s390:IBM CPU
- sparc:Sun CPU
- sparc64:Sun CPU
- ppc:Power CPU
- ia64:Intel CPU
- athlon:AMD CPI
如果你不清楚自己機器CPU的型號可以用下面的指令來察看。
[root@benjr root]# cat /proc/cpuinfo
processor : 0
vendor_id : GenuineIntel
cpu family : 15
model : 2
model name : Intel(R) Xeon(TM) CPU 2.60GHz
stepping : 7
cpu MHz : 2592.519
cache size : 512 KB
fdiv_bug : no
hlt_bug : no
f00f_bug : no
coma_bug : no
fpu : yes
fpu_exception : yes
cpuid level : 2
wp : yes
flags : fpu vme de pse tsc msr pae mce cx8 apic mtrr pge mca cmov pat pse36 clflush dts acpi mmx fxsr sse sse2 ss ht tm pbe cid
bogomips : 5111.80
可以看到我的機器的CPU型號是屬於Intel Xeon EM64T的所以我就可以下參數為x86_64
[root@benjr root]# cd /usr/src/redhat/SPECS/
[root@benjr SPECS]# rpmbuild -bp –target=x86_64 kernel-<VERSION><VERSION>.spec
根據預設的 RPM 設定,這核心樹將會位於 /usr/src/redhat/BUILD/kernel-<VERSION><VERSION><VERSION>。
為了方便我喜歡將他搬到 /usr/src/目錄下。(一般編譯核心的目錄)
[root@benjr SPECS]# cd /usr/src/redhat/BUILD
[root@benjr BUILD]# mv kernel-<VERSION>linux-<VERSION><VERSION><VERSION> /usr/src/
在編譯kernel前你最好對你的機器有充分的了解,你可以試著用下面的指令來看你所有的硬體裝置。
[root@benjr root]# lspci
00:00.0 Host bridge: Intel Corporation E7500 Memory Controller Hub (rev 03)
00:00.1 Class ff00: Intel Corporation E7500/E7501 Host RASUM Controller (rev 03)00:02.0 PCI bridge: Intel Corporation E7500/E7501 Hub Interface B PCI-to-PCI Bridge (rev 03)
00:1d.0 USB Controller: Intel Corporation 82801CA/CAM USB (Hub #1) (rev 02)
00:1d.1 USB Controller: Intel Corporation 82801CA/CAM USB (Hub #2) (rev 02)
00:1e.0 PCI bridge: Intel Corporation 82801 PCI Bridge (rev 42)
00:1f.0 ISA bridge: Intel Corporation 82801CA LPC Interface Controller (rev 02)
00:1f.1 IDE interface: Intel Corporation 82801CA Ultra ATA Storage Controller (rev 02)
00:1f.3 SMBus: Intel Corporation 82801CA/CAM SMBus Controller (rev 02)
01:1c.0 PIC: Intel Corporation 82870P2 P64H2 I/OxAPIC (rev 03)
01:1d.0 PCI bridge: Intel Corporation 82870P2 P64H2 Hub PCI Bridge (rev 03)
01:1e.0 PIC: Intel Corporation 82870P2 P64H2 I/OxAPIC (rev 03)
01:1f.0 PCI bridge: Intel Corporation 82870P2 P64H2 Hub PCI Bridge (rev 03)
04:03.0 VGA compatible controller: ATI Technologies Inc Rage XL (rev 27)
04:04.0 Ethernet controller: Intel Corporation 82557/8/9 [Ethernet Pro 100] (rev 0d)
04:05.0 Ethernet controller: Intel Corporation 82557/8/9 [Ethernet Pro 100] (rev 0d)
Step 2 : Patch 至最新版本的核心
如果你想更新你的核心至最新的版本,不需要重新下載全部的kernel只需下載Patch檔案就可以將他更新至你所需要的版本。
下面的示範是使用kernel 2.6.1 並且更新至2.6.2版本。
首先你必須要有完整的kernel 2.6.1的檔案,以及patch 2.6.2 的檔案。
這些都可以在 http://www.kernel.org 找到你所需要的檔案。
[root@benjr root]# cp linux-2.6.1.tar.bz2 /usr/src/
[root@benjr root]# cp patch-2.6.2.bz2 /usr/src/
[root@benjr root]# cd /usr/src
[root@benjr src]# bunzip2 linux-2.6.1.tar.bz2
[root@benjr src]# tar xvf linux-2.6.1.tar
[root@benjr src]# bunzip2 patch-2.6.2.bz2
[root@benjr src]# ls -l
total 12040
drwxr-xr-x 4 root root 4096 Dec 9 14:33 kernels
drwxrwxr-x 18 1046 1046 4096 Dec 22 21:52 linux-2.6.1
-rwxr-xr-x 1 root root 12281798 Dec 22 21:51 patch-2.6.2
drwxr-xr-x 7 root root 4096 Dec 9 14:33 redhat
[root@benjr src]# cd linux-2.6.1
[root@benjr src]# patch -p1 < ../path-2.6.2
………略………
patching file security/selinux/include/objsec.h
patching file security/selinux/netif.c
patching file security/selinux/ss/Makefile
patching file sound/core/sound.c
patching file sound/oss/dmabuf.c
patching file sound/oss/soundcard.c
patching file sound/oss/trident.c
patching file sound/oss/trident.h
patching file sound/pci/intel8x0.c
patching file sound/pcmcia/vx/vx_entry.c
patching file sound/sound_core.c
patching file sound/usb/usbaudio.c
如果看到上面的就代表你已經成功更新至你所需的kernel版本。
如果你是使用RedHat 所提供的 kernel-<VERSION>.src.rpm 方法也是一樣。不過有一點要注意每個核心的 patch 僅有針對前一版的核心來分析而已。舉例來說目前你使用kernel-2.6.1你想更新至kernel-2.6.5時,你必須下載patch-2.6.2,patch-2.6.3,patch-2.6.4 和 patch-2.6.5 依序更新下來才成。
note:Patch小講
Patch主要是使用指令 diff 所產生的檔案來分析兩個檔案的不同,進而將舊版的檔案內容更新成新版的檔案,來看看下面的例子,就會很清楚的知道Patch的原理。我建立了兩個檔案 file-1.1 和 file-1.2,file-1.2 是新的檔案。
[root@benjr root]# cat file-1.1
echo “I love Ben"
echo “You love Ben"
echo “Actually,everybody does"
echo “Just kidding"
[root@benjr root]# cat file-1.2
echo “I love Ben"
echo “You love Ben"
echo “Actually,everybody else doesn’t"
echo “Just kidding"
[root@benjr root]# diff file-1.1 file-1.2
3c3
< echo “Actually,everybody does"
—
>echo “Actually,everybody else doesn’t"
可以很清楚的看到這兩個檔案只有第三行不同。首先我們先建立兩個檔案的差異檔。
[root@benjr root]# diff -Naur file-1.1 file-1.2 >patch-1.2
[root@benjr root]# cat patch-1.2
— new 2005-12-23 10:37:40.000000000 +0800
+++ old 2005-12-23 10:38:15.000000000 +0800
@@ -1,4 +1,4 @@
echo “I love Ben"
echo “You love Ben"
-echo “Actually,everybody does"
+echo “Actually,everybody else doesn’t"
echo “Just kidding"
在建立的patch差異檔中,指出 “-“,“+”就是他們檔個檔案中不同的部份。有了檔案我們就可以進行Patch的動作。
[root@benjr root]# patch -p0 < patch-1.2
Patching file file-1.1
動作完成,現在可以看看 file-1.1的內容。
[root@benjr root]# cat file-1.1
echo “I love Ben"
echo “You love Ben"
echo “Actually,everybody else doesn’t"
echo “Just kidding"
可以清楚的看到 file-1.1 的內容已經變成 file-1.2 的內容,這就是 Patch 的運作原理。這邊我還要特別說明 patch 的參數 -Pnum。
那是與 patch 檔案裡面列出的第一行有關的資訊。假如在 patch 檔案第一行寫的是這樣:
— /usr/src/linux-2.6.1
那麼當我執行 “patch -p0 < patch“ 時,則更新的檔案是 “/usr/src/linux-2.6.1” ,如果 “patch -p1 < patch” ,則更新的檔案為 “usr/src/linux-2.6.1″,如果 “patch -p3< patch” 則更新 “inux-2.6.1″,也就是說, -Pnum 那個 num 代表 “拿掉幾個斜線(/)” 的意思。
現在準備工作都結束了,可以開始進行編譯 kernel 的工作。
Step 3 : 編譯 .config
1.編譯成 Modules 或 Static
在編譯前我們就要先想清楚,每項功能是要編譯成 modules 或 static(包在核心擋中),static的好處世是統一開機就可以使用這項功能,不用在像 modules 還要 insert or remove等動作。但是如果都編譯成 static 又會造成 kernel 太大而使得開機變慢,或可能系統的穩定。最好的方式是將一般以及開機所需的編譯成 static 至於其他一些就可以編譯成 modules.
2.指定唯一kernel名稱
為了不與原先的 kernel 名稱重覆所以我們需要一個這台電腦 kernel 唯一的名稱。
[root@benjr root]# cd /usr/src/linux-<VERSION>
[root@benjr linux-<VERSION>]# vi Makefile
VERSION = 2
PATCHLEVEL = 6
SUBLEVEL = 9
EXTRAVERSION = – prep
NAME=AC 1
………略………
後面的 EXTRAVERSION = – prep和 NAME=AC 1 都可以依據你的喜歡來命名。至於VERSION = 2 ,PATCHLEVEL = 6 以及 SUBLEVEL = 9 是 kernel 的版本,不建議修改。 3.清除舊有編譯過 kernel 的檔案如果你以前已經在這一台機器編譯過 kernel ,可能會留下之前編譯過的檔案所以在開始前建議先清除舊有的檔案。不過他會連舊有的 .config 都清掉。所以你可以先將舊有的 .config 備份起來。
[root@benjr linux-<VERSION>]# cp .config config.bak
[root@benjr linux-<VERSION>]# make mrproper
其他清除的參數還有make clean,make distclean 但功能上都有些許的不同,下面是他 Makefile 檔中的說明
# Cleaning is done on three levels.
# make clean Delete most generated files。Leave enough to build external modules
# make mrproper Delete the current configuration, and all generated files
# make distclean Remove editor backup files, patch leftover files and the like
Step 4.config檔案的設定
編譯核心需要 .config 這個設定擋才能編譯。這個檔案的內容包括了哪個功能需要編譯在 kernel 內或者編譯成 modules都是記載在這個。
而系統上提供了四種方式來建立 .config,接下來說明。
I.config:
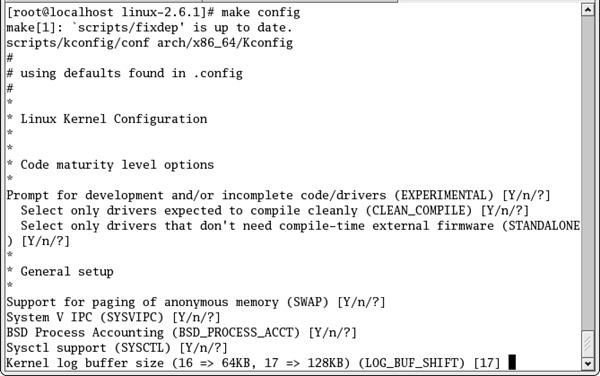
[root@benjr linux-<VERSION>]# make config

這是最早的方式來編譯 kernel ,系統會一步一步的問你,哪個功能需要編譯在 kernel 內或者編譯成 modules。
除非你有過人的意志力,實在不建議你使用這一種方式來編譯。
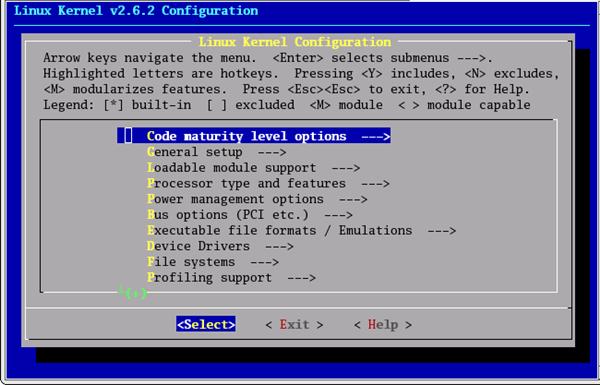
II.menuconfig:
[root@benjr linux-<VERSION>]# make menuconfig

這是有選單方式來進行選擇。方便多了,如果上面的文字模式都不習慣下面還提供了圖形介面方式。
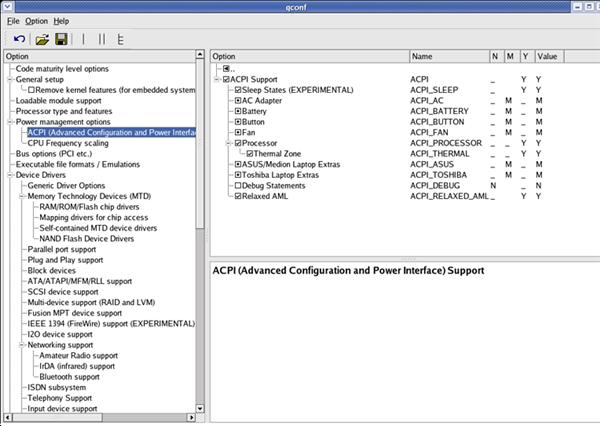
III.xconfig or gconfig
[root@benjr linux-<VERSION>]# make xconfig
[root@benjr linux-<VERSION>]# make gconfig

前面都是適合在文字模式來使用。如果你有使用 x-window 那建議你使用這一種方式,清楚又有說明文件的配合。
IV.oldconfig:
這一種方式是自動產生,不用自己手動來選擇哪些須要編譯在 kernel 內或者編譯成 modules。那自動產生是依據什麼來產生 .config 擋。
如果在編譯核心目錄下 /usr/src/linux-<VERSION>/ 有.config檔,則系統會直接採用。只會詢問目前核心跟 .config 有更新的部份是要編譯在 kernel 內或者編譯成 modules。
[root@benjr linux-<VERSION>]# make oldconfig
make[1]: `scripts/fixdep’ is up to date.
scripts/kconfig/conf -o arch/x86_64/Kconfig
#
# using defaults found in .config
#
如果你沒有 .config 檔案則系統會去拷貝一份目前核心所使用的 .config 而這個檔案就存在 /boot/config-<VERSION>內。
[root@benjr linux-<VERSION>]# make oldconfig
make[1]: `scripts/fixdep’ is up to date.
scripts/kconfig/conf -o arch/x86_64/Kconfig
#
# using defaults found in /boot/config-2.6.9-22.ELsmp
所以最按步就班的編譯核心方式為。
[root@benjr linux-<VERSION>]# cd /usr/src/linux-<VERSION><VERSION>
[root@benjr linux-<VERSION>]# cp /boot/config-<VERSION><VERSION>.config
[root@benjr linux-<VERSION>]# make oldconfig
[root@benjr linux-<VERSION>]# make xconfig
note:
Red Hat Enterprise Linux 4 所使用的特定核心設定都位於 /configs/ 目錄中。舉例來說,x86_64 SMP 設定檔的名稱為 /configs/kernel-<VERSION>-x86_64-smp.config。請執行以下指令,將所需的設定檔放到適當的位置以開始建立:cp <DESIRED-FILE>./.config
編譯 Kernel
前面的都是準備步驟現在才要開始將這些編成 kernel 檔。有一點要注意的是就是kernel 2.4 和 2.6 有一點不太一樣。
kernel 2.4
[root@benjr linux-<VERSION>]# make dep
[root@benjr linux-<VERSION>]# make bzImage
kernel 2.6
[root@benjr linux-<VERSION>]# make or make bzImage
在目錄 ./arch/$ARCH/boot 就會產生 bzImage 這就是我們開機所需要的 kernel。
$ARCH 就是你機器CPU的種類。
Step 5 : 編譯 modules
還記得有些功能我們並沒將他包在 kernel 內。所以接來就是要將 modules 準備好。
[root@benjr linux-<VERSION>]# make modules
[root@benjr linux-<VERSION>]# make modules_install
這樣就會在目錄 /lib/modules/kernel-version 產生所需的 modules。
Step 6 : 安裝最後步驟
最後步驟就是將需要的檔案各就各位,首先 /boot 需要 vmlinuz(kernel) 和 system.map
[root@benjr linux-<VERSION>]# cp arch/i386/boot/bzImage /boot/vmlinuz-<VERSION>
[root@benjr linux-<VERSION>]# cp System.map /boot/System.map-<VERSION>
以及 RAM Disk(initrd.img)
[root@benjr linux-<VERSION>]# mkinitrd initrd-<VERSION>.img <KERNEL-VERSION>
[root@benjr linux-<VERSION>]# cp initrd-<VERSION>.img /boot/
和告訴GRUB這一次開機由新的 kernel 和 initrd.img 開機。
[root@benjr linux-<VERSION>]# vi /boot/grub/grub.conf
# grub.conf generated by anaconda
#
# Note that you do not have to rerun grub after making changes to this file
# NOTICE: You have a /boot partition. This means that
# all kernel and initrd paths are relative to /boot/, eg.
# root (hd0,0)
# kernel /vmlinuz-version ro root=/dev/VolGroup00/LogVol00
# initrd /initrd-version.img
#boot=/dev/sda
default=1
timeout=5
splashimage=(hd0,0)/grub/splash.xpm.gz
hiddenmenu
title Red Hat Enterprise Linux AS (2.6.9-prep)
root (hd0,0)
kernel /vmlinuz-2.6.9-prep ro root=/dev/VolGroup00/LogVol00 rhgb quiet
initrd /initrd-2.6.9-prep.img
黑體字就是我們需要加的,至於版本請依自己的核心版本來編號。其實也不用這麼辛苦,用下面指令一樣可以幫你作好所有的工作。
[root@benjr linux-<VERSION>]# make install
重新開機吧!!!!!!
2 thoughts on “Linux – 編譯核心”