![]()
測試環境為 CentOS7 + MySQL 5.7.43-1 (虛擬機) , 安裝請參考 – https://benjr.tw/105806
先來看一下 Master Slave Replication 架構
為了避免硬碟損毀進而造成資料庫遺失,可以使用主從式資料庫 (Master Slave Replication) 的技術. Master 的資料庫會透過 Binlog 的機制將資料同步到 Slave , Master 不是真的會把資料複製一份到 Slave,而是 Master 會把所有會變動到資料的指令儲存到 Binlog ,其中包含 CREATE , ALTER TABLE , INSERT , UPDATE , DELETE … (不包含 SELECT 和 SHOW 這一類不影響資料的) .
Slave 透過 IO Thread 的方式 ( IO Thread 會請 Master 發送 Binlog 有更新的部分,並儲存至 Slave 的 Relay Log ) , Slave 再透過 SQL Thread 讀取剛剛 IO Thread 儲存的 Relay Log 來執行有更新的部分(指令), 讓兩邊透過非同步的方式來同步資料.
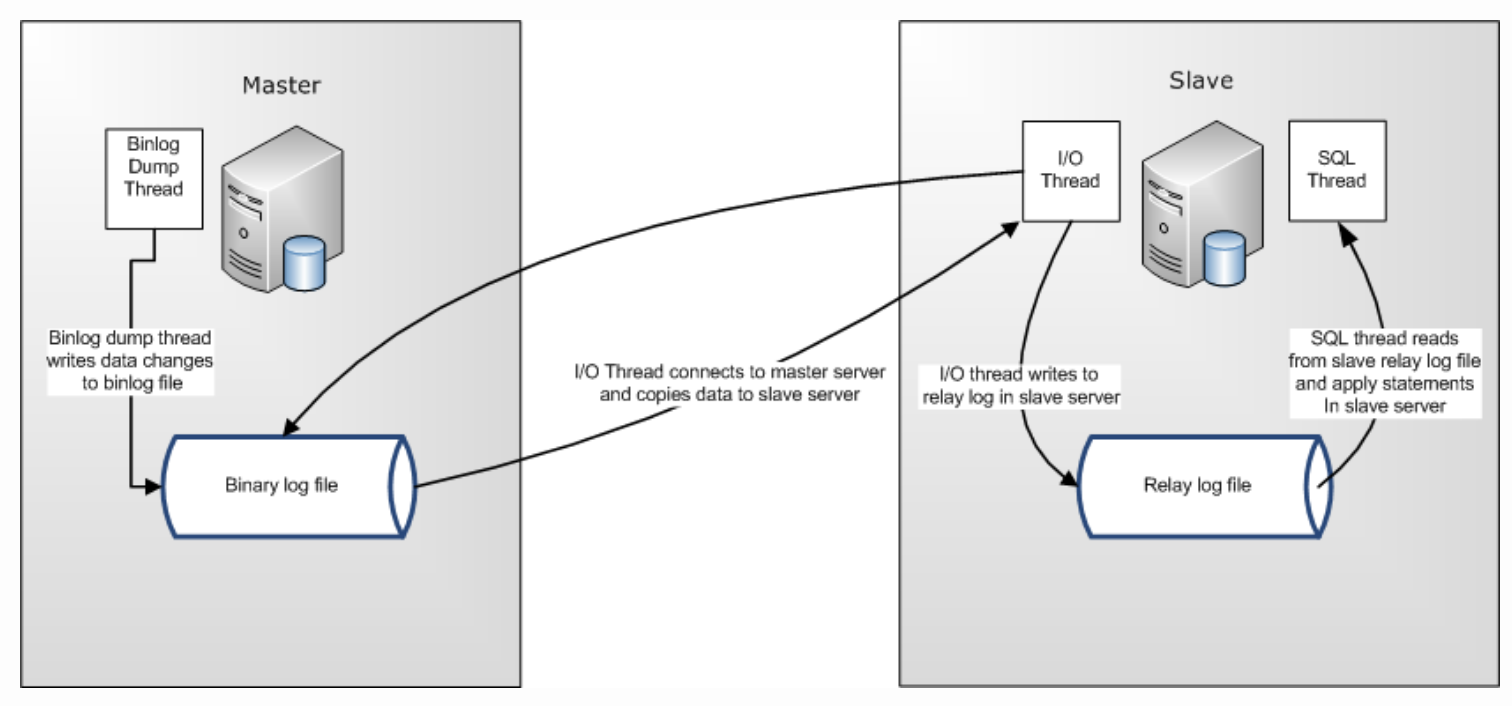
圖片出自於 – https://gilbertasm.github.io/mysql/2018/04/15/understanding-mysql-replication-coordinates.html
關於詳細 Master Slave Replication 請參考 – https://benjr.tw/102278
如果要把多台 Master 的資料寫到同一台 Slave ,這時候可以使用 Multi-Source Replication (MySQL 5.7.6 以上版本有支援)
- Master-1 IP : 192.168.31.144
- Master-2 IP : 192.168.31.150
- Slave IP : 192.168.31.151
安裝/設定 Multi-Source Replication
-
Master-1
在 my.cnf 設定檔 [mysqld] 區塊加入以下與 Master replication 相關設定.
[root@localhost ~]# vim /etc/my.cnf
[mysqld]
server_id=1
log-bin=mysql-bin
binlog-format=row
binlog-do-db=testdb1
- server_id=1
server_id 需為唯一值 (不同台的 Master , Slave 不可重覆) - log-bin=mysql-bin
指定 bin log 檔案名稱. - binlog-format=row
記錄模式有三種 statement , row , mixed (沒特別研究). - binlog-do-db=testdb1
指定哪一個資料庫需要被同步.
重啟資料庫服務.
[root@localhost ~]# systemctl restart mysqld
登入資料庫系統,並新增剛剛要同步的資料庫 testdb1 (如資料庫已存在請跳過這個步驟).
[root@localhost ~]# mysql -u root -p
Enter password:
Welcome to the MySQL monitor.  Commands end with ; or \g.
Your MySQL connection id is 2
Server version: 5.7.43 MySQL Community Server (GPL)

Copyright (c) 2000, 2023, Oracle and/or its affiliates.

Oracle is a registered trademark of Oracle Corporation and/or its
affiliates. Other names may be trademarks of their respective
owners.

Type 'help;' or '\h' for help. Type '\c' to clear the current input statement.

mysql> CREATE DATABASE testdb1;
Query OK, 1 row affected (0.00 sec)
新增需要同步資料的使用者 slaveuser 與其密碼.
mysql> GRANT REPLICATION SLAVE ON *.* TO 'slaveuser'@'%' IDENTIFIED BY '111111';
Query OK, 0 rows affected (0.00 sec)

mysql> FLUSH PRIVILEGES;
Query OK, 0 rows affected (0.00 sec)
一開始 Master 的資料需要手動同步到 Slave ,需先把資料庫設定成為唯讀 (Read lock).
mysql> FLUSH TABLES WITH READ LOCK;
Query OK, 0 rows affected (0.00 sec)
這邊需要新開一個 Linux command line (離開 mysql command line 後會讓唯讀 Read lock 失效),透過 mysqldump 把所有資料備份下來並傳給 Slave (IP: 192.168.31.151)
[root@localhost ~]# mysqldump --user=root --password --databases testdb1 > testdb1.sql
[root@localhost ~]# scp testdb1.sql root@192.168.31.151:/root/
root@192.168.31.151's password:
testdb1.sql                                                                    100%  867KB  64.5MB/s   00:00
檢視一下 Master 的狀態 ,需把 File (指令同步的檔案名稱) 與 Position (同步檔案目前位於哪一行) 記錄起來,後續 Slave 設定需要使用該參數.
mysql> SHOW MASTER STATUS;
+------------------+----------+--------------+------------------+-------------------+
| File             | Position | Binlog_Do_DB | Binlog_Ignore_DB | Executed_Gtid_Set |
+------------------+----------+--------------+------------------+-------------------+
| mysql-bin.000001 |      762 | testdb1      |                  |                   |
+------------------+----------+--------------+------------------+-------------------+
1 row in set (0.00 sec)
這邊就可以取消唯讀了,因為已經紀錄 File (指令同步的檔案名稱) 與 Position (同步檔案目前位於哪一行),之後 Master 做了什麼改變,Slave 都知道可以從哪一行指令 (Position) 還原做起.
mysql> UNLOCK TABLES;
Query OK, 0 rows affected (0.00 sec)

mysql> exit
Bye
- server_id=1
-
Master-2
第二台 Master 設定跟第一台是一樣的,記得在 my.cnf 設定檔使用不同的 server_id ,其他步驟皆相同,這邊就不再贅述.
[root@localhost ~]# vim /etc/my.cnf
[mysqld]
server_id=2
log-bin=mysql-bin
binlog-format=row
binlog-do-db=testdb2
-
Slave
在 my.cnf 設定檔 [mysqld] 區塊加入以下與 Slave replication 相關設定.
[root@localhost ~]# vim /etc/my.cnf
[mysqld]
server-id = 3
master_info_repository=TABLE
relay_log_info_repository=TABLE
- server_id=2
Slave 的 server-id 設定為 3 錯開其他 Master-1 (為 1) , Master-2 (為 2) 不相同即可. - master_info_repository=TABLE
當使用 multiple replication channels 時須設定為 TABLE. 透過下面指令檢視一下設定是否為 Table .mysql> show global variables where variable_name like '%repository%'; +---------------------------+-------+ | Variable_name | Value | +---------------------------+-------+ | master_info_repository | TABLE | | relay_log_info_repository | TABLE | +---------------------------+-------+ 2 rows in set (0.00 sec)
- relay_log_info_repository=TABLE
當使用 multiple replication channels 時須設定為 TABLE.
重啟資料庫服務.
[root@localhost ~]# systemctl restart mysqld
匯入剛剛從 Master 1 得到資料庫的備份檔案.
[root@localhost ~]# mysql -u root -p < testdb1.sql
Enter password:
回到 Mysql 指令介面來完成與 Master 同步資料的指令.
[root@localhost ~]# mysql -u root -p
Enter password:
Welcome to the MySQL monitor.  Commands end with ; or \g.
Your MySQL connection id is 2
Server version: 5.7.43 MySQL Community Server (GPL)

Copyright (c) 2000, 2023, Oracle and/or its affiliates.

Oracle is a registered trademark of Oracle Corporation and/or its
affiliates. Other names may be trademarks of their respective
owners.

Type 'help;' or '\h' for help. Type '\c' to clear the current input statement.
依據不同 Master 來設定不同 channel 來進行同步.
mysql> CHANGE MASTER TO MASTER_HOST="192.168.31.144", MASTER_USER="slaveuser", MASTER_PASSWORD="111111", MASTER_LOG_FILE='mysql-bin.000001' , MASTER_LOG_POS=762 FOR CHANNEL "master-1";
Query OK, 0 rows affected (0.01 sec)
- MASTER_HOST=’192.168.31.144′
Master 的 IP. - MASTER_PORT=8198
如果使用非標準 Mysql SQL 3306 port 時,可以自行指定. - MASTER_USER=’slaveuser’
- MASTER_PASSWORD=’111111′
Master 有權限同步資料的使用者與其密碼. - MASTER_LOG_FILE=’mysql-bin.000001′
- MASTER_LOG_POS=762;
還記得剛剛在 Master 記錄起來 File 與 Position 值 (沒有記錄起來,請從備份 Master 資料庫重新做起,從前面紀錄的階段到現階段 Master 的資料庫有可能已有變化,其 Position 會不同,這會讓 Slave 與 Master 有一段時間的資料不同步的問題).+------------------+----------+--------------+------------------+-------------------+ | File | Position | Binlog_Do_DB | Binlog_Ignore_DB | Executed_Gtid_Set | +------------------+----------+--------------+------------------+-------------------+ | mysql-bin.000001 | 762 | testdb1 | | | +------------------+----------+--------------+------------------+-------------------+
啟動 Master Slave 並指定 channel.
mysql> START SLAVE FOR CHANNEL 'master-1';
Query OK, 0 rows affected (0.00 sec)
檢視一下 Slave 的狀態, Slave_IO_Running 與 Slave_SQL_Running 須為 Yes 才代表成功.
mysql> SHOW SLAVE STATUS FOR CHANNEL "master-1"\G
*************************** 1. row ***************************
               Slave_IO_State: Waiting for master to send event
                  Master_Host: 192.168.31.144
                  Master_User: slaveuser
                  Master_Port: 3306
                Connect_Retry: 60
              Master_Log_File: mysql-bin.000001
          Read_Master_Log_Pos: 762
               Relay_Log_File: localhost-relay-bin-master@002d1.000002
                Relay_Log_Pos: 320
        Relay_Master_Log_File: mysql-bin.000001
             Slave_IO_Running: Yes
            Slave_SQL_Running: Yes
              Replicate_Do_DB:
          Replicate_Ignore_DB:
           Replicate_Do_Table:
       Replicate_Ignore_Table:
      Replicate_Wild_Do_Table:
  Replicate_Wild_Ignore_Table:
                   Last_Errno: 0
                   Last_Error:
                 Skip_Counter: 0
          Exec_Master_Log_Pos: 762
              Relay_Log_Space: 544
              Until_Condition: None
               Until_Log_File:
                Until_Log_Pos: 0
           Master_SSL_Allowed: No
           Master_SSL_CA_File:
           Master_SSL_CA_Path:
              Master_SSL_Cert:
            Master_SSL_Cipher:
               Master_SSL_Key:
        Seconds_Behind_Master: 0
Master_SSL_Verify_Server_Cert: No
                Last_IO_Errno: 0
                Last_IO_Error:
               Last_SQL_Errno: 0
               Last_SQL_Error:
  Replicate_Ignore_Server_Ids:
             Master_Server_Id: 1
                  Master_UUID: 4e355a34-3506-11ee-86e3-000c29df6cc8
             Master_Info_File: mysql.slave_master_info
                    SQL_Delay: 0
          SQL_Remaining_Delay: NULL
      Slave_SQL_Running_State: Slave has read all relay log; waiting for more updates
           Master_Retry_Count: 86400
                  Master_Bind:
      Last_IO_Error_Timestamp:
     Last_SQL_Error_Timestamp:
               Master_SSL_Crl:
           Master_SSL_Crlpath:
           Retrieved_Gtid_Set:
            Executed_Gtid_Set:
                Auto_Position: 0
         Replicate_Rewrite_DB:
                 Channel_Name: master-1
           Master_TLS_Version:
1 row in set (0.00 sec)
如有 Master-2 ,依樣設定專屬 Channel 來同步資料.
mysql> CHANGE MASTER TO MASTER_HOST="192.168.31.150", MASTER_USER="slaveuser", MASTER_PASSWORD="111111", MASTER_LOG_FILE='mysql-bin.000001' , MASTER_LOG_POS=762 FOR CHANNEL "master-2";
Query OK, 0 rows affected, 2 warnings (0.01 sec)

mysql> START SLAVE FOR CHANNEL 'master-2';
Query OK, 0 rows affected (0.00 sec)

mysql> SHOW SLAVE STATUS FOR CHANNEL "master-2"\G
- server_id=2
測試 MySQL Replication
-
Master-1
在 Master testdb 資料庫新增 test 資料表,並新增一筆資料.
mysql> USE testdb1;
Database changed
mysql> CREATE TABLE test (ID INT);
Query OK, 0 rows affected (0.00 sec)

mysql> INSERT INTO test VALUES(1);
Query OK, 1 row affected (0.00 sec)

mysql> SELECT * FROM test;
+------+
| ID   |
+------+
|    1 |
+------+
1 row in set (0.00 sec)
-
Slave
在 Slave 也會看到剛剛在 Master 新增的資料.
mysql> USE testdb1;
Reading table information for completion of table and column names
You can turn off this feature to get a quicker startup with -A

Database changed
mysql> SELECT * FROM test;
+------+
| ID   |
+------+
|    1 |
+------+
1 row in set (0.00 sec)
Note: 在 Slave 新增的資料並不會同步到 Master.
遇過的問題
在 Slave 透過 SHOW SLAVE STATUS FOR CHANNEL “master-1″\G 顯示了以下訊息.
Could not find first log file name in binary log index file
這是因為 Master 的紀錄跟 Salve 不匹配, 參考文件 https://shazi.info/mysql-replication-%E8%99%95%E7%90%86-got-fatal-error-1236-from-master-%E9%A9%97%E8%AD%89-binlog-%E8%B3%87%E8%A8%8A/ .
須先到 Master 檢視狀態,把 File (指令同步的檔案名稱) 與 Position (同步檔案目前位於哪一行) 記錄起來,後續 Slave 設定需要使用該參數.
mysql> SHOW MASTER STATUS;
+------------------+----------+--------------+------------------+-------------------+
| File             | Position | Binlog_Do_DB | Binlog_Ignore_DB | Executed_Gtid_Set |
+------------------+----------+--------------+------------------+-------------------+
| mysql-bin.000001 |      762 | testdb1      |                  |                   |
+------------------+----------+--------------+------------------+-------------------+
1 row in set (0.00 sec)
還要確認 Salve binlog 的執行記錄 資料是否正確 ,如果無誤需重新執行.
mysql> CHANGE MASTER TO MASTER_LOG_FILE='mysql-bin.000001', MASTER_LOG_POS=762 for channel "master-1";
mysql> START SLAVE FOR CHANNEL "master-1"\G
mysql> SHOW SLAVE STATUS FOR CHANNEL "master-1"\G