![]()
測試環境為 CentOS 8 x86_64 虛擬機.
參考文章 – https://www.redhat.com/sysadmin/container-networking-podman
Podman 為無背景程序(Daemonless)的容器引擎, Container 可以使用 root 或 非 root 的使用者來執行,相較於 docker 是個 Daemon ,且需要操作的使用者要有 root 相同權限才能執行.
下面範例將所有容器放入 singular pod 中,這些容器可以直接使用 localhost 進行溝通.
Podman pod 中的所有 Container 共享相同的 network namespace ( namespace 命名空間是 Linux 核心 2.6.24 之後的一個功能,它可以隔離和虛擬化 processes 相關系統資源,虛擬化資源包括 process IDs, hostnames, user IDs, network access, interprocess communication, 以及 filesystems . ) ,這意味著 Containers 將使用相同的 IP 地址 , MAC 地址 與 Port mapping 網路埠映射.
使用一般使用者 ben (非 sudo user)登入並操作.
下面使用 Nginx (http server) rootless container 使用 pod 的方式讓 Container 彼此間能進行溝通.
[ben@localhost ~]$ podman search nginx
docker.io  docker.io/library/nginx                               Official build of Nginx.                         14935   [OK]
...
[root@localhost ~]# podman pull docker.io/library/nginx
Trying to pull docker.io/library/nginx:latest...
Getting image source signatures
Copying blob 8283eee92e2f done
Copying blob febe5bd23e98 done
Copying blob 69692152171a done
Copying blob 30afc0b18f67 done
Copying blob 351ad75a6cfa done
Copying blob 596b1d696923 done
Copying config d1a364dc54 done
Writing manifest to image destination
Storing signatures
d1a364dc548d5357f0da3268c888e1971bbdb957ee3f028fe7194f1d61c6fdee
[root@localhost ~]# podman images
REPOSITORY               TAG     IMAGE ID      CREATED     SIZE
docker.io/library/nginx  latest  d1a364dc548d  6 days ago  137 MB
下面範例會用本地端 ~/docker-nginx/html 資料夾去取代 Container 內的 /usr/share/nginx/html 資料夾,先建立該資料夾.
[ben@localhost ~]$ mkdir -p ~/docker-nginx/html
[ben@localhost ~]$ vi ~/docker-nginx/html/index.html
Local index.html
建立 Nginx 的 Container .
[ben@localhost ~]$ podman run --pod new:mypod --name docker-nginx -p 8080:80 -d -v ~/docker-nginx/html:/usr/share/nginx/html nginx
f1db5225510757117a3209dbe0b91a5ef1ac86f6c6827b2f7ece9d646b5450e5
使用參數:
- –pod=name
Run container in an existing pod. If you want Podman to make the pod for you, prefix the pod name with new:.
使用參數 –pod new:mypod 指定了一個新的 pod 名稱為 mypod (也可以是先建立 podman pod create –name testpod),從以下指令可以看到.[ben@localhost ~]$ podman pod ls POD ID NAME STATUS CREATED INFRA ID # OF CONTAINERS d3aae47d8cc6 mypod Degraded About a minute ago ade5ec81c311 2
- –name=name
Assign a name to the container. - –publish, -p=ip:hostPort:containerPort | ip::containerPort | hostPort:containerPort | containerPort
Publish a container’s port, or range of ports, to the host. - –detach, -d=true|false
Detached mode: run the container in the background and print the new container ID. - –volume, -v[=[[SOURCE-VOLUME|HOST-DIR:]CONTAINER-DIR[:OPTIONS]]]
Create a bind mount. If you specify /HOST-DIR:/CONTAINER-DIR, Podman bind mounts host-dir in the host to CONTAINER-DIR in the Podman container.
用本地端 ~/docker-nginx/html 資料夾去取代 Container 內的 /usr/share/nginx/html 資料夾.
下面除了剛剛產生的 nginx container 還會看到多一個 container (d77d11a88d83-infra)
[ben@localhost ~]$ podman ps -a
CONTAINER ID  IMAGE                                         COMMAND               CREATED        STATUS            PORTS                 NAMES
0dab87b6603d  registry.access.redhat.com/ubi8/pause:latest                        3 seconds ago  Up 3 seconds ago  0.0.0.0:8080->80/tcp  d77d11a88d83-infra
f1db52255107  docker.io/library/nginx:latest                nginx -g daemon o...  3 seconds ago  Up 3 seconds ago  0.0.0.0:8080->80/tcp  docker-nginx
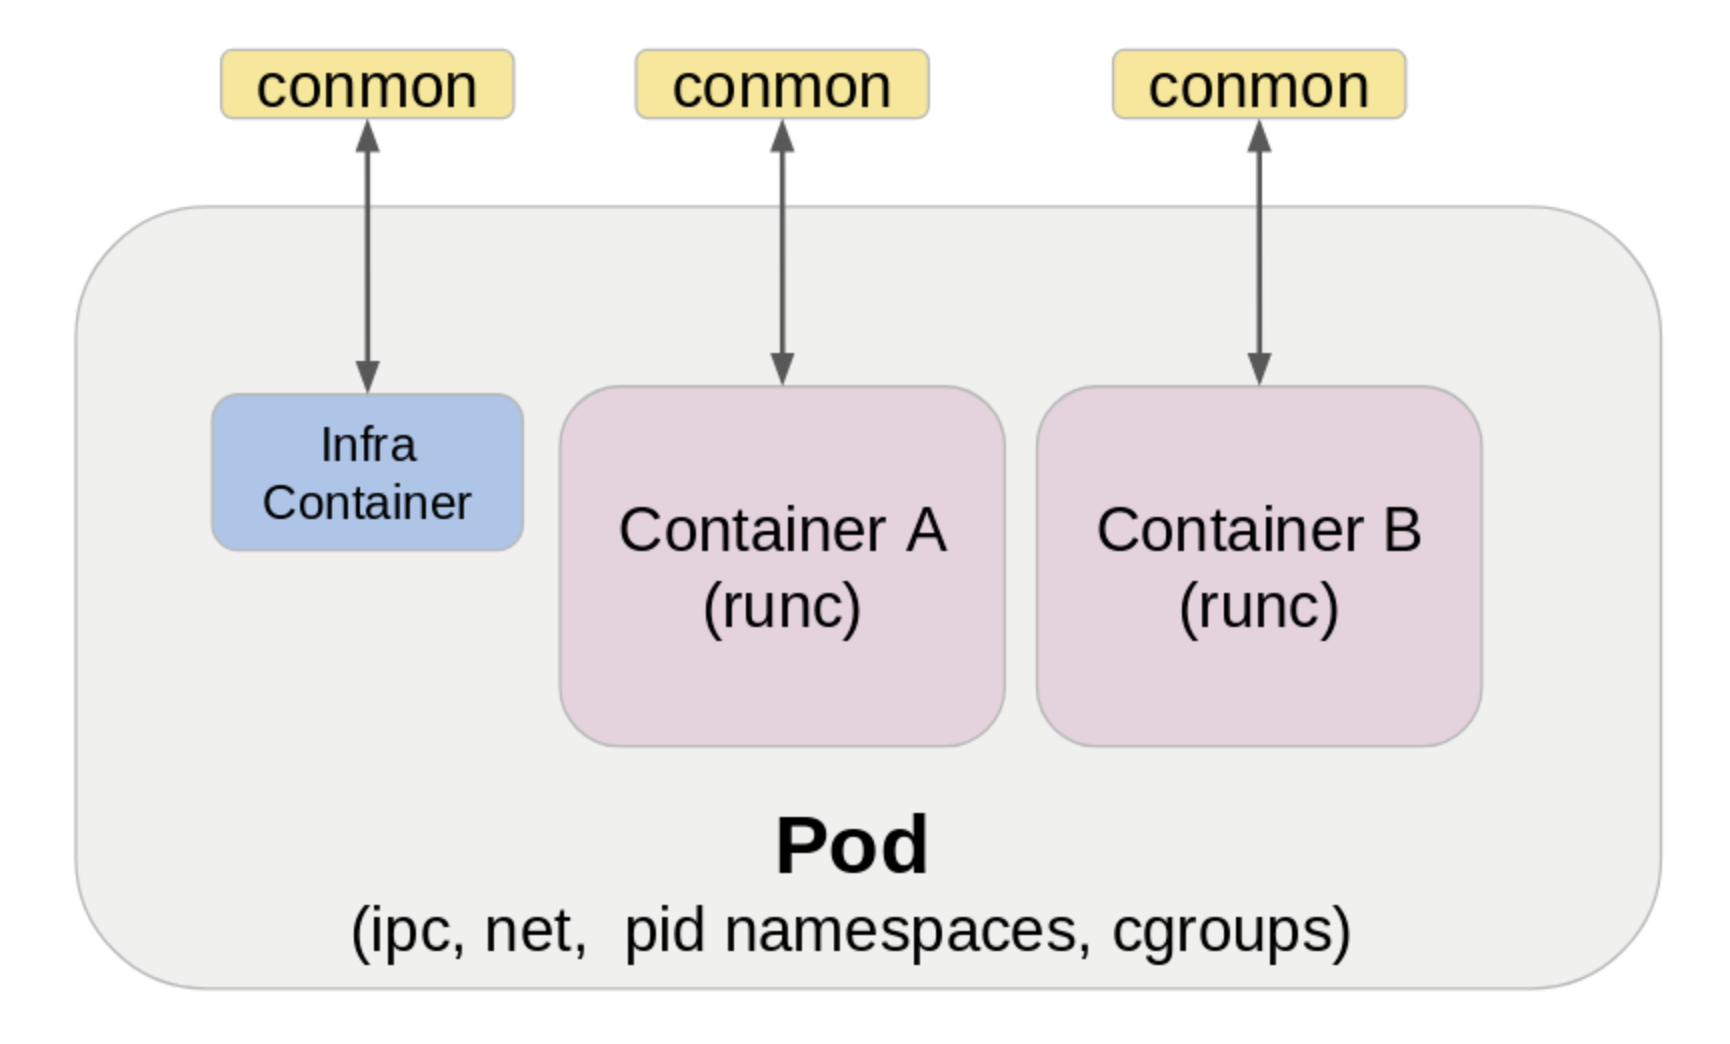
根據 https://developers.redhat.com/blog/2019/01/15/podman-managing-containers-pods (下面圖片出處)說明

每個 Podman pod 都包含一個 infra container. 它的目的是保存與 pod 關聯的 命名空間 ( namespace ),並允許 podman 將其他容器連接到 pod.
[ben@localhost ~]$ podman port -a
0dab87b6603d	80/tcp -> 0.0.0.0:8080
f1db52255107	80/tcp -> 0.0.0.0:8080
透過 curl 文字版的瀏覽器看一下 Nginx 的確使用了當地端的資料夾.
[ben@localhost ~]$ curl http://localhost:8080
Local index.html
[ben@localhost ~]$ curl http://192.168.111.30:8080
Local index.html
再建立一個在相同 pod 的 Container ,用以確認透過 localhost (IP:127.0.0.1) 是互通的.
[ben@localhost ~]$ podman run --pod mypod -it --rm docker.io/library/nginx /bin/sh
# curl http://localhost
Local index.html
# curl http://127.0.0.1
Local index.html
# exit
[ben@localhost ~]$