![]()
Ubuntu 18.04 安裝 wordpress 版本為 5.x, 我採用的 web server 為 Apache2 , Database 是 MariaDB ,在使用 WordPress 前你必須先確定 Ubuntu 系統軟體符合他的需求.
- Apache (Web server) PHP 7.3 以上的版本.
- MySQL 版本需要大於 5.6 或是 MariaDB 10.0 以上的版本.
Apache (Web server) + PHP
安裝 Apache + PHP 所需套件,需要哪些套件可以參考官方網站 – https://make.wordpress.org/hosting/handbook/handbook/server-environment/#php-extensions 說明.
root@ubuntu:~# apt install php libapache2-mod-php php-common php-mbstring php-xmlrpc php-gd php-xml php-mysql php-cli php-zip php-curl
安裝好 WordPress 之後還可檢查哪一些套件沒有安裝,在 控制台 \ 網站狀態 \ 找不到一或多個建議模組 可以看到如下圖.

Ubuntu 18.04 目前提供的 PHP 版本為 7.2.15 ,雖然不是 WordPress 建議的 7.3 但還是可以使用.
root@ubuntu:~# php -v
PHP 7.2.15-0ubuntu0.18.04.1 (cli) (built: Feb  8 2019 14:54:22) ( NTS )
Copyright (c) 1997-2018 The PHP Group
Zend Engine v3.2.0, Copyright (c) 1998-2018 Zend Technologies
    with Zend OPcache v7.2.15-0ubuntu0.18.04.1, Copyright (c) 1999-2018, by Zend Technologies
root@ubuntu:~# systemctl status apache2
● apache2.service - The Apache HTTP Server
   Loaded: loaded (/lib/systemd/system/apache2.service; enabled; vendor preset:
  Drop-In: /lib/systemd/system/apache2.service.d
           └─apache2-systemd.conf
   Active: active (running) since Mon 2019-03-11 01:13:14 PDT; 35min ago
 Main PID: 7317 (apache2)
    Tasks: 55 (limit: 1102)
   CGroup: /system.slice/apache2.service
           ├─7317 /usr/sbin/apache2 -k start
           ├─7319 /usr/sbin/apache2 -k start
           └─7320 /usr/sbin/apache2 -k start
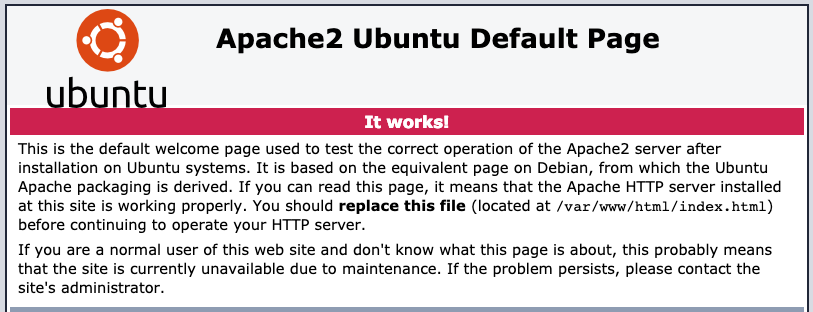
透過瀏覽器 http://yourIP/ 成功可以看到如下的畫面 (也可以透過 curl 文字瀏覽器).
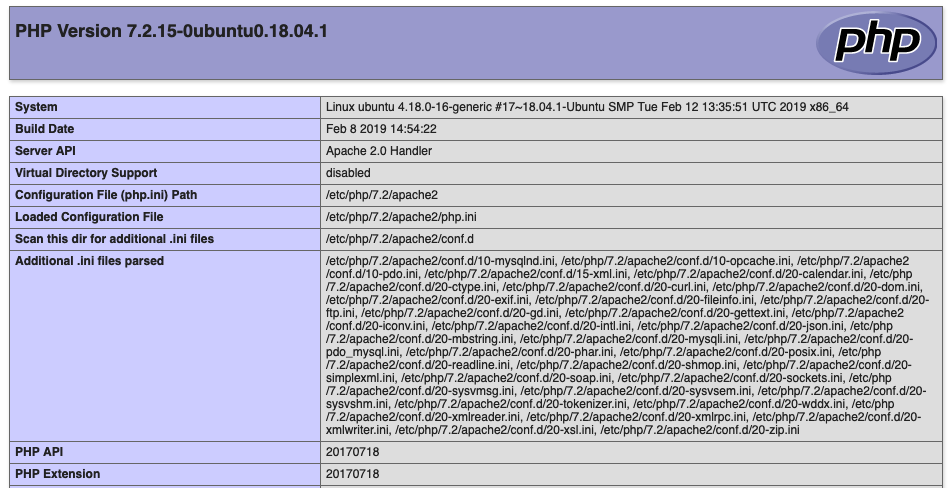
測試一下相關 PHP 套件是否已安裝.
root@ubuntu:~# echo "<?php phpinfo() ?>" > /var/www/html/phpinfo.php
root@ubuntu:~# systemctl restart apache2
透過瀏覽器 http://yourIP/phpinfo.php 成功可以看到如下的畫面 (也可以透過 curl 文字瀏覽器).
如果出現錯誤,可以檢查一下 /var/log/apache2/error.log
MariaDB (Database)
因為 WordPress 會將資料儲存在 database 中,我們用 MariaDB 當成我們的資料庫系統.
root@ubuntu:~# apt-get install mariadb-server mariadb-client
確定一下 MariaDB 執行中.
root@ubuntu:~# systemctl status mysql
● mariadb.service - MariaDB 10.1.38 database server
   Loaded: loaded (/lib/systemd/system/mariadb.service; enabled; vendor preset:
   Active: active (running) since Mon 2019-03-11 23:03:55 PDT; 8min ago
     Docs: man:mysqld(8)
           https://mariadb.com/kb/en/library/systemd/
 Main PID: 3503 (mysqld)
   Status: "Taking your SQL requests now..."
    Tasks: 27 (limit: 1102)
   CGroup: /system.slice/mariadb.service
           └─3503 /usr/sbin/mysqld
資料庫初始化設定.
root@ubuntu:~# mysql_secure_installation

NOTE: RUNNING ALL PARTS OF THIS SCRIPT IS RECOMMENDED FOR ALL MariaDB
      SERVERS IN PRODUCTION USE!  PLEASE READ EACH STEP CAREFULLY!

In order to log into MariaDB to secure it, we'll need the current
password for the root user.  If you've just installed MariaDB, and
you haven't set the root password yet, the password will be blank,
so you should just press enter here.

Enter current password for root (enter for none):
OK, successfully used password, moving on...

Setting the root password ensures that nobody can log into the MariaDB
root user without the proper authorisation.

Set root password? [Y/n]  y
New password:
Re-enter new password:
Password updated successfully!
Reloading privilege tables..
 ... Success!


By default, a MariaDB installation has an anonymous user, allowing anyone
to log into MariaDB without having to have a user account created for
them.  This is intended only for testing, and to make the installation
go a bit smoother.  You should remove them before moving into a
production environment.

Remove anonymous users? [Y/n]
 ... Success!

Normally, root should only be allowed to connect from 'localhost'.  This
ensures that someone cannot guess at the root password from the network.

Disallow root login remotely? [Y/n]
 ... Success!

By default, MariaDB comes with a database named 'test' that anyone can
access.  This is also intended only for testing, and should be removed
before moving into a production environment.

Remove test database and access to it? [Y/n]
 - Dropping test database...
 ... Success!
 - Removing privileges on test database...
 ... Success!

Reloading the privilege tables will ensure that all changes made so far
will take effect immediately.

Reload privilege tables now? [Y/n]
 ... Success!

Cleaning up...

All done!  If you've completed all of the above steps, your MariaDB
installation should now be secure.

Thanks for using MariaDB!
新安裝 wordpress
剛剛就已經設定了 MariaDB root 密碼,接下來我們要為將來使用的 wordpress 建立一個資料庫,方法很簡單只要下面幾個步驟,建立一個資料庫名稱為 wordpress 以及使用者帳號 wordpressuser 以及其該使用者密碼 password,你可以依據自己的喜好來命名.
root@ubuntu:~# mysql -u root -p
Enter password:
Welcome to the MariaDB monitor.  Commands end with ; or \g.
Your MariaDB connection id is 49
Server version: 10.1.38-MariaDB-0ubuntu0.18.04.1 Ubuntu 18.04

Copyright (c) 2000, 2018, Oracle, MariaDB Corporation Ab and others.

Type 'help;' or '\h' for help. Type '\c' to clear the current input statement.
這邊就是要建立 wordpress 專用的資料庫,create database 資料庫名稱你可以依據自己的需求做改變,注意每個指令後面都要加上 “;”
MariaDB [(none)]> CREATE DATABASE wordpress;
Query OK, 1 row affected (0.00 sec)
建立 wordpressuser 這個帳號.
MariaDB [(none)]> CREATE USER wordpressuser@localhost IDENTIFIED BY 'password';
Query OK, 0 rows affected (0.02 sec)
- CREATE USER wordpressuser@localhost
username@localhost , username – 新增的使用者, localhost – 限制可從哪裡來存取, 可用 ‘%’ (代表全部) - IDENTIFIED BY ‘password’
password: 使用者密碼
將剛剛建立的 wordpress 資料庫權限給 wordpressuser.
MariaDB [(none)]> GRANT ALL PRIVILEGES ON wordpress.* TO wordpressuser@localhost;
Query OK, 0 rows affected (0.00 sec)
- GRANT ALL PRIVILEGES
授權的權限 (ALL: SELECT, INSERT, DELETE …. etc) - wordpress.*
指定可以存取哪些 Db_name/Table - wordpressuser@localhost
username@localhost , username – 新增的使用者, localhost – 限制可從哪裡來存取, 可用 ‘%’ (代表全部)
MariaDB [(none)]> FLUSH PRIVILEGES;
Query OK, 0 rows affected (0.00 sec)

MariaDB [(none)]> EXIT
Bye
試一下剛剛建立好的 wordpress 資料庫和使用者吧!!這邊要輸入的密碼是 wordpressuser 的密碼,我剛剛設定的是 password.
root@ubuntu:~# mysql -u wordpressuser -p
Enter password:
Welcome to the MariaDB monitor.  Commands end with ; or \g.
Your MariaDB connection id is 50
Server version: 10.1.38-MariaDB-0ubuntu0.18.04.1 Ubuntu 18.04

Copyright (c) 2000, 2018, Oracle, MariaDB Corporation Ab and others.

Type 'help;' or '\h' for help. Type '\c' to clear the current input statement.
連線到 wordpress 資料庫看一下.如果你可以用 wordpressuser 連線到 wordpress 資料庫,那代表資料庫的連結沒有問題.可以開始進入安裝 wordpress 了.跳出來吧!!以後再也用不到了 SQL 的指令了.
MariaDB [(none)]> connect wordpress;
Connection id:    51
Current database: wordpress

MariaDB [wordpress]> show databases;
+--------------------+
| Database           |
+--------------------+
| information_schema |
| wordpress          |
+--------------------+
2 rows in set (0.00 sec)
MariaDB [wordpress]> exit
Bye
直接下載最新版本的 WordPress 來使用.
root@ubuntu:~# cd ~
root@ubuntu:~# wget http://wordpress.org/latest.tar.gz
root@ubuntu:~# tar xzvf latest.tar.gz
還記得剛剛在 Databases 設定資料庫 wordpress 使用者帳號 wordpressuser 以及其該使用者密碼 password,這些資料都需要寫入到 wp-config.php 設定檔.
root@ubuntu:~# cd ~/wordpress
root@ubuntu:~/wordpress# cp wp-config-sample.php wp-config.php
root@ubuntu:~/wordpress# vi wp-config.php
// ** MySQL settings - You can get this info from your web host ** //
/** The name of the database for WordPress */
define('DB_NAME', 'wordpress');

/** MySQL database username */
define('DB_USER', 'wordpressuser');

/** MySQL database password */
define('DB_PASSWORD', 'password');
Apache 預設的根目錄為 /var/www/html/ 需要將剛剛整理好的文件複製到該處.如果裡面有檔案建議先刪除.
root@ubuntu:~/wordpress# ll /var/www/html
total 24
drwxr-xr-x 2 root root  4096 Oct 23 04:43 ./
drwxr-xr-x 3 root root  4096 Oct 23 04:42 ../
-rw-r--r-- 1 root root 11510 Oct 23 04:42 index.html
-rw-r--r-- 1 root root    20 Oct 23 04:43 phpinfo.php
root@ubuntu:~/wordpress# rm /var/www/html/index.html /var/www/html/phpinfo.php
root@ubuntu:~/wordpress# rsync -avP ~/wordpress/ /var/www/html/
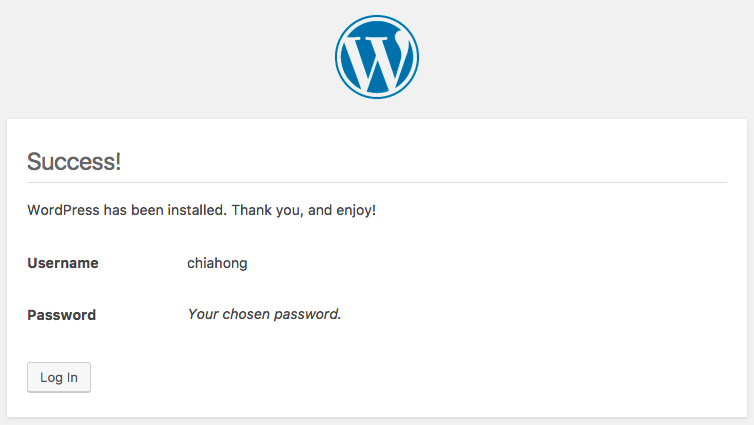
在瀏覽器輸入你的網域或是 IP ( http://Domain or IP/wp-config.php ),完成下面幾個步驟即將大功告成.
輸入你的 Site Title , Username , Password , Your Email

WordPress 上傳圖片的目錄權限
上傳圖片的目錄 /var/www/html/wp-content/uploads 要改成 www-data ,才能把圖片正確上傳.
root@ubuntu:~# mkdir /var/www/html/wp-content/uploads
root@ubuntu:~# chown www-data:www-data /var/www/html/wp-content/uploads
其他關於 WordPress 檔案權限設定,請參考 https://benjr.tw/10912
搬遷 wordpress
主要把 /var/www/html 與資料庫做搬遷即可.
備份 wordpress
root@ubuntu:~# tar zcvf benjr.tar.gz /var/www/benjr
備份資料庫
root@ubuntu:~# mysqldump -u root -p benjr > benjr.sql
Enter password:
還原 wordpress
root@ubuntu:~# tar zxvf benjr.tar.gz
root@ubuntu:~# mv var/www/benjr /var/www/
還原資料庫
root@ubuntu:~# mysql -u root -p
Enter password:
MariaDB [(none)]> create database benjr;
MariaDB [(none)]> grant all privileges on benjr.* to user@localhost identified by 'your.password' ;
MariaDB [(none)]> exit;
root@ubuntu:~# mysql -u root -p benjr < benjr.sql

Enter password:
這樣就可以了.
wordpress 其他設定
參考如下
- 連線型態 FTP FTPS (SSL) SSH2 – https://benjr.tw/10928
- 固定網址設定 – https://benjr.tw/10918
- Linux – Virtual Host – https://benjr.tw/11082
- 網域 DNS 設定 – https://benjr.tw/13311
- Ubuntu 防火牆 ufw – https://benjr.tw/93733