![]()
Windows 系統透過 SMB (Session Message Block protocol) 傳輸協定來進行檔案分享,在 Linux 系統透過 samba 軟體,一樣可以使用 SMB 協定.不過 Windows SMB 的版本從 SMB1 一直演進到 SMB2 , SMB3,所以藉由 Linux 下的 samba 檔案分享,最常就是遇到版本的問題.
在使用 CentOS 6 Samba 時會遇到 Windows Client 無法連線的問題,主要的原因是 CentOS 6 所使用的 Samba 版本為 3.x 預設只支援 SMB1 (CentOS 7 採用的是 Samba 4.x 預設支援 SMB2).
先來看一下不同的 Windows 支援哪一些 SMB 版本.
- CIFS – The ancient version of SMB that was part of Microsoft Windows NT 4.0 in 1996. SMB1 supersedes this version.
- SMB 1.0 (or SMB1) – The version used in Windows 2000, Windows XP, Windows Server 2003 and Windows Server 2003 R2
- SMB 2.0 (or SMB2) – The version used in Windows Vista (SP1 or later) and Windows Server 2008
- SMB 2.1 (or SMB2.1) – The version used in Windows 7 and Windows Server 2008 R2
- SMB 3.0 (or SMB3) – The version used in Windows 8 and Windows Server 2012
- SMB 3.02 (or SMB3) – The version used in Windows 8.1 and Windows Server 2012 R2
解決方式有兩種,第一種就是讓 Samba 支援 SMB2 或是讓 Windows 支援 SMB1
安裝/設定 Linux Samba
測試環境為 CentOS 6 x64(虛擬機 , IP : 192.168.95.187 ),Samba 所需軟體如下.
[root@localhost ~]# yum install samba samba-client samba-common
我採用本機身份驗證的方式 security = user ,分享 public (Folder – /home/samba) 資料夾,並透過指令 testparm 來檢查設定檔是否有錯誤.
[root@localhost ~]# mkdir /home/samba
[root@localhost ~]# chmod 777 /home/samba
[root@localhost ~]# vi /etc/samba/smb.conf
[global]
        workgroup = MYGROUP
        server string = Samba Server Version %v
        log file = /var/log/samba/log.%m
        max log size = 50
        security = user
        passdb backend = tdbsam
        load printers = yes
        cups options = raw
[public]
        comment = Public Stuff
        path = /home/samba
        public = yes
        writable = yes
[root@localhost ~]# testparm /etc/samba/smb.conf
Load smb config files from /etc/samba/smb.conf
rlimit_max: increasing rlimit_max (1024) to minimum Windows limit (16384)
Processing section "[public]"
Loaded services file OK.
Server role: ROLE_STANDALONE

Press enter to see a dump of your service definitions

# Global parameters
[global]
        workgroup = MYGROUP
        server string = Samba Server Version %v
        log file = /var/log/samba/log.%m
        max log size = 50
        client signing = required
        idmap config * : backend = tdb
        cups options = raw

[public]
        comment = Public Stuff
        path = /home/samba
        read only = No
        guest ok = Yes
開啟 Samba (smb) 服務.
[root@localhost ~]# service smb start
Starting SMB services:                                     [  OK  ]
[root@localhost ~]# chkconfig smb on
[root@localhost ~]# service smb status
smbd (pid  3123) is running...
建立 samba 使用者.
[root@localhost ~]# pdbedit -au ben
new password:
retype new password:
Unix username:        ben
NT username:
Account Flags:        [U          ]
User SID:             S-1-5-21-2159730495-4192464508-3301124198-1000
Primary Group SID:    S-1-5-21-2159730495-4192464508-3301124198-513
Full Name:            Ben
Home Directory:       \\localhost\ben
HomeDir Drive:
Logon Script:
Profile Path:         \\localhost\ben\profile
Domain:               LOCALHOST
Account desc:
Workstations:
Munged dial:
Logon time:           0
Logoff time:          三, 06  2月 2036 07:06:39 PST
Kickoff time:         三, 06  2月 2036 07:06:39 PST
Password last set:    四, 20 12月 2018 09:36:12 PST
Password can change:  四, 20 12月 2018 09:36:12 PST
Password must change: never
Last bad password   : 0
Bad password count  : 0
Logon hours         : FFFFFFFFFFFFFFFFFFFFFFFFFFFFFFFFFFFFFFFFFF
[root@localhost ~]# pdbedit -L
ben:500:Ben
檢視 SMB 服務的連線是否正確.
[root@localhost ~]# smbclient -L 192.168.95.187 -U ben
Enter ben's password:
Domain=[MYGROUP] OS=[Unix] Server=[Samba 3.6.23-51.el6]

	Sharename       Type      Comment
	---------       ----      -------
	public          Disk      Public Stuff
	IPC$            IPC       IPC Service (Samba Server Version 3.6.23-51.el6)
Domain=[MYGROUP] OS=[Unix] Server=[Samba 3.6.23-51.el6]

	Server               Comment
	---------            -------

	Workgroup            Master
	---------            -------
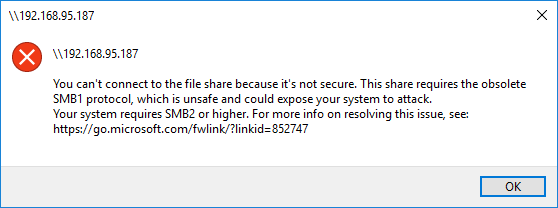
但當只支援 SMB2 以上的 Windows 10 連到 CentOS6 所分享的 SMB1 資料夾時,會顯示以下的錯誤訊息.
You can't connect to the file share because it's not secure. This share requires the obsolete SMB1 protocol, which is unsafe and could expose your system to attack.
Your system requires SMB2 or higher. For more info on resolving this issue, see: https://go.microsoft.com/fwlink/?linkid=85247
Samba 支援 SMB2
查了一下看樣子 CentOS 6 所使用的 Samba 版本為 3.x 只支援 SMB1,想要支援必須升級到 Samba 4.x 或是把作業系統升級到 CentOS 7 (安裝的是 Samba 4.x 預設支援 SMB2).
Windows 支援 SMB1
測試環境為 Windows 10.
可以透過 PowerShell 來修改是否支援 SMB v1 ,v2/v3 協定.透過 Windows PowerShell 執行下面指令需要有 Administrator 權限 (Windows PowerShell 右鍵 Run as Administrator),Enable SMB1Protocol 系統需要重開機.
PS C:\Windows\system32> Get-WindowsOptionalFeature –Online –FeatureName SMB1Protocol

FeatureName      : SMB1Protocol
DisplayName      : SMB 1.0/CIFS File Sharing Support
Description      : Support for the SMB 1.0/CIFS file sharing protocol and the Computer Browser protocol.
RestartRequired  : Possible
State            : Disabled
CustomProperties :
                   ServerComponent\Description : Support for the SMB 1.0/CIFS file sharing protocol and the Computer
                   Browser protocol.
                   ServerComponent\DisplayName : SMB 1.0/CIFS File Sharing Support
                   ServerComponent\Id : 487
                   ServerComponent\Type : Feature
                   ServerComponent\UniqueName : FS-SMB1
                   ServerComponent\Deploys\Update\Name : SMB1Protocol
PS C:\Windows\system32> Enable-WindowsOptionalFeature -Online -FeatureName SMB1Protocol
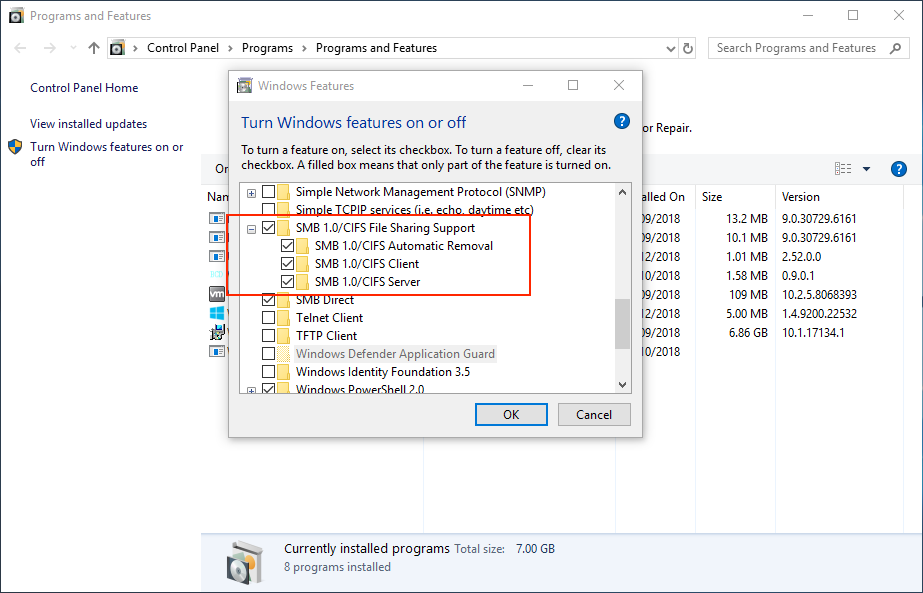
如果沒有安裝 SMB1Protocol 需要先透過 dism 或是 Control Panel / Programes / Programes and Features / Turn Windows Feature on or off / SMB 1.0 / CIFE File Sharing Support 來安裝.
PS C:\Windows\system32> dism /online /enable-feature /featurename:SMB1Protocol

Deployment Image Servicing and Management tool
Version: 10.0.16299.15

Image Version: 10.0.16299.726

Enabling feature(s)
[==========================100.0%==========================]
The operation completed successfully.
Restart Windows to complete this operation.
Do you want to restart the computer now? (Y/N)y
下面是關於 SMBv1 v2 v3 的指令參考.
- SMB v1 Protocol
Detect:Get-WindowsOptionalFeature –Online –FeatureName SMB1Protocol
Disable:
Disable-WindowsOptionalFeature -Online -FeatureName SMB1Protocol
Enable:
Enable-WindowsOptionalFeature -Online -FeatureName SMB1Protocol
- SMB v2/v3 Protocol
Detect:Get-SmbServerConfiguration | Select EnableSMB2Protocol
Disable:
Set-SmbServerConfiguration –EnableSMB2Protocol $false
Enable:
Set-SmbServerConfiguration –EnableSMB2Protocol $true
更多不同版本的 Windows SMB 指令請參考 – https://support.microsoft.com/en-us/help/2696547/how-to-detect-enable-and-disable-smbv1-smbv2-and-smbv3-in-windows-and