![]()
Step 0. 前言
Step 1. Linux 核心支援
Step 2. Bonding 的模式
Step 3. Mode 0 (Balance round-robin)
Step 4. Mode 1 (active-backup)
Step 5. 其他 mode
Step 6. 其他
Step 0. 前言
Bonding 是一個為通過由多個網卡創建的 team(多張網卡視同一張),可以提供負載平衡(load-balancing),容錯(fault-tolerance)的功能.
Step 1. Linux 核心支援
Linux Channel Bonding 在 Linux 2.4.12之後的核心中,就提供了 bonding 的驅動,可以支援把多個網路卡集合在一起,當作一個網路卡來使用.下面以 Red Hat 為例,簡單介紹一下實現的基本方法:
第一步就是檢查目前核心是否支援 bonding
[root@unsvr root]# cat /boot/config-kernel-version |grep -i bonding
CONFIG_BONDING=m
如果沒編譯成核心或模組,那我們需要重新編譯核心來支援 bonding.
note:
編譯核心 ‘make menuconfig/xconfig/config’時,在”Network device support”區段中選擇”Bonding driver support”,建議設定該驅動程序為模組,這樣才能支持傳遞參數和多個bonding設備.
如果你的 Bonding 預設為模組。我們需要在 /etc/modules.conf 中加入一行,這樣才可以在設置了 bonding後,系統啟動的時候自動載入 bonding 的驅動程序.
[root@unsvr root]# vi /etc/modules.conf
……….
alias bond0 bonding
options bond0 miimon=100 mode=0
你也可以直接在下 command 加上模組的參數,至於參數為何用意下面會在說明。
[root@unsvr root]# modprobe bonding miimon=100 mode=0
Step 2. Bonding 的模式
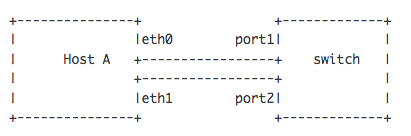
Bonding 是 將多片網卡虛擬成一片(竄改成同一個 IP/MAC),以便達到分散負載。虛擬後所有 eth(#) 網卡的 IP 和 MAC 將會變成完全相同,然後多出一個 bond0 的虛擬網卡.這個功能本來是高階網路卡,如 Intel, 3COM 之類才有的硬體功能,有自己的商業名詞,現在在 Linux 下也能夠用軟體實現,Linux 下則是稱作 bonding.
硬體需求:網路卡至少兩張以上,不一定要同一款的網路卡.
Bonding 提供了下面幾種模式,但要注意的是其中的 active-backup (mode=1),balance-tlb (mode=5) , balance-alb (mode=6) 是不需要 switch 特別支援設定的.
但是其它模式 round-robin(mode=0), XOR(mode=2), broadcast(mode=3), 802.3ad (LACP : Link Aggregation Control Protocol) policies(mode=4)則需要特別 switch 來支援.
如果在設定 Bonding 時沒有指定預設將會使用 mode 0 balance-rr(round-robin).
- balance-rr or 0
假設將兩張網路卡設成Balance時 , 同時間Balance包含容錯功能如果一張網卡故障另一張依然運作. - active-backup or 1
假設有兩張網卡時一張是PRIMARY另一張是STANDBY 這時候流量只在PRIMARY上跑,當PRIMARY掛掉時STANDBY會自動啟用接手變成PRIMARY ,如果原來PRIMARY恢復時會自動變成STANDBY 。至於下面幾種模式我實在也搞不清楚,如果希望瞭解更詳細的訊息,可以參考 ‘/usr/src/linux-[version]/Documentation/networking/bonding.txt. - balance-xor or 2
XOR policy: Transmit based on [(source MAC address XOR’d with destination MAC address) modula slave count]. This selects the same slave for each destination MAC address. This mode provides load balancing and fault tolerance. - broadcast or 3
Broadcast policy: transmits everything on all slave interfaces. This mode provides fault tolerance. - 802.3ad or 4 (LACP: Link Aggregation Control Protocol)
假設將兩張網路卡設成Dynamic Link Aggregation時 , 進來流量為200M出去流量為200M, 這時候需接往支援Dynamic Link Aggregation的交換器(switch), 同時間Dynamic Link Aggregation包含容錯功能如果一張網卡故障另一張依然運作. - balance-tlb or 5(Transmit load balancing)
Adaptive transmit load balancing: channel bonding that does not require any special switch support. The outgoing traffic is distributed according to the current load(computed relative to the speed) on each slave. Incoming traffic is received by the current slave. If the receiving slave fails, another slave takes over the MAC address of the failed receiving slave.
進來流量為100M出去流量為200M - balance-alb or 6(Adaptive load balancing)
Adaptive load balancing: includes balance-tlb + receive load balancing (rlb) for IPV4 traffic and does not require any special switch support. The receive load balancing is achieved by ARP negotiation. The bonding driver intercepts the ARP Replies sent by the server on their way out and overwrites the src hw address with the unique hw address of one of the slaves in the bond such that different clients use different hw addresses for the server.
進來流量為100M出去流量為200M.
Step 3. Mode 0 (Balance round-robin)
假設將兩張網路卡設成 Balance 時,同時間 Balance 包含容錯功能如果一張網卡故障另一張依然運作.
假設我的環境如下:
網段:192.168.0.0 / 255.255.255.0
廣播位址:192.168.0.255
假設虛擬網卡 bond0 的IP為:192.168.0.30
有兩片網卡:eth0,eht1
[root@unsvr root]# vi /etc/modules.conf (在最後面加入兩行)
……….
alias bond0 bonding
options bond0 miimon=100 mode=0
說明:
miimon=100
miimon 是指多久時間要檢查網路一次,單位是ms(毫秒),這邊的100,是100ms,即是0.1秒,意思是假設其中有一條網路斷線,會在0.1秒內自動備援.
mode=0
balance-rr(round-robin). 這個模式主要是做負載平衡(load-balancing).
建立這個虛擬網卡 bond0 的設定檔
[root@unsvr root]# cat /etc/sysconfig/network-scripts/ifcfg-bond0
DEVICE=bond0
ONBOOT=yes
BOOTPROTO=static
IPADDR=192.168.0.30
NETMASK=255.255.255.0
GATEWAY=192.168.0.254
USERCTL=no
在 bonding 中的所有網路的設定檔中,都要有 SLAVE 和 MASTER 的定義.
例如,如果要讓eth0(SLAVE)和eth1(SLAVE)成為bond0(MASTER)的成員,它們對應的設定檔 (ifcfg-eth0 和 ifcfg-eth1) 就要仿照下面的內容進行更改:
[root@unsvr root]# cat /etc/sysconfig/network-scripts/ifcfg-eth0
DEVICE=eth0
ONBOOT=yes
BOOTPROTO=static
MASTER=bond0
SLAVE=yes
[root@unsvr root]# cat /etc/sysconfig/network-scripts/ifcfg-eth1
DEVICE=eth1
ONBOOT=yes
BOOTPROTO=static
MASTER=bond0
SLAVE=yes
設定完成後,重開機,或是重新啟動網路服務,都可以重新啟動系統來使 bond0 生效.
[root@unsvr root]# /etc/rc.d/init.d/network restart
or
[root@unsvr root]# service network restart
這樣,bonding 的設置基本上就結束了.接下來我們可以看目前 Bonding 的狀態如何.
[root@unsvr root]# cat /proc/net/bonding/bond0
Ethernet Channel Bonding Driver: v2.6.0 (January 14, 2004)
Bonding Mode: load balancing (round-robin)
MII Status: up
MII Polling Interval (ms): 0
Up Delay (ms): 0
Down Delay (ms): 0
Slave Interface: eth0
MII Status: up
Link Failure Count: 0
Permanent HW addr: 00:0a:5e:3e:77:41
Slave Interface: eth1
MII Status: up
Link Failure Count: 0
Permanent HW addr: 00:0a:5e:3e:7c:30
還有目前網路的設定
[root@unsvr root]# ifconfig
bond0 Link encap:Ethernet HWaddr 00:0A:5E:3E:77:41
inet addr:192.168.0.30 Bcast:192.168.0.255 Mask:255.255.255.0
UP BROADCAST RUNNING MASTER MULTICAST MTU:1500 Metric:1
RX packets:86009442 errors:0 dropped:0 overruns:0 frame:0
TX packets:414270098 errors:0 dropped:0 overruns:0 carrier:0
collisions:0 txqueuelen:0
RX bytes:3749356653 (3575.6 Mb) TX bytes:124489446 (118.7 Mb)
eth0 Link encap:Ethernet HWaddr 00:0A:5E:3E:77:41
inet addr:192.168.0.30 Bcast:192.168.0.255 Mask:255.255.255.0
UP BROADCAST RUNNING SLAVE MULTICAST MTU:1500 Metric:1
RX packets:6119846 errors:0 dropped:0 overruns:0 frame:0
TX packets:23960950 errors:0 dropped:0 overruns:0 carrier:0
collisions:0 txqueuelen:1000
RX bytes:1179793455 (1125.1 Mb) TX bytes:3732737688 (3559.8 Mb)
Interrupt:24

eth1 Link encap:Ethernet HWaddr 00:0A:5E:3E:77:41
inet addr:192.168.0.30 Bcast:192.168.0.255 Mask:255.255.255.0
UP BROADCAST RUNNING SLAVE MULTICAST MTU:1500 Metric:1
RX packets:5826277 errors:0 dropped:0 overruns:0 frame:0
TX packets:23959600 errors:0 dropped:0 overruns:0 carrier:0
collisions:0 txqueuelen:1000
RX bytes:1126390337 (1074.2 Mb) TX bytes:3719587744 (3547.2 Mb)
Interrupt:48
bond0 是虛擬網卡,而且 eth0、eth1 的 IP 和 MAC 都和 bond0 一樣.
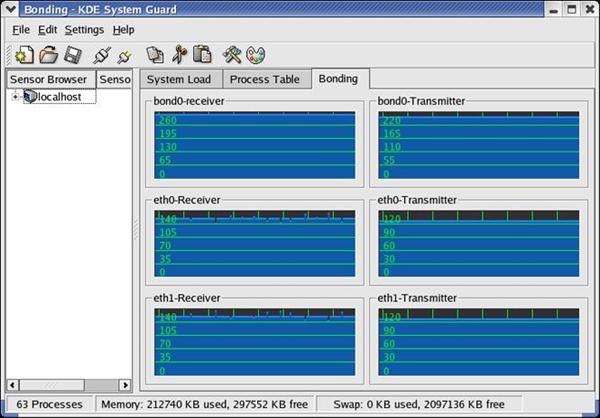
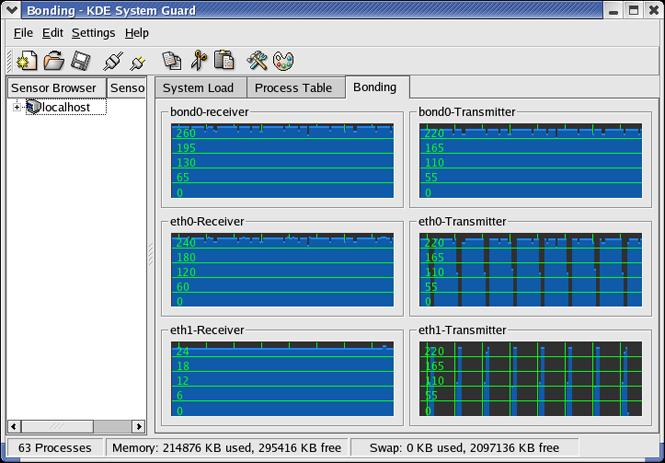
下面這一張是 Bonding mode 0 網路流量的圖示.不過要仔細看一下eth1的接收端並沒有任何流量,因為我所使用的 switch 並不支援 round-robin 所以並沒有達成真正的 Load balance.

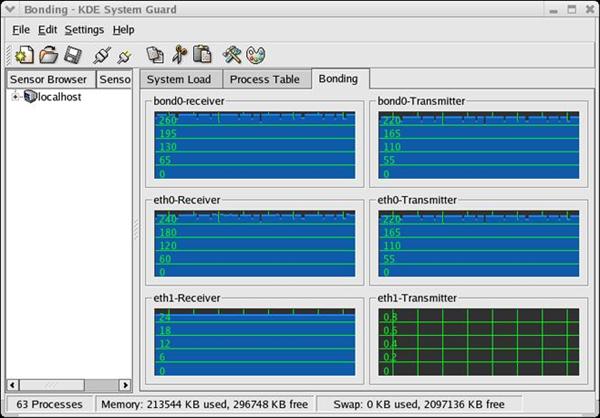
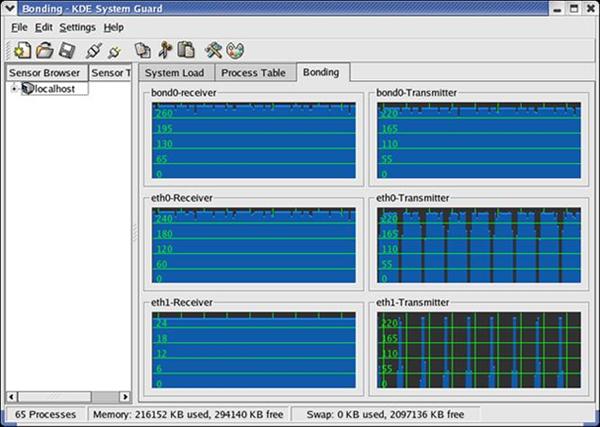
下面的則是使用有支援 round-robin 的 switch。
Step 4. Mode 1 (active-backup)
假設有兩張網卡時一張是 PRIMARY 另一張是 STANDBY 這時候流量只在 PRIMARY 上跑,當 PRIMARY 掛掉時 STANDBY 會自動啟用接手變成 PRIMARY,如果原來 PRIMARY 恢復時會自動變成 STANDBY.
主要設定檔都是和 mode 0 一樣只有參數要改成 mode 1.
[root@unsvr root]# vi /etc/modules.conf (在最後面加入兩行)
……….
alias bond0 bonding
options bond0 miimon=100 mode=1
說明:
mode=1
active-backup. 這個模式主要是做容錯 (fault-tolerance).
設定完成後,重開機,或是重新啟動網路服務,都可以重新啟動系統來使 bond0 生效.
接下來我們可以看目前 Bonding 的狀態如何.
[root@unsvr root]# cat /proc/net/bonding/bond0
Ethernet Channel Bonding Driver: v2.6.0 (January 14, 2004)
Bonding Mode: fault-tolerance (active-backup)
Primary Slave: None
Currently Active Slave: eth0
MII Status: up
MII Polling Interval (ms): 100
Up Delay (ms): 0
Down Delay (ms): 0
Slave Interface: eth0
MII Status: up
Link Failure Count: 0
Permanent HW addr: 00:0a:5e:3e:77:41
Slave Interface: eth1
MII Status: up
Link Failure Count: 0
Permanent HW addr: 00:0a:5e:3e:7c:30
看一下目前網路的設定。
[root@unsvr root]# ifconfig
bond0 Link encap:Ethernet HWaddr 00:0A:5E:3E:77:41
inet addr:192.168.0.30 Bcast:192.168.0.255 Mask:255.255.255.0
UP BROADCAST RUNNING MASTER MULTICAST MTU:1500 Metric:1
RX packets:76698 errors:7236 dropped:0 overruns:0 frame:6
TX packets:207347 errors:0 dropped:0 overruns:0 carrier:0
collisions:32820 txqueuelen:0
RX bytes:14804376 (14.1 Mb) TX bytes:291784412 (278.2 Mb)eth0 Link encap:Ethernet HWaddr 00:0A:5E:3E:77:41
inet addr:192.168.0.30 Bcast:192.168.0.255 Mask:255.255.255.0
UP BROADCAST RUNNING SLAVE MULTICAST MTU:1500 Metric:1
RX packets:38186 errors:32 dropped:0 overruns:0 frame:6
TX packets:207347 errors:0 dropped:0 overruns:0 carrier:0
collisions:32820 txqueuelen:1000
RX bytes:7372857 (7.0 Mb) TX bytes:291784412 (278.2 Mb)
Interrupt:24
eth1 Link encap:Ethernet HWaddr 00:0A:5E:3E:77:41
inet addr:192.168.0.30 Bcast:192.168.0.255 Mask:255.255.255.0
UP BROADCAST RUNNING NOARP SLAVE MULTICAST MTU:1500 Metric:1
RX packets:38512 errors:7204 dropped:0 overruns:0 frame:0
TX packets:0 errors:0 dropped:0 overruns:0 carrier:0
collisions:0 txqueuelen:1000
RX bytes:7431519 (7.0 Mb) TX bytes:0 (0.0 b)
Interrupt:48
其中的 eth1 為 NOARP 表示他處於 backup 的狀態.
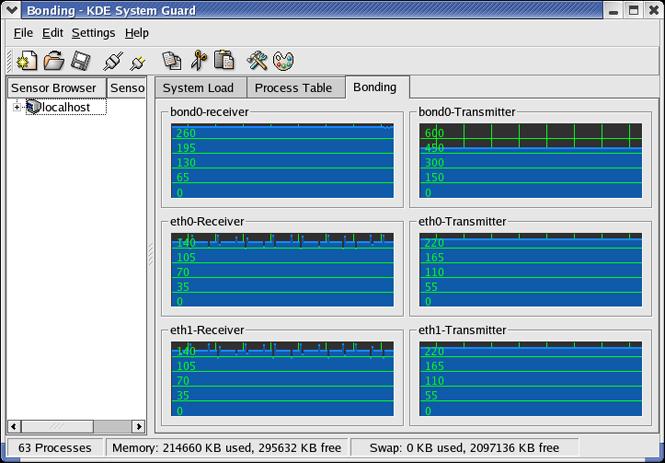
下面這一張是 Bonding mode 1 網路流量的圖示.

很明顯的平常只有一個 eth ( Ative )有動作,當我移除第一個eth0時。Backup(eth1)才會啟動.
Step 5. 其他 mode
其他 mode 我並沒有實際分辨出他們的不同,下次有機會在回來看看這幾種模式的實際運作如何.
- mode 2
- mode 3
- mode 5
- mode6
Step 6. 其他
從上面的幾種方法來看,如果要實現VLAN的功能的話,就需要 BASP 或者 iANS 這樣的工具,同時,還要使用對應的可以支持的網絡適配器,當使用第三方的網路卡時,BASP和iANS都不能實現VLAN的功能.如果只是需要實現網卡的高可用性,三種方法都可以實現.
下面是透過指令的方式快速進行 bonding 的動作,每次開機都需要再做一次,比較適合試驗 bonding 功能不適合長時間的運作.
[root@benjr ~]# insmod bonding
[root@benjr ~]# ifconfig eth0 down
[root@benjr ~]# ifconfig eth1 down
在 bonding 中的所有網路的設定檔中,都要有 SLAVE 和 MASTER 的定義.
[root@benjr ~]# ifconfig bond0 ipaddress
讓 eth0(SLAVE) 和 eth1(SLAVE) 成為 bond0(MASTER) 的成員
[root@benjr ~]# ifenslave bond0 eth0
[root@benjr ~]# ifenslave bond0 eth1
下面是透過指令的方式快速進行 bonding 的動作,每次開機都需要再做一次,比較適合試驗 bonding 功能不適合長時間的運作.
在 bonding 中的所有網路的設定檔中,都要有 SLAVE 和 MASTER 的定義.
讓 eth0(SLAVE) 和 eth1(SLAVE) 成為 bond0(MASTER) 的成員.