![]()
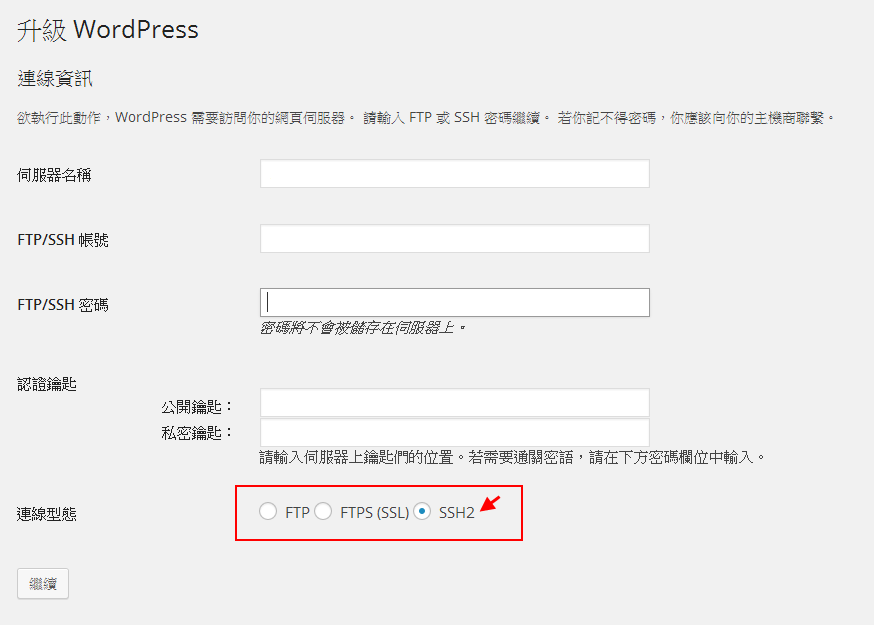
預設 WordPress 要上傳 plugin 或是 Theme 的連線型態只能選擇 FTP 或是 FTPS (SSL) 沒有 SSH2 可以做選擇
但問題是我的主機服務根本不允許開啟 FTP 所以就算是比較安全的 FTPS 也不能使用
注意 FTPS 與 SFTP 不同喔!!
FTPS 是 FTP (Port 21)使用 SSL 的連線方式,但 SFTP (Port 22)是以 SSH 的方式做連接.
那要怎麼讓 WordPress 的連線型態支援 SSH2 呢!!其實很簡單只要讓你的 Apache 支援 SSH2 即可以使用.
Apache + SSH2
CentOS
測試環境為 CentOS 6
- 安裝 EPEL 套件庫 (Repository)
所需的套件不在標準 CentOS 可以找到,所以需要額外的套件源 Extra Packages for Enterprise Linux (EPEL)# rpm -Uvh http://download.fedoraproject.org/pub/epel/6/i386/epel-release-6-7.noarch.rpm
- yum 套件安裝
主要就是安裝 php-pecl-ssh2 (PHP SSH module) 這個套件.# yum install php-pecl-ssh2
- 重載 Apache 服務
# /sbin/service httpd reload
重新載入 Apache 即可,我們可以透過 php 指令來查詢.
# php -m | grep ssh2
如果看到東西就代表安裝成功。
CentOS 6.7 要安裝的是 epel-release-6-7.noarch.rpm 請依據實際環境安裝 EPEL 版本.
回到 WordPress 就會出現如下 SSH2的選項
Ubuntu
測試環境為 Ubuntu
- 安裝跟 php SSH2 相關的函數庫:
如果是 Ubuntu 就簡單多了只要安裝 libssh2-php.- Ubuntu 12.04
root@ubuntu:~# sudo apt-get install php5-dev libssh2-1-dev libssh2-php
重新啟動 Apache 讓新的 PHP 函數庫生效
# service reload apache2
- Ubuntu 16.04
root@ubuntu:~# sudo apt-get install php-dev libssh-dev php-ssh2
重新啟動 Apache 讓新的 PHP 函數庫生效
# systemctl reload apache2
- Ubuntu 12.04
-
一樣檢查一下是否已經安裝成公 SSH2 函數庫:
# php -m | grep ssh2
看到 “ssh2″ 就代表成功了.
用了 SSH 可以順便設定金鑰,就不需要再輸入帳號(使用者 ben 為範例)密碼了.
wordpress 檔案權限設定
設定說明請參考 https://benjr.tw/10976
root@ubuntu:~# chown -R ben:ben /var/www/html/
root@ubuntu:~# find /var/www/html/ -type d -exec chmod 755 {} \;
root@ubuntu:~# find /var/www/html/ -type f -exec chmod 644 {} \;
root@ubuntu:~# chgrp www-data /var/www/html/wp-config.php
root@ubuntu:~# chmod 440 /var/www/html/wp-config.php
root@ubuntu:~# touch /var/www/html/.htaccess
root@ubuntu:~# chgrp www-data /var/www/html/.htaccess
root@ubuntu:~# chmod 664 /var/www/html/.htaccess
root@ubuntu:~# find /var/www/html/wp-content -exec chgrp www-data {} \;
root@ubuntu:~# find /var/www/html/wp-content -type d -exec chmod 775 {} \;
root@ubuntu:~# find /var/www/html/wp-content -type f -exec chmod 664 {} \;
設定金鑰
SSH2 採用 RSA Asymmetric Encryption (非對稱式加密) 來做身份確認,主要透過 傳送端 產生兩把鑰匙 (公與私 Public / Private Key) 來確認身份,方法如下.
- SSH Server (Ubuntu) 會把他的公開金鑰提供給 SSH Client 來作加密使用.
- SSH 伺服器會檢查 SSH Client 指定的使用者是否有儲存公開金鑰在 $HOME/.ssh/authorized_key 檔案中.
- 沒有 – 基於密碼的安全驗證,SSH Server 會提示使用者輸入使用者密碼(前面的方式).
- 有 – 基於金鑰的安全驗證.
- SSH Server 會請求 SSH Client 作身份驗證.
- SSH Client 會檢查自己的 $HOME/.ssh 目錄下,看看你是否擁有私鑰 (名稱 id_dsa)
- 如果私鑰存在,SSH 會提示你輸入此私鑰的通行證 passphrase ,接下來會使用這私鑰來建立簽章並傳給 SSH Server.
- 如果 SSH Server 用 SSH Client 公鑰驗證,驗證成功就不需要使用者輸入密碼了.
這邊是自己驗證自己,所以我們需要三個東西 .
1,2 .使用者的公與私 Public / Private Key
3. 儲存自己的公開金鑰在 $HOME/.ssh/authorized_key 檔案中
使用者的公與私 Public / Private Key
root@ubuntu:~# sudo su - ben
ben@ubuntu:~$ ssh-keygen -t rsa -b 4096
Generating public/private rsa key pair.
Enter file in which to save the key (/home/ben/.ssh/id_rsa):
Created directory '/home/ben/.ssh'.
Enter passphrase (empty for no passphrase):
Enter same passphrase again:
Your identification has been saved in /home/ben/.ssh/id_rsa.
Your public key has been saved in /home/ben/.ssh/id_rsa.pub.
The key fingerprint is:
SHA256:cgVtD1r1PkM524V3sl47112dfdswerSDF34Fw8pEhQpwodiw ben@ubuntu
The key's randomart image is:
+---[RSA 4096]----+
|        o.++o+ +o|
|       E ==o..B+.|
|      . ++.o .Bo+|
|        ..  +o.Bo|
|      . S  . ** o|
|       o  . o.o+.|
|           o  .* |
|          . . + +|
|           .   o |
+----[SHA256]-----+
ben@ubuntu:~$ cp /home/ben/.ssh/id* /home/ben/
ben@ubuntu:~$ exit
logout
authorized_key
root@ubuntu:~# cat /home/ben/id_rsa.pub >> /home/ben/.ssh/authorized_keys
root@ubuntu:~# chown ben:ben /home/ben/.ssh/authorized_keys
root@ubuntu:~# chmod 644 /home/ben/.ssh/authorized_keys
root@ubuntu:~# vim /home/ben/.ssh/authorized_keys
from="127.0.0.1" ssh-rsa
wp-config.php
root@ubuntu:~# vi /var/www/html/wp-config.php
/** Define Upgrade FTP Usernames and Passwords */
define('FTP_BASE', '/var/www/html');
define('FTP_CONTENT_DIR', '/var/www/html/wp-content/');
define('FTP_PLUGIN_DIR', '/var/www/html/wp-content/plugins/');
define('FTP_PUBKEY','/home/ben/id_rsa.pub');
define('FTP_PRIKEY','/home/ben/id_rsa');
define('FTP_USER','ben');
define('FTP_PASS','');
define('FTP_HOST','127.0.0.1:22');
define('FS_METHOD', 'direct');
請問把 .ssh/id* 複製到家目錄下的用意是什麼呢?讓那些檔案留在 .ssh/ 也是可以用的。
不好意思,我知道複製檔案的用意了。那是因為 www-data 帳號看不到 .ssh/ 目錄下的東西。